Homemade French Croissant Recipe – MushroomSalus

Making croissants from scratch is a true labor of love—but once you take that first bite of a fresh, homemade croissant, you’ll totally get why it’s worth every minute of effort.
These classic French pastries start with a yeasted dough that’s carefully layered with butter, then folded and rolled multiple times to create those incredible, flaky layers we all dream about.
Sure, it takes some time, but honestly, it’s not as scary as it sounds. After you make them once, it becomes more of a comforting ritual than a kitchen challenge.
And can I just say—the smell of croissants baking will transform your kitchen into your very own Parisian café. Pulling apart those perfectly golden, buttery layers? It’s one of life’s little joys.
Pin it for later
Croissants are more than just a recipe—they’re a project that rewards your patience and care. You’ll find a quiet kind of happiness in rolling out the dough, watching it gently rise, and seeing those golden, buttery crescents puff up beautifully in the oven.
The first time you try making them, they might not look like something from a fancy bakery—and that is perfectly okay! Because that first warm bite of homemade croissant is truly unforgettable.
Plus, when friends or family can’t believe you made them from scratch, it’s the best kind of cooking win.
Making croissants is a dance of technique and patience—but the payoff is so worth it. This recipe will guide you through every step, from mixing the dough (called détrempe) and shaping that cold butter block (beurrage), to laminating with three careful turns, then cutting, rolling into crescents, proofing until nice and puffy, and baking to flaky, golden perfection.
Set aside several hours for this process—from start to finish you’ll have some active time mixing, rolling, and shaping, but just as much hands-off chilling and proofing. The recipe yields around 12 to 15 standard croissants, and if your schedule is tight, you can split the steps across two days or freeze shaped, unbaked croissants to bake whenever you’re ready.
Here’s what you’ll get from reading on:
- Why the lamination technique is the magic behind those flaky layers
- A simple, clear list of ingredients and a step-by-step guide for mixing, laminating, shaping, and baking
- Tips and tricks to keep your butter and dough perfectly cold, plus advice on solving common hiccups
- Ideas for sweet and savory croissant variations and ways to store or freeze your baked goods
Follow along with a little patience, and you’ll have warm, flaky croissants that taste just like they came from your favorite neighborhood bakery—and you’ll have a new kitchen ritual you can’t wait to repeat.
Why These Croissants Flake Perfectly
Every step in this recipe is essential—no skipping allowed here! Resting and chilling the dough lets those layers stay crisp and clean. The butter becomes tightly locked in, and each fold multiplies those buttery layers that steam up during baking (just like in a raspberry danish made with puff pastry) to create that irresistible flakiness.
The end result? Light, flaky pastry that just melts and shatters with every bite.
Adding warm milk to the dough and letting it proof fully also makes sure your croissants are tender without falling apart—a perfect balance.
Dough, Butter Block, and Egg Wash
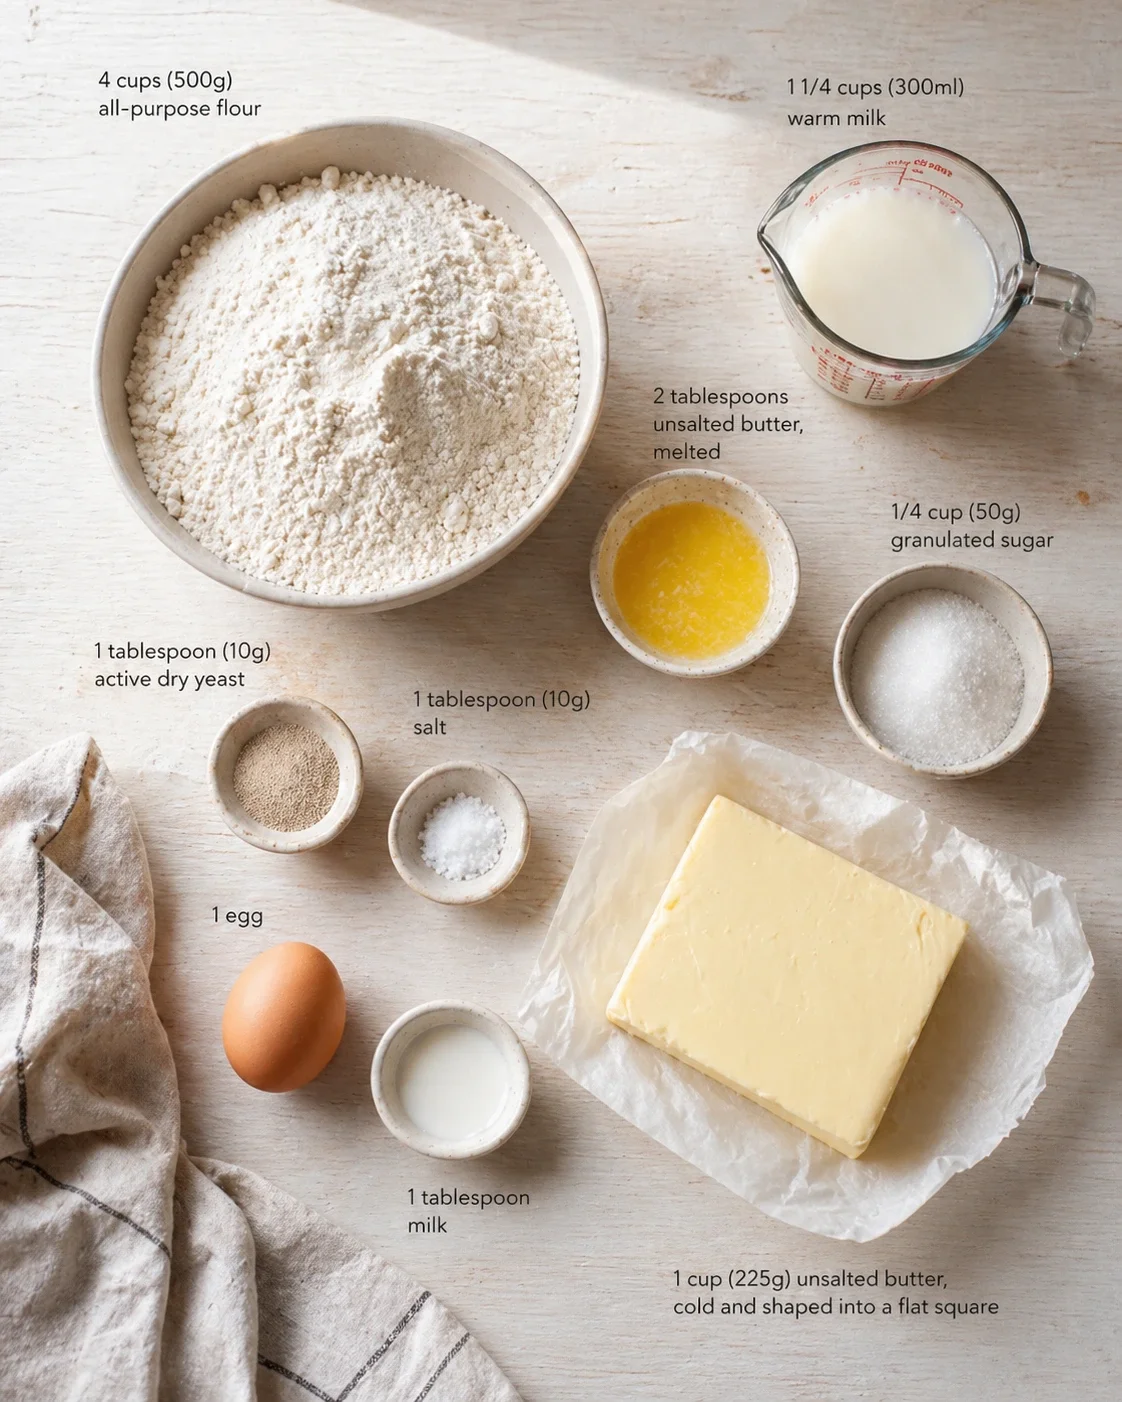
- 4 cups (500g) all-purpose flour
- 1/4 cup (50g) granulated sugar
- 1 tablespoon (10g) salt
- 1 tablespoon (10g) active dry yeast
- 1 1/4 cups (300ml) warm milk
- 2 tablespoons unsalted butter, melted
- 1 cup (225g) unsalted butter, cold and shaped into a flat square
- 1 egg
- 1 tablespoon milk
Mix, Rest, Fold, and Bake
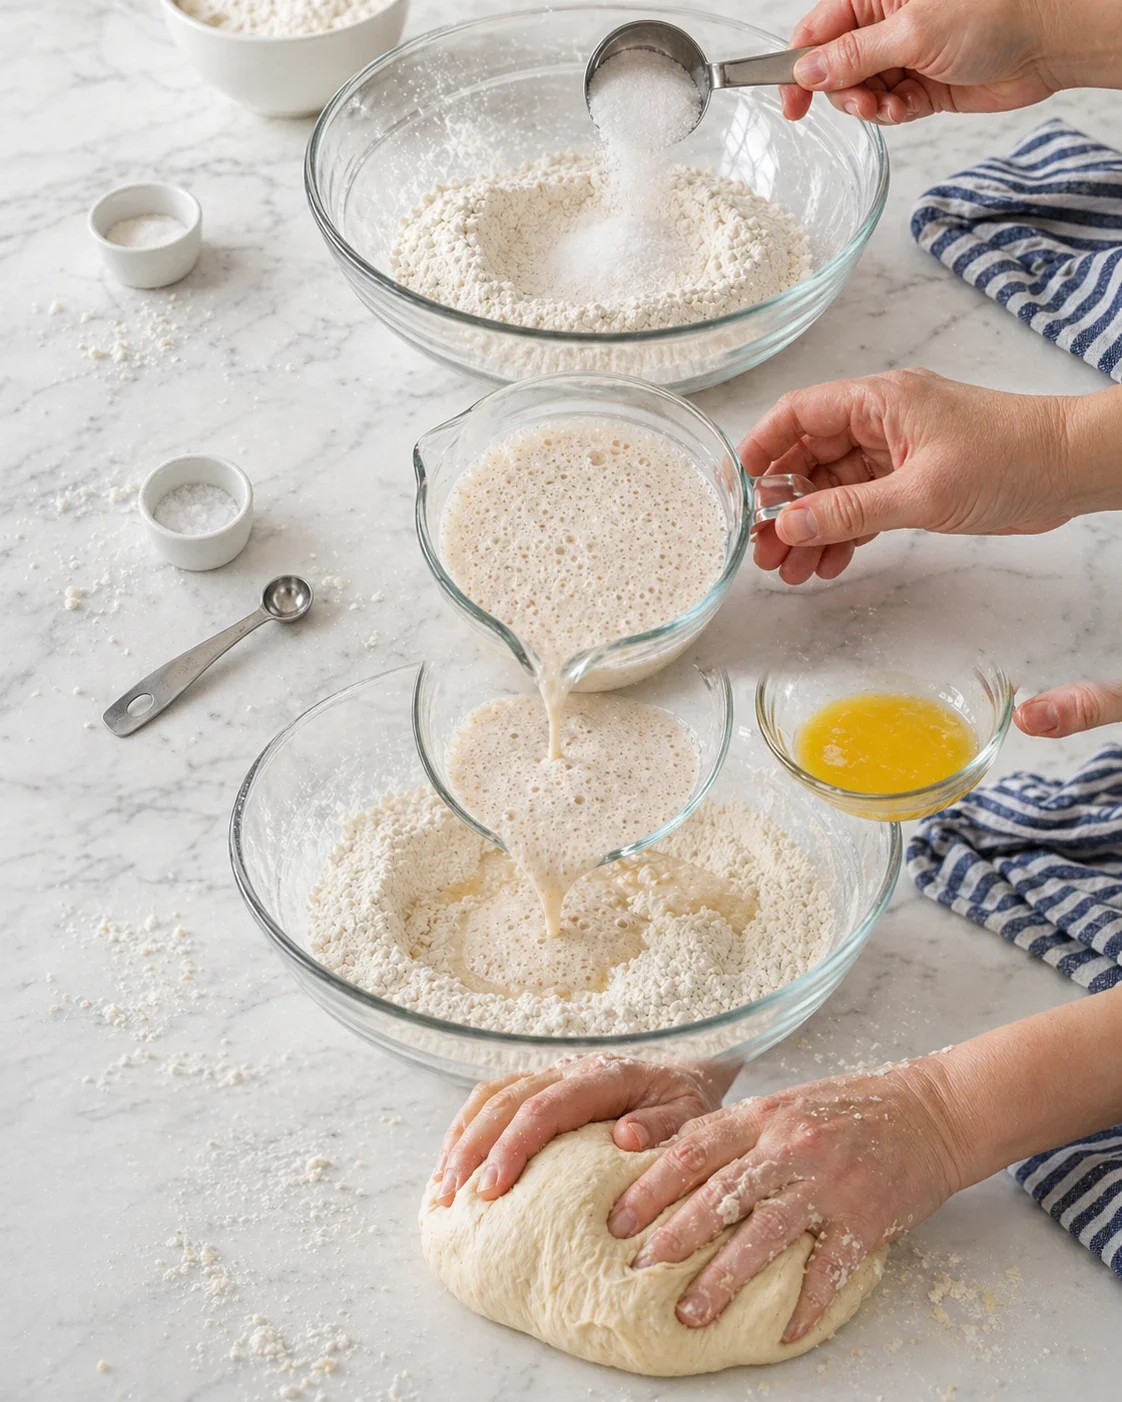
- Combine the flour, sugar, and salt in a large bowl or the bowl of a stand mixer.
- Dissolve the active dry yeast in warm milk and let sit 5–10 minutes until foamy.
- Add the foamy yeast-milk and melted butter to the dry ingredients.
-
Knead the mixture until the dough is smooth, about 3–5 minutes.
- Shape the dough into a neat rectangle, wrap tightly in plastic wrap, and chill in the refrigerator for 1 hour.
- Place the cold butter between two sheets of parchment and roll it into a 6-inch square; chill or rest until cold but pliable.
- Roll the chilled dough into a 12-inch square on a lightly floured surface.
-
Place the butter square diagonally in the center of the dough and fold the dough corners over to completely enclose the butter.

- Roll the dough out into an 8 by 20-inch rectangle, then fold it into thirds (letter fold); wrap tightly and chill for 30 minutes.
- Repeat the rolling, folding, and 30-minute chilling two more times for a total of three turns.
- After the final rest, roll the dough into a large rectangle about 1/4-inch thick, trim the edges, and cut triangles roughly 5 inches wide at the base.
-
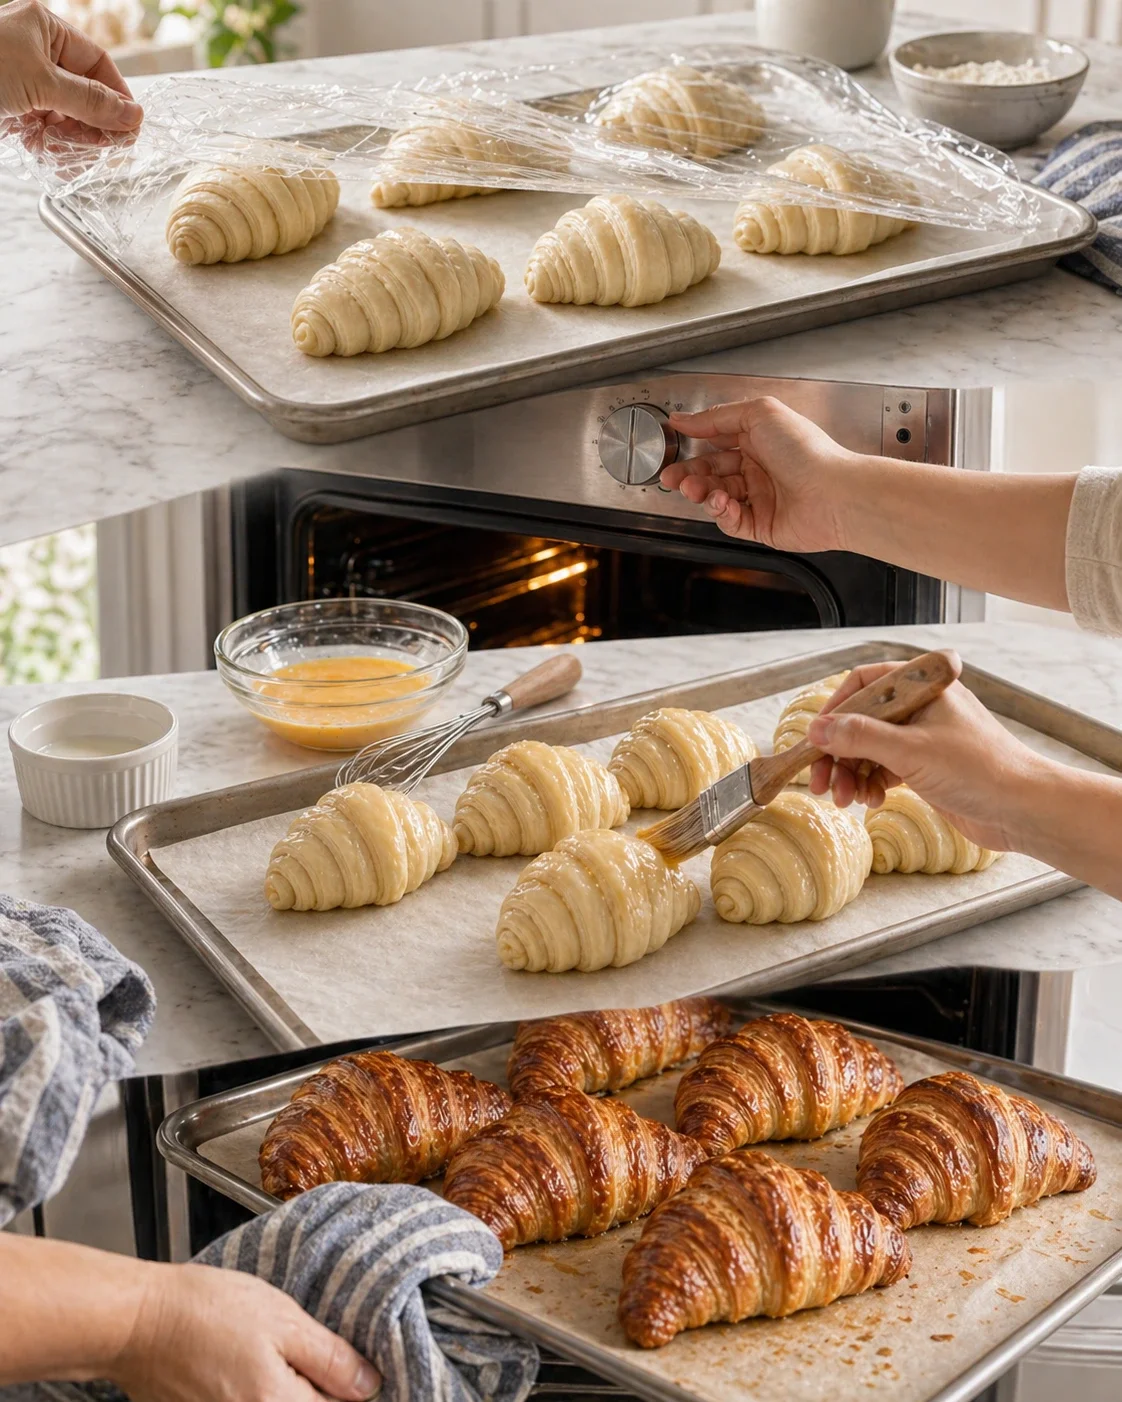
Starting from the wide end, gently stretch and roll each triangle into a crescent and place on a parchment-lined baking sheet with the point tucked underneath.
- Cover the croissants lightly and let them proof at room temperature for 1.5 to 2 hours until noticeably puffy.
- Preheat the oven to 400°F (200°C).
- Whisk the egg with 1 tablespoon milk and brush the egg wash gently over each croissant.
-
Bake the croissants for 18–22 minutes until puffed and richly golden, rotating the pan halfway through.
-
Cool the croissants on a wire rack for at least 10 minutes before serving.

Baker’s Tips for Reliable Flakiness
- Keep everything cold. If your butter starts melting into the dough while you’re rolling, just pop the whole thing back in the fridge before continuing. For a clear example of how cold butter builds layers, see the method used in flaky buttermilk biscuits.
- Use good butter. European-style butter, which has higher fat content, really makes these extra flavorful and flaky.
- Roll gently. Press too hard and you’ll squish your layers or cause butter to ooze out—gentle is the way to go, just like when shaping easy puff pastry chocolate croissants.
- Practice patience. The dough takes its time—and rushing will only make it tougher. Calm energy and slow steps yield better croissants.
Sweet and Savory Croissant Ideas

Ready to switch things up? Try adding some grated chocolate onto the dough before shaping for a sweet surprise or spreading almond paste in the middle to create classic almond croissants. Or go big with Sourdough Croissant Bread for buttery, sliceable layers. For a savory twist, tuck in some grated cheese or thin slices of ham before rolling — or borrow flavor ideas from these herb-and-cheese puff pastry appetizers.
Also, don’t forget you can freeze shaped, unbaked croissants for another day. Just thaw and proof them overnight in the fridge, then bake like usual. Super convenient for busy weeks!
Store, Freeze, and Reheat
The best time to enjoy croissants is fresh out of the oven on the same day. But life gets busy, so here are some smart ways to store and reheat your homemade croissants to keep that flavor and texture:
- Room temperature (short term): Once completely cooled, keep your croissants in an airtight container or a paper bag for up to 24 hours. They’ll stay flaky the first day but start softening after that.
- Refrigerator (short window): Baked croissants can chill in the fridge for up to 48 hours. Just know refrigeration speeds staling and softens those layers, so warm them in the oven before serving to bring back some crispness.
- Freezing (best for longer storage): Freeze baked croissants tightly wrapped in plastic and foil or sealed in a freezer bag. They keep great for up to 2 months. As for unbaked, shaped croissants—freeze them spread out on a tray until firm, then transfer to a bag and store for about a month. This freeze-then-bake approach also works well for dinner rolls—see No-Knead Buttermilk Pull-Apart Rolls for timing cues.
- Thawing and baking baked croissants: For unbaked frozen shapes, thaw them slowly overnight in the refrigerator on a baking sheet. The next day, bring them to room temperature and proof for 1.5 to 2 hours until puffy, then brush with egg wash and bake as usual. You can often proof frozen shapes right from the fridge too if they had that overnight cool retard.
- Reheating baked croissants: Warm up your croissants in a preheated oven or toaster oven at 325°F (160°C) for 5–10 minutes until heated through and crispy on the outside. Avoid microwaving, as it’ll make them soggy and chewy.
- Make-ahead dough tips: After the first chill, you can refrigerate the dough for up to 24 hours between turns, or even do a cold overnight ferment to develop deeper flavor. Just remember to keep dough and butter cold when working on the lamination steps. For a step-by-step overnight schedule you can adapt, check out Homemade Cinnamon Rolls.

Common Questions and Troubleshooting
-
How long does making croissants take from start to finish?
Expect about 5 to 8 hours total, depending on your chilling and proofing times. You’ll spend roughly 1.5 to 2 hours actively mixing, shaping, and rolling; the rest is waiting during the various chilling and proofing rests—the initial 1-hour chill, three 30-minute chills between folds, and a final 1.5 to 2-hour rise before baking.
-
Is this recipe suitable for beginners?
Definitely! The technique is more about repetition than complexity. Follow the chilling schedule, keep everything cold, and take your time the first round—you’ll get better fast with practice. If you want a shorter, low-stress pastry warm-up, try a batch of Chocolate Pastry Puffs.
-
Do I need special equipment?
No fancy machines necessary. A rolling pin, a sharp knife or bench scraper, a ruler if you want to be precise, a baking sheet, and parchment paper are all you need. A stand mixer is handy for kneading but you can also mix by hand.
-
Can I make the dough or shaped croissants ahead of time?
Yes! You can refrigerate the dough after the initial chill for up to 24 hours between turns. For shaped croissants, freeze them on a tray until firm, then bag them for up to a month. Thaw overnight in the fridge, proof at room temp until puffy, brush with egg wash, and bake.
-
Why did butter leak or smear while I was rolling?
Butter leaks when it’s too warm compared to the dough or when you press too hard while rolling. Make sure to chill dough and butter if they start to soften, roll gently, work fast, and keep a light dusting of flour on your surface.
-
Can I use instant yeast instead of active dry?
Yes, just swap with the same weight of instant yeast mixed directly in with dry ingredients—no need to proof in milk first. Your dough might proof a little faster, so watch for puffiness instead of relying strictly on time.
-
What butter should I use?
Go for unsalted butter so you can control salt levels. European-style butter with higher fat gives better flavor and flakiness, though regular unsalted butter works fine. If using salted butter, reduce the dough salt accordingly.
-
How many turns should I do and why?
Three turns is just right for building those layers without getting overwhelmed. Each fold multiplies the layers of dough and butter, which equals that signature flaky texture.
-
How can I tell when shaped croissants are ready to bake?
The croissants won’t double in size, but you’ll notice a nice puffiness and a light jiggle when you gently shake the tray. They should look soft and springy before you give them the egg wash and pop them in the oven at 400°F (200°C).
-
They brown too quickly on top — what should I do?
If your croissants are coloring too fast, loosely tent them with foil during the last 5 to 10 minutes, lower your oven temp by 10 to 15 degrees Fahrenheit, or brush on a lighter layer of egg wash. Don’t forget to rotate your pan halfway through baking for even browning.
-
Q: My croissants didn’t rise or seem dense—what went wrong?
A: Usually, that means the yeast wasn’t active enough, the dough was too cold to proof properly, proofing time was too short, or you didn’t do enough lamination turns. Use fresh yeast, warm (not hot) milk to activate it, and make sure your shaped croissants get visibly puffy before baking.
-
Q: Butter leaked out while rolling—why and how can I prevent this?
A: Butter leakage happens if the butter softens too much or you roll with heavy pressure. Keep your dough and butter well chilled, work briskly, and chill again if the butter starts to smear. Gentle rolling is key.
-
Q: Can I use instant yeast instead of active dry yeast?
A: Yes! Use the same weight or about the same volume in your dry ingredients instead of mixing yeast in warm milk. The dough might proof faster, so keep an eye on puffiness rather than just timing.
-
Q: What temperature is best for proofing croissants?
A: A cozy, moderately warm spot around 75–80°F (24–27°C) is ideal. Cooler proofing slows yeast and can be great for flavor if you want to retard dough overnight. Avoid spots that are too warm, as that can melt your butter and mess up your layers.
-
Q: Can I use salted butter or make these vegan?
A: Salted butter works if you drop the salt in the dough a bit. Vegan croissants are trickier since traditional lamination depends on butter’s melt and texture. You’d need a high-fat vegan butter and an alternative egg wash like plant milk, but results vary.
-
Q: How can I tell when shaped croissants are ready to bake?
A: Look for noticeable puffiness and a slight jiggle when you gently shake the tray. They won’t double, but should look airy and soft. A nice even egg wash and preheating your oven to 400°F (200°C) will help them bake up beautifully.

A detailed recipe for making authentic, flaky French croissants from scratch using a laminated yeasted dough technique.
- Total Time: 5 to 8 hours (includes resting, chilling, proofing, and baking)
- Yield: 12 to 15 standard croissants 1x
Ingredients
- 4 cups (500g) all-purpose flour
- 1/4 cup (50g) granulated sugar
- 1 tablespoon (10g) salt
- 1 tablespoon (10g) active dry yeast
- 1 1/4 cups (300ml) warm milk
- 2 tablespoons unsalted butter, melted
- 1 cup (225g) unsalted butter, cold and shaped into a flat square (for lamination)
- 1 egg
- 1 tablespoon milk (for egg wash)
Instructions
- Combine the flour, sugar, and salt in a large bowl or the bowl of a stand mixer.
- Dissolve the active dry yeast in warm milk and let sit 5–10 minutes until foamy.
- Add the foamy yeast-milk and melted butter to the dry ingredients.
- Knead the mixture until the dough is smooth, about 3–5 minutes.
- Shape the dough into a neat rectangle, wrap tightly in plastic wrap, and chill in the refrigerator for 1 hour.
- Place the cold butter between two sheets of parchment and roll it into a 6-inch square; chill or rest until cold but pliable.
- Roll the chilled dough into a 12-inch square on a lightly floured surface.
- Place the butter square diagonally in the center of the dough and fold the dough corners over to completely enclose the butter.
- Roll the dough out into an 8 by 20-inch rectangle, then fold it into thirds (letter fold); wrap tightly and chill for 30 minutes.
- Repeat the rolling, folding, and 30-minute chilling two more times for a total of three turns.
- After the final rest, roll the dough into a large rectangle about 1/4-inch thick, trim the edges, and cut triangles roughly 5 inches wide at the base.
- Starting from the wide end, gently stretch and roll each triangle into a crescent and place on a parchment-lined baking sheet with the point tucked underneath.
- Cover the croissants lightly and let them proof at room temperature for 1.5 to 2 hours until noticeably puffy.
- Preheat the oven to 400°F (200°C).
- Whisk the egg with 1 tablespoon milk and brush the egg wash gently over each croissant.
- Bake the croissants for 18–22 minutes until puffed and richly golden, rotating the pan halfway through.
- Cool the croissants on a wire rack for at least 10 minutes before serving.
Notes
Keep all ingredients, especially the butter and dough, cold during lamination to prevent butter from melting and ensure flaky layers., Use European-style butter with higher fat content for better flavor and flakiness, though regular unsalted butter works fine., Roll gently to avoid squishing layers or causing butter to leak out., Be patient with chilling and proofing times; rushing can result in tougher croissants., Shaped croissants can be frozen before baking for up to one month; thaw overnight in refrigerator and proof before baking., Avoid microwaving reheated croissants as it makes them soggy; instead, warm in a preheated oven or toaster oven at 325°F (160°C) for 5–10 minutes., If croissants brown too quickly, loosely tent with foil, reduce oven temperature slightly, or apply a lighter egg wash layer.
- Prep Time: 1 hour 30 minutes (active and initial chilling)
- Cook Time: 18 to 22 minutes
- Category: Dessert
- Cuisine: French
Nutrition
- Serving Size: 1 croissant
- Calories: Approx. 250 calories per croissant
- Fat: 15g per serving
- Carbohydrates: 25g per serving
- Protein: 5g per serving