Beef and Cheese Hand Pies: A Delicious Recipe for Savory Snacks

Beef and Cheese Hand Pies are such a cozy, delicious treat that bring comfort in every bite. These savory little pastries aren’t just your average meal—they’re a celebration of flavor passed down from traditional meat pies enjoyed around the world for generations. With tender, well-seasoned beef and ooey-gooey cheese all wrapped up in a flaky crust, they hit the perfect balance between hearty and indulgent.
What I truly adore about Beef and Cheese Hand Pies is just how flexible they are. Whether you’re looking for a filling lunch, a quick dinner fix, or a fun party appetizer that’ll wow your guests, these pies fit the bill. The rich, savory beef combined with perfectly melted cheese creates a mouthwatering experience you won’t want to miss. Plus, they’re surprisingly simple to make and really easy to tweak to your own tastes. So come on, let’s dive in and whip up a batch of these mouthwatering hand pies that could soon become your new go-to!
These Beef and Cheese Hand Pies are handheld pockets of happiness—flaky crusts wrapped around flavorful, seasoned ground beef and melted cheese that’s just right for a quick weeknight dinner, a snack on the go, or a crowd-pleasing appetizer. They’re forgiving to make, easy to customize, and bake up golden and crispy every time you make them.
In this post, I’m sharing everything you need to confidently make these at home: detailed ingredients, step-by-step directions for the filling and crust, easy assembly and baking tips, plus pro secrets to avoid soggy bottoms and make sure your pies seal up nicely. I’ll also cover tasty variations, smart storage and freezing tips, and answers to the most common questions to help you make these your own.
Whether you stick to the recipe as is or swap in your favorite cheeses, proteins, or pastry, you’ll come away with a foolproof plan for scrumptious hand pies that are simple, satisfying, and so versatile!
Beef and Cheese Hand Pies are straightforward, cozy pastries with a golden, flaky outside and a savory, cheesy beef filling inside. They’re perfect for a fast weeknight dinner, a portable snack, or a party appetizer. Plus, they’re pretty forgiving—whether you roll your own dough or use a store-bought crust, you’ll still end up with a winner.
This guide covers everything: clear ingredient lists, easy-to-follow steps for making the filling and crust, simple assembly and baking tips, and handy advice to keep your pies crisp and perfectly sealed.
- Learn how to cook and cool the filling to keep your pies from getting soggy.
- Discover simple cutting, filling, and sealing techniques for neat, evenly baked pies.
- Find easy swaps and variations for the cheese, meat, and dough.
- Get smart storage, freezing, and reheating tips, plus answers to common questions.
Stick with me, and you’ll have a reliable method for golden, delicious, and totally customizable hand pies each time you bake.
What Makes Them a Crowd-Pleaser
To sum it up, these Beef and Cheese Hand Pies are a total must-make if you want to upgrade your snack game or impress at your next gathering. The blend of savory, seasoned beef, melty cheese, and flaky crust delivers a warm, comforting bite that hits the spot every time. They’re incredibly versatile too! Serve them as a hearty appetizer, a main course with a crisp salad, or pack them for your next picnic.
Don’t be shy to mix it up with your fillings — try tossing in caramelized onions, diced peppers, or even a touch of jalapeño for a spicy twist. Different cheeses work wonders too — pepper jack adds some zing, while sharp cheddar keeps it classic and bold.
I can’t wait for you to try this recipe and make it your own. When you do, please share your stories, tweaks, or a snapshot of your pies! Cooking together like this makes it so much more fun. Enjoy baking!
Ingredients for Filling and Crust

- 1 pound ground beef
- 1 medium onion, finely chopped
- 2 cloves garlic, minced
- 1 cup shredded cheddar cheese
- 1 cup frozen mixed vegetables (peas, carrots, corn)
- 1 teaspoon Worcestershire sauce
- 1 teaspoon salt
- 1/2 teaspoon black pepper
- 1/2 teaspoon paprika
- 1/2 teaspoon dried oregano
- 1 package (2 sheets) of refrigerated pie crusts
- 1 egg, beaten (for egg wash)
Assembly and Baking Instructions
- Preheat oven to 400°F (200°C) and line a baking sheet with parchment paper.
- Heat a large skillet over medium heat and cook 1 pound ground beef, breaking it up, until browned (about 5–7 minutes).
- Drain off excess fat from the skillet.
-
Add 1 finely chopped onion and 2 minced garlic cloves to the beef and sauté until the onion is translucent (about 3–4 minutes).
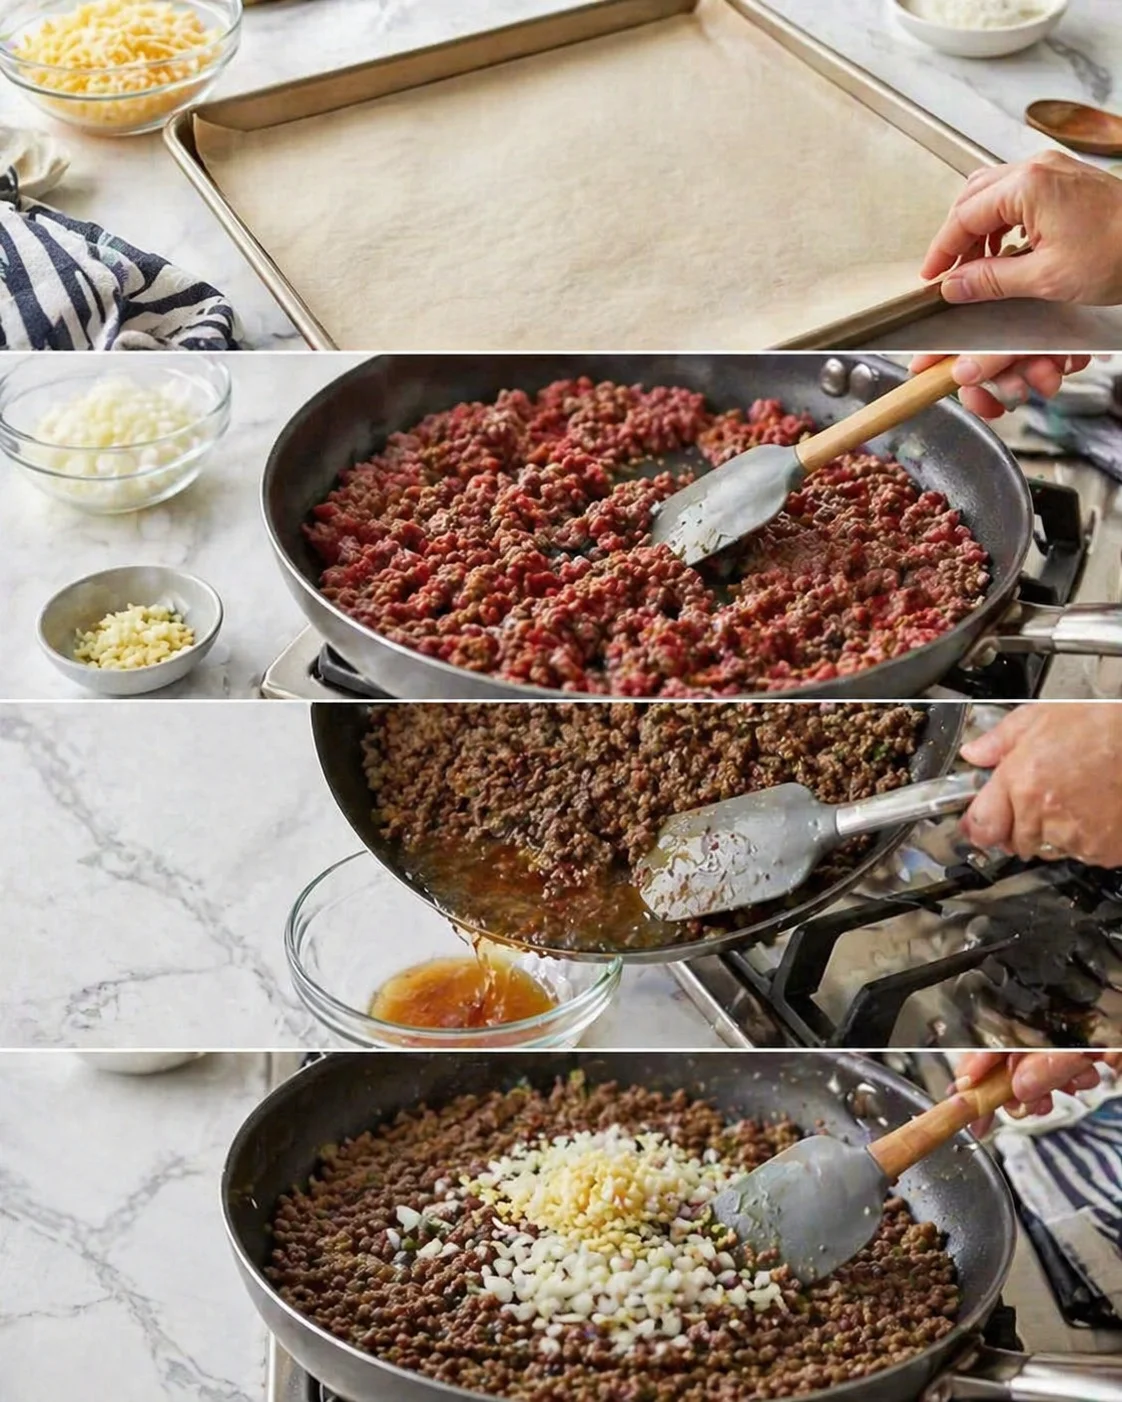
- Stir in 1 cup frozen mixed vegetables, 1 teaspoon Worcestershire sauce, 1 teaspoon salt, 1/2 teaspoon black pepper, 1/2 teaspoon paprika, and 1/2 teaspoon dried oregano; cook until the vegetables thaw and moisture reduces (about 4–5 minutes).
- Remove the skillet from heat and let the filling cool for 3–5 minutes.
- Fold in 1 cup shredded cheddar cheese until evenly combined.
-
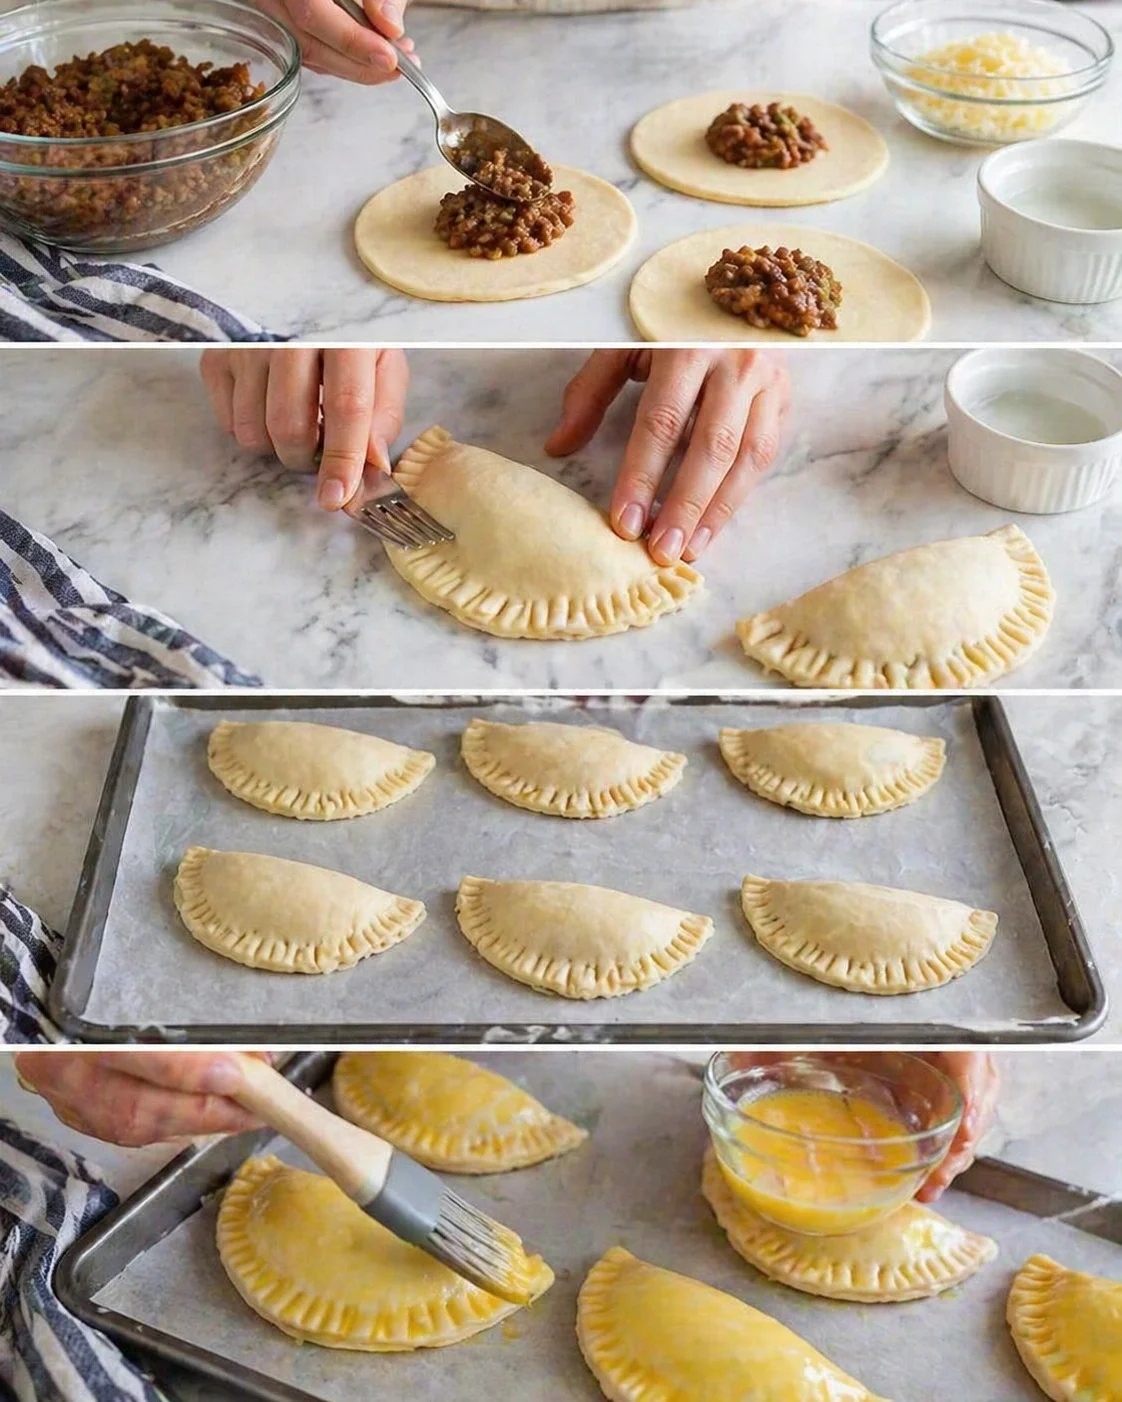
Unroll refrigerated pie crusts on a lightly floured surface and cut 5–6 inch circles with a round cutter or bowl.

- Spoon about 1½–2 tablespoons of filling into the center of each dough circle.
- Moisten the edges of each circle with water, fold into a half-moon, press edges firmly, and crimp with a fork to seal.
- Arrange the assembled pies on the lined baking sheet.
-
Brush the tops and edges with beaten egg.
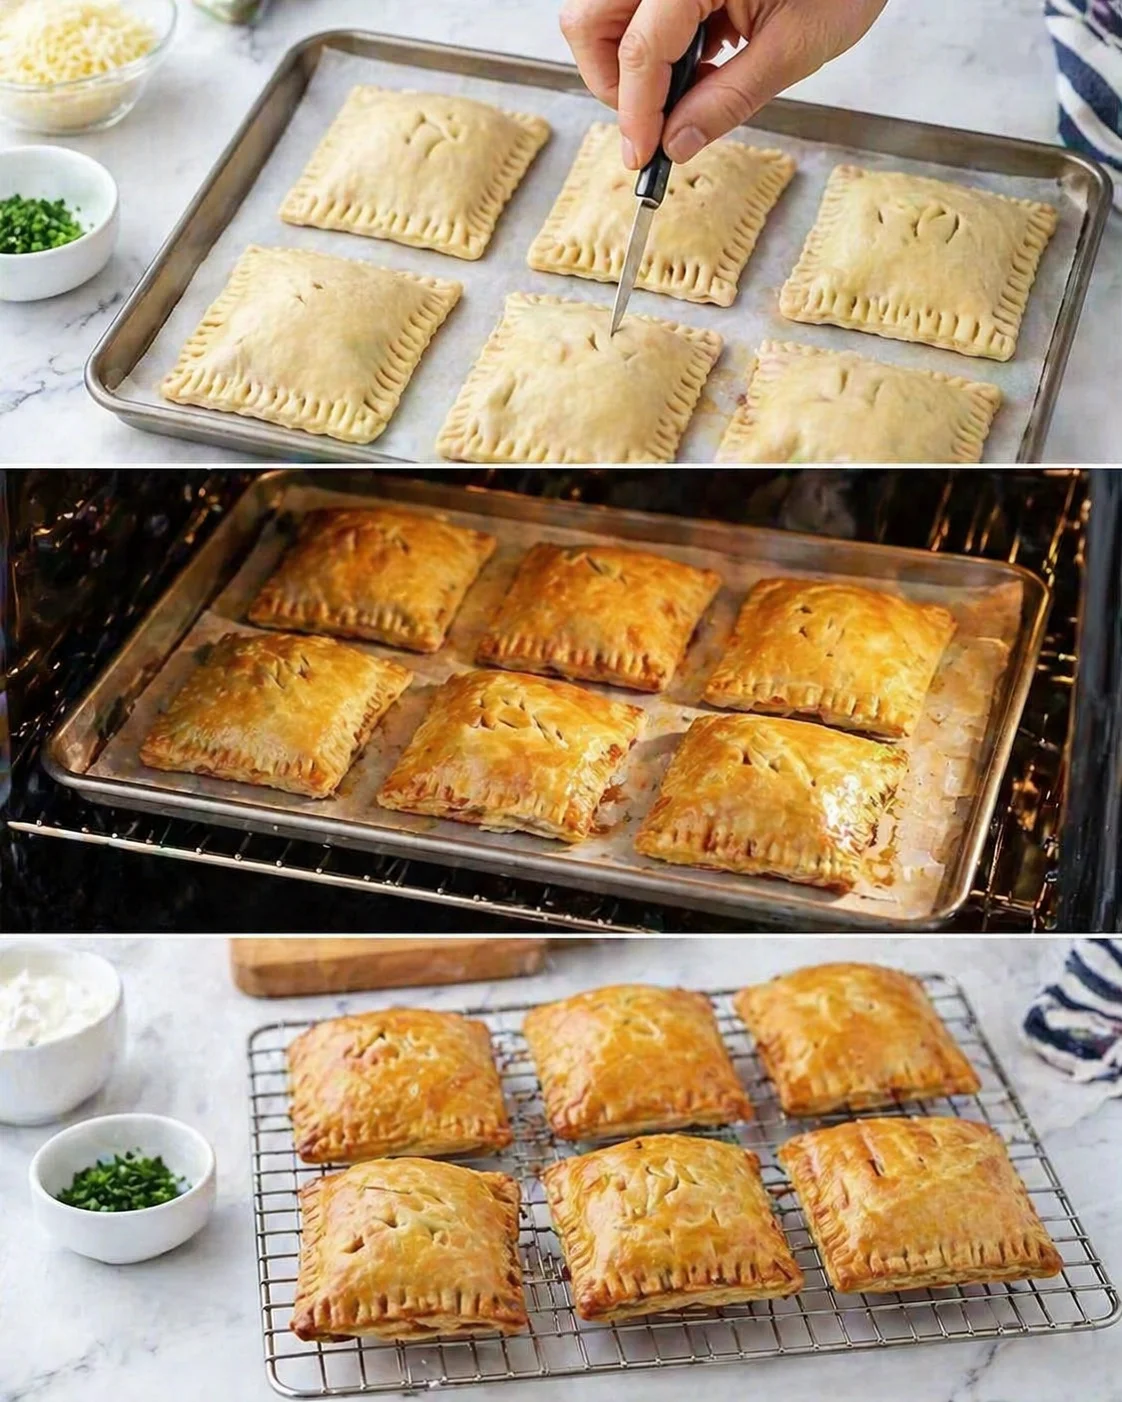
- Cut a few small slits in the top of each pie to vent steam.
- Bake in the preheated oven for 20–25 minutes until golden and flaky, checking at 20 minutes to avoid overbrowning.
-
Cool the pies on the baking sheet for about 5 minutes, then transfer to a wire rack to finish cooling.
Expert Tips for Flaky Crusts
- Make sure to drain the cooked beef well. This keeps the filling from making the crust soggy, which nobody wants!
- Let your filling cool just a bit before adding cheese and filling your crusts. If it’s too hot, the cheese can melt too early and the dough can get tricky to work with.
- Don’t overfill the dough circles—about 1½ to 2 tablespoons per pie works best to avoid spills or bursts in the oven.
- Seal your pies tightly by pressing and crimping the edges well with a fork—watch the step-by-step apple turnovers video tutorial for a quick look at crimping and venting. This keeps all that cheesy filling right where it belongs.
- Brush egg wash on top just before baking for a gorgeous golden-brown finish; a little extra egg wash on edges helps seal them even better.
- Don’t forget to cut small steam vents on top—this lets hot air escape, keeping your pies intact and preventing soggy insides.
- For a crispier bottom crust, try baking your pies on a preheated baking sheet or placing the baking sheet on the lowest rack for the first few minutes.
Flavor Swaps and Substitutions
- Swap the cheddar for pepper jack if you want a bit of spice, Monterey Jack for a super melty texture, or sharp cheddar to keep that classic tang.
- Instead of pie crust, puff pastry gives you a lighter, flakier crust (see our Herb and Cheese Puff Pastry Appetizers for handling tips), while empanada dough creates a sturdier shell if you want something heartier.
- Try ground turkey, chicken, or even plant-based ground meat as your filling protein for different tastes or dietary needs.
- For a vegetarian option, sauté mushrooms, lentils, or crumbled tempeh with your usual seasonings and veggies in place of the beef.
- Give your filling a flavor boost with a teaspoon of tomato paste or a splash of hot sauce. You might also stir in diced jalapeños or roasted red peppers for brightness and heat.
- Want bite-sized snacks? Make mini hand pies by cutting smaller circles and using about 1 tablespoon of filling each. Just remember to shorten baking time by a few minutes. For a quick visual on shaping minis, see Mini Apple Pies.
Storage and Make-Ahead Tips
- Store your cooled, baked hand pies in an airtight container in the fridge for up to 3 to 4 days—perfect for quick meals later in the week. If you have extra beef filling, repurpose it into quick weeknight tacos with homemade corn tortillas.
- To freeze unbaked pies, place them on a parchment-lined tray and freeze until firm, then transfer to a freezer bag or container. They can keep well for about 2 months. When ready to bake, pop them straight in the oven at 400°F (200°C), adding 8 to 12 minutes to the bake time. Don’t forget to brush with egg wash before baking!
- For freezing baked pies, cool completely, then wrap each tightly or store in an airtight container. Freeze up to 2 months. Reheat from frozen in a 350°F (175°C) oven for 15 to 20 minutes until warmed through.
- Reheat in the oven or toaster oven at 350°F (175°C) for 8 to 12 minutes for best texture and crispness. Microwaving heats faster, but can make the crust soggy—if you do microwave, heat briefly then crisp in a hot oven for a few minutes after.
Common Questions Answered
- Can I use homemade pie dough instead of store-bought? — Absolutely! Just make sure your dough is well-chilled and rolled out evenly for even baking. If you prefer flaky layers, here’s how to make puff pastry dough from scratch.
- Can I prepare these hand pies ahead of time? — Yes! You can assemble and refrigerate them for a day before baking, or freeze them unbaked to bake fresh later.
- What’s the best way to avoid soggy bottoms? — Drain the beef really well, avoid adding watery ingredients, let your filling cool before filling the crusts, and bake on a preheated sheet or low oven rack for a crispier base.
- Can I make these gluten-free? — Yes, just swap in a gluten-free pie crust (store-bought or homemade). Baking times might shift slightly, so keep an eye on your pies as they bake.
- How do I know when they’re done? — You want a golden, flaky crust and hot, bubbly filling visible through the vent slits. Usually this takes about 20 to 25 minutes at 400°F (200°C).
Savory handheld pies featuring seasoned ground beef, melted cheddar cheese, and mixed vegetables wrapped in a flaky pie crust. Perfect for snacks, appetizers, or quick meals.
- Total Time: 45 minutes
- Yield: 8-10 hand pies 1x
Ingredients
- 1 pound ground beef
- 1 medium onion, finely chopped
- 2 cloves garlic, minced
- 1 cup shredded cheddar cheese
- 1 cup frozen mixed vegetables (peas, carrots, corn)
- 1 teaspoon Worcestershire sauce
- 1 teaspoon salt
- 1/2 teaspoon black pepper
- 1/2 teaspoon paprika
- 1/2 teaspoon dried oregano
- 1 package (2 sheets) refrigerated pie crusts
- 1 egg, beaten (for egg wash)
Instructions
- Preheat oven to 400°F (200°C) and line a baking sheet with parchment paper.
- Heat a large skillet over medium heat and brown the ground beef for 5–7 minutes, breaking it up as it cooks.
- Drain excess fat from the skillet.
- Add finely chopped onion and minced garlic to the beef; sauté until onion is translucent, about 3–4 minutes.
- Stir in frozen mixed vegetables, Worcestershire sauce, salt, black pepper, paprika, and dried oregano; cook until vegetables thaw and moisture reduces, about 4–5 minutes.
- Remove skillet from heat and let the filling cool for 3–5 minutes.
- Fold in shredded cheddar cheese until evenly combined.
- Unroll refrigerated pie crusts on a lightly floured surface and cut 5–6 inch circles using a round cutter or bowl.
- Spoon about 1½–2 tablespoons of filling into the center of each dough circle.
- Moisten edges with water, fold dough into a half-moon, press edges firmly and crimp with a fork to seal.
- Arrange assembled pies on the lined baking sheet.
- Brush tops and edges with beaten egg.
- Cut small slits on top of each pie to vent steam.
- Bake for 20–25 minutes until golden and flaky, checking at 20 minutes to prevent overbrowning.
- Cool pies on the baking sheet for about 5 minutes, then transfer to a wire rack to finish cooling.
Notes
Drain cooked beef well to avoid soggy crusts., Let filling cool before adding cheese and filling dough to prevent early melting of cheese and difficult dough handling., Do not overfill the pies; about 1½ to 2 tablespoons per pie prevents spills during baking., Seal edges tightly and crimp well to keep filling contained., Brush egg wash on edges and tops for a golden finish and better sealing., Cut small steam vents on top to release hot air and prevent soggy filling., Bake on a preheated baking sheet or on the lowest rack initially for a crisper bottom crust., Variations include swapping cheddar for pepper jack, Monterey Jack, or sharp cheddar; using puff pastry or empanada dough instead of pie crust; using ground turkey, chicken, plant-based meat, or vegetarian alternatives like mushrooms and lentils., Store baked pies in airtight container in fridge up to 3-4 days., Freeze unbaked pies on parchment-lined tray until firm before bagging; bake straight from frozen at 400°F, adding 8-12 minutes to time., Reheat pies in oven or toaster oven at 350°F for best crispness; avoid microwaving alone to prevent sogginess., Homemade or gluten-free pie crusts can be substituted; adjust baking time as needed.
- Prep Time: 20 minutes
- Cook Time: 25 minutes
- Category: Main Course
- Cuisine: American
Nutrition
- Serving Size: 1 hand pie
- Calories: Approximately 280 calories per serving
- Fat: 14g per serving
- Carbohydrates: 20g per serving
- Protein: 18g per serving