Discovering the Joy of Belgische Waffle Teig for Perfect Treats

Belgische Waffle Teig is my top choice for those mornings when everyone’s craving something cozy but no one has the patience to wait around. You know the scene: you peek in the fridge, spot eggs and milk, and hope this simple combo turns into a fun breakfast treat.
I used to whip up pancakes out of habit, but waffles? They feel like a little luxury with basically the same effort. The magic is in this batter — it’s easy, forgiving, and fills your kitchen with the smell of fresh bakery goodness. If you’ve got a waffle iron and a mixing bowl, you’re already halfway to waffle heaven.
Anyone who’s made waffles with a hungry crowd circling knows that speed is king. The good news? A solid Belgische Waffle Teig cooks fast and comes out crisp on the outside while staying soft and steamy inside. To me, waffles are like the quickest, easiest way to make any morning feel just a bit more special.
Here’s my favorite trusted recipe to make at home. No fuss, no fancy tricks — just a reliable batter that lets you shine without breaking a sweat.
Hey there! This is your go-to, no-fuss recipe for Belgische Waffle Teig — a quick and easy batter that flips your usual morning into something a bit more festive. You don’t need fancy tools or unusual ingredients: just a waffle iron, a mixing bowl, and simple pantry staples like flour, eggs, milk, and butter. The goal? Waffles that are crisp on the outside, tender inside, and made with zero stress.
Keep reading for straightforward steps you can count on and some little tips that really make a difference: how long to rest your batter, why and when to grease the iron, how to tell when your waffles are ready by steam, plus easy add-ins that don’t complicate cooking. I’ll also share how to prep ahead and keep your waffles crispy whether you’re serving fresh or freezing for later.
- Time: about 10–15 minutes for prep and cooking combined.
- Equipment: just a good, hot waffle iron and a mixing bowl to get started.
- Texture: aim for a batter as thick as heavy cream and waffles that steam less before you open the iron — crispy edges with a soft center.
- Flexibility: works beautifully with plant milks and oils, accepts mix-ins like blueberries or chocolate chips, and freezes well for quick weekday breakfasts.
This intro sets you up to make consistent, crowd-pleasing waffles without fuss — a trusty batter and a few smart techniques that make you look like a pro, even if you’re a beginner.
What Makes These Waffles Great
This Belgische Waffle Teig is quick, forgiving, and just plain dependable — perfect for turning everyday mornings into a small celebration with hardly any work. Using common ingredients (think flour, eggs, milk, butter), it cooks fast in a hot waffle iron and yields waffles with a glorious crisp outside and a tender inside every time — much like these homemade waffles with buttery flavor and crisp edges. You can tweak it easily for sweeter or more savory tastes, and the waffles freeze beautifully so a batch turns into several quick breakfasts.
- Quick and easy — ready in about 10–15 minutes.
- Forgiving — don’t sweat the lumps, and it handles substitutions like plant milk or oil just fine.
- Versatile — add your favorite fruit, chocolate, or spice mix-ins.
- Freezer-friendly — a batch that works for weekday rushes and reheats crisp and delicious.
Ingredients and Mix-Ins
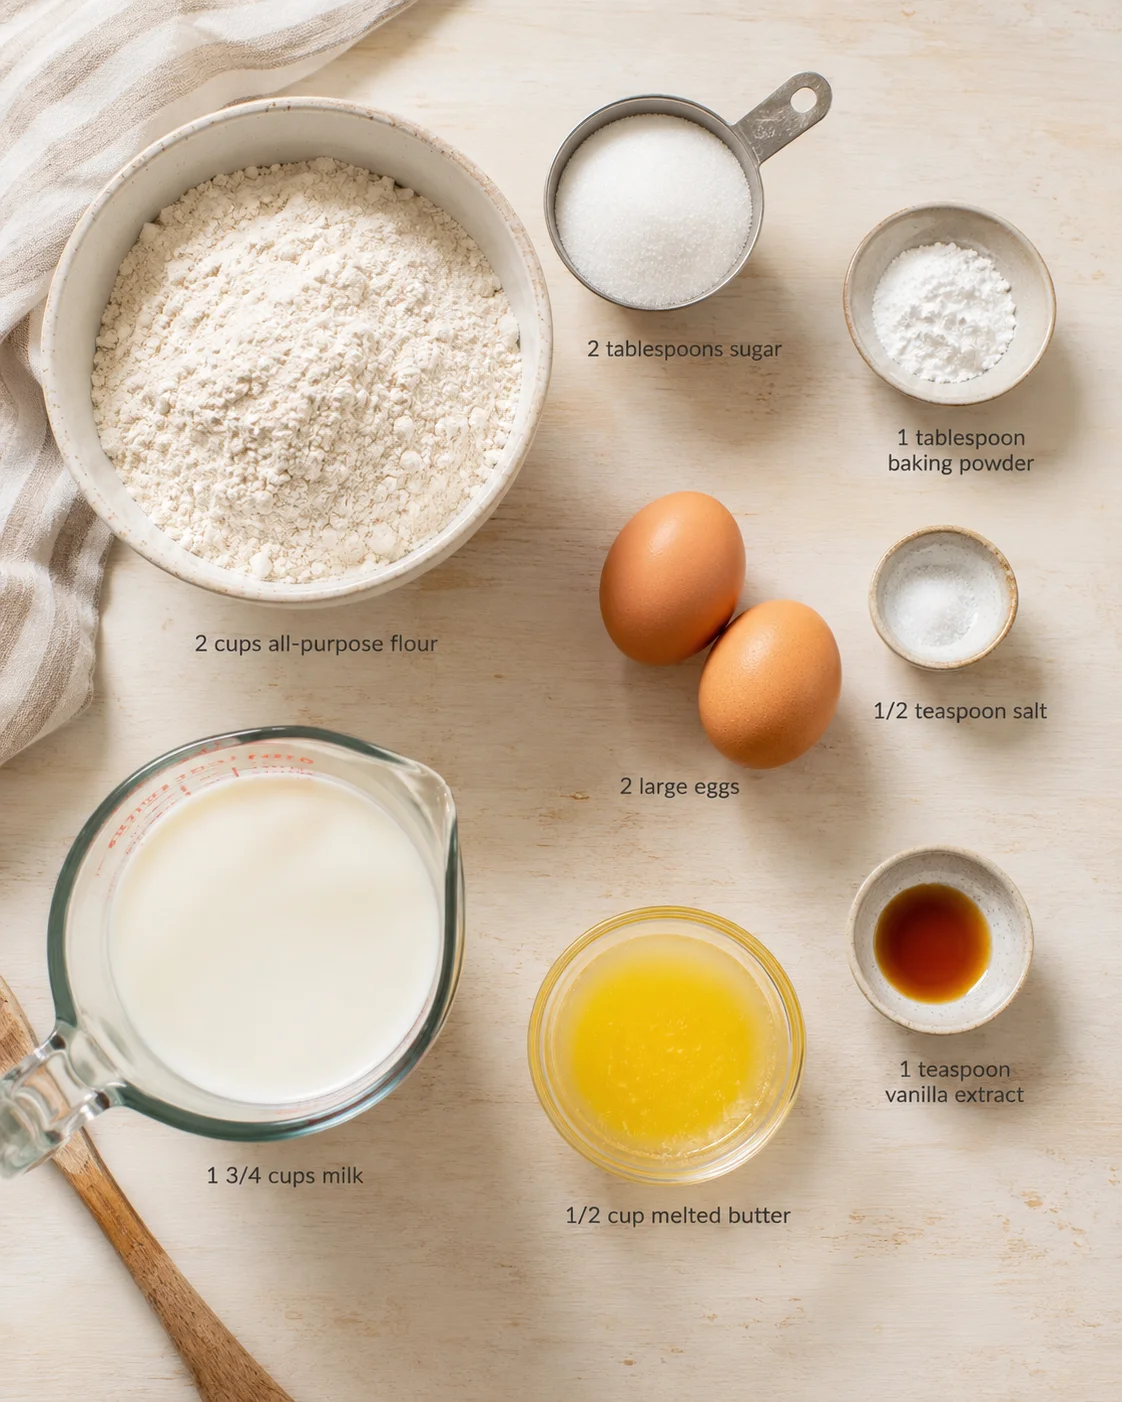
- 2 cups all-purpose flour
- 2 tablespoons sugar (feel free to add more if you like sweeter waffles)
- 1 tablespoon baking powder
- 1/2 teaspoon salt
- 2 large eggs
- 1 and 3/4 cups milk (any kind works — dairy or plant-based)
- 1/2 cup melted butter (or neutral oil like canola or avocado)
- 1 teaspoon vanilla extract
Making the Batter and Waffles
- Preheat the waffle iron until fully hot (use indicator lights if available).
- Whisk flour, sugar, baking powder, and salt together in a large bowl.
- In a separate bowl, beat the eggs and whisk in milk, melted butter (or oil), and vanilla.
- Pour the wet ingredients into the dry ingredients and fold gently until mostly combined; avoid overmixing (a few lumps are fine).
- Let the batter rest 5–10 minutes while the waffle iron finishes heating.
-
If the batter is too thin, stir in flour a tablespoon at a time; if too thick, add a splash of milk until it reaches a heavy cream consistency.
- Lightly brush oil or melted butter onto the hot waffle iron, even if it’s nonstick.
- Gently fold any mix-ins (blueberries, chocolate chips, mashed banana, etc.) into the batter right before cooking.
- Use a measuring cup or ladle to pour an even amount of batter into the iron, close the lid, and cook.
- Cook each waffle until the steam slows, then open the lid and remove the waffle.
- Transfer cooked waffles to a wire rack to keep them crisp and repeat with remaining batter.
- Use the first waffle as a tester and adjust iron heat, batter amount, or cook time if waffles are pale or cook unevenly.
Tips for Crisp, Even Waffles
Let’s be honest: your waffle iron makes or breaks your waffles. Over the years, I’ve used plenty, and the best ones heat evenly and release waffles cleanly. No need to splurge on the fanciest model, but aim for one that gets hot enough to crisp your waffles without burning or drying them out.
Here’s what I look for when picking a waffle iron or recommending one:
Even heating: no sad pale spots or burnt patches.
Clear indicator lights: it sounds small, but it saves a lot of guessing when the iron is ready.
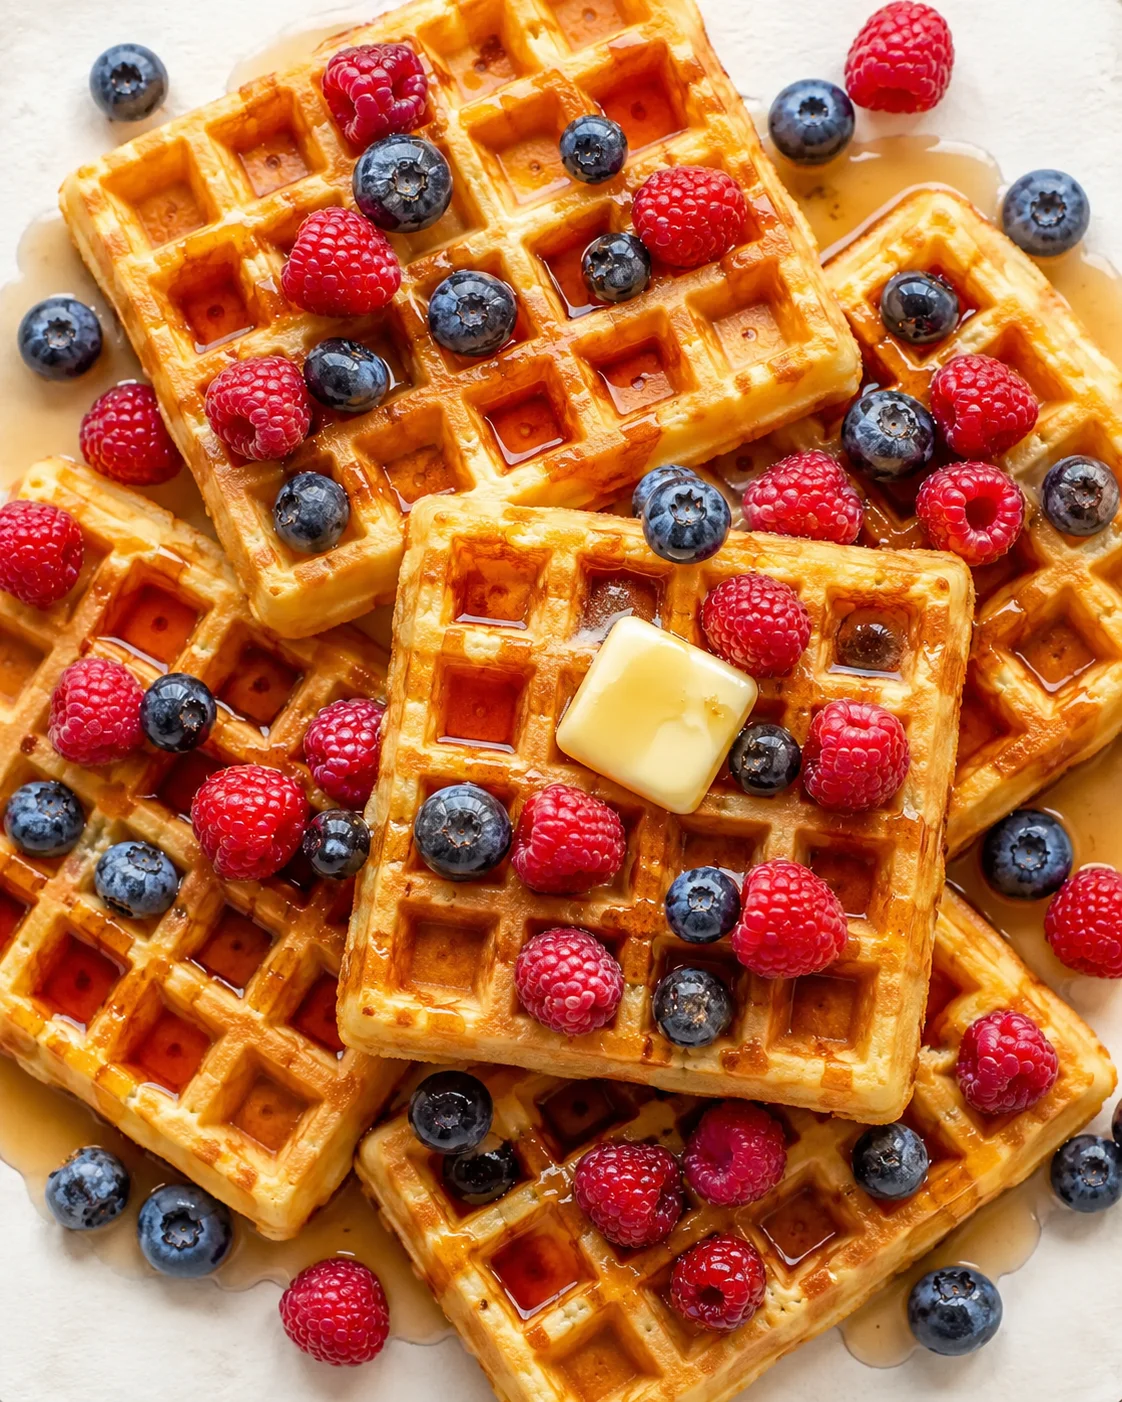
Deep grids: for those classic waffle pockets that hold syrup and toppings like champions — think a spoonful of homemade cherry pie filling.
Easy cleanup: because no one wants to scrub batter from their iron at breakfast time.
;
A little tool tip: use a measuring cup or small ladle to pour batter so each waffle turns out consistent. It also prevents messes like batter spilling over and smoking up your kitchen. I learned this the hard way!
If you cook for a crowd, a bigger waffle iron helps speed things up. For just one or two people, smaller irons work perfectly and save space. Personally, I like a sturdy mid-sized iron that can handle a few batches without slowing down — perfect for weekend mornings.
If you remember one thing from this post, let it be this: Belgische Waffle Teig is easy and low-stress. Keep your waffle iron hot, don’t overmix the batter, and only open the iron when the steam has quieted. Then load your waffles up with your favorites and enjoy that little boost of happiness from the first crispy bite. If you want a protein-packed variation, try cottage cheese waffles.
Easy Flavor Twists and Add-Ins
After you’ve got your reliable Belgische Waffle Teig down, the recipe really becomes your canvas. I usually start with the classic batter and then add whatever I find in the fridge or pantry. Just remember: a little goes a long way when it comes to mix-ins — too much can throw off cooking time and texture.
Here are some of my favorite easy tweaks that add a fresh twist without extra fuss:
- Blueberry lemon: fold in fresh or frozen blueberries and sprinkle in some lemon zest for a bright pop.
- Chocolate chip: stir in mini chocolate chips and a pinch of salt for that classic sweet and salty combo.
- Cinnamon vanilla: add 1/2 teaspoon cinnamon to the mix to bring warm cozy vibes.
- Banana walnut: mashed banana gives extra softness — just cook a little longer so they’re done through.
If you’re craving something savory, cheesy garlic waffles with shredded mozzarella are fantastic; for a healthier spin without losing that treat feel, I often do half all-purpose flour and half whole wheat. It adds a nice nutty flavor and makes waffles more filling. Plus, these waffles freeze like a dream. Just cool completely, freeze them flat, and you have quick breakfasts waiting. Toast from frozen and they crisp right back up.
Some readers ask about prepping the batter the night before. You can do it, but I suggest keeping the dry and wet ingredients separate overnight and combining them right before cooking. If you mix it all too early, the batter may lose some lift and your waffles won’t be as fluffy.
For toppings, I keep things classic: butter and maple syrup never go out of style. But if you want to mix it up, try Greek yogurt with honey, fresh berries dusted with powdered sugar, a sprinkle of peanut butter chocolate granola for crunch, or even a spoonful of peanut butter melted over warm waffles — all so good!
Storing and Reheating Waffles
Saving waffles and prepping batter ahead can really save your mornings—especially when the clock is ticking.
- Cool your waffles completely on a wire rack to prevent them from turning soggy before storing.
- In the fridge: Store cooked waffles in an airtight container for up to 2–3 days. Reheat them in a 350°F (175°C) oven for around 8–10 minutes to bring back that crisp, or use the toaster for singles.
- In the freezer: Freeze waffles laid out in a single layer until frozen solid, then pop them in a freezer bag. They keep well for up to 2 months. To reheat, toast them straight from frozen or bake until hot and crisp.
- For serving warm: Place waffles on a wire rack in a 200°F oven and avoid stacking them so they stay crispy, not soggy.
- For make-ahead batter: Keep dry and wet ingredients separate and mix just before cooking for best results. If you must refrigerate combined batter, use it within 24 hours and expect a slight drop in fluffiness.
Troubleshooting and Common Questions
Q: Can I make Belgische Waffle Teig without butter?
A: Absolutely! Use a neutral oil like canola or avocado oil. The waffles won’t have quite the same rich flavor but they will still crisp up nicely.
Q: Why do my waffles stick to the iron?
A: Usually, the iron isn’t hot enough or lacks a light grease layer. Also, try not to open the iron early — wait for the steam to slow before lifting the lid.
Q: How can I keep waffles warm for a group?
A: Place cooked waffles on a wire rack inside a 200°F oven. Remember not to stack them, or they’ll get soft.
Q: Can I freeze leftover waffles?
A: Yes! Let them cool completely, freeze in a single layer, then store in a sealed bag. Reheat in the toaster for the best crispy texture.
Q: Is it okay if my batter has lumps?
A: Totally fine! A few lumps are normal and actually help keep the waffles tender and fluffy.

A forgiving, simple batter that makes crispy, fluffy Belgian waffles perfect for cozy breakfasts or casual brunches.
- Total Time: 25 minutes
- Yield: 6-8 waffles 1x
Ingredients
- 2 cups all-purpose flour
- 2 tablespoons sugar (add more if you prefer sweeter waffles)
- 1 tablespoon baking powder
- 1/2 teaspoon salt
- 2 large eggs
- 1 and 3/4 cups milk (dairy or plant-based)
- 1/2 cup melted butter (or neutral oil such as canola or avocado)
- 1 teaspoon vanilla extract
Instructions
- Preheat the waffle iron until fully hot (use indicator lights if available).
- Whisk flour, sugar, baking powder, and salt together in a large bowl.
- In a separate bowl, beat the eggs and whisk in milk, melted butter (or oil), and vanilla extract.
- Pour the wet ingredients into the dry ingredients and fold gently until mostly combined; avoid overmixing (a few lumps are fine).
- Let the batter rest 5 to 10 minutes while the waffle iron finishes heating. Adjust batter consistency to heavy cream thickness by adding flour or milk if necessary.
- Lightly brush oil or melted butter onto the hot waffle iron, even if it’s nonstick.
- Gently fold any mix-ins such as blueberries, chocolate chips, mashed banana, etc., into the batter right before cooking (optional).
- Use a measuring cup or ladle to pour an even amount of batter into the iron, close the lid, and cook each waffle until the steam slows.
- Remove the waffle and transfer to a wire rack to keep crisp. Repeat with remaining batter.
- Use the first waffle as a tester and adjust iron heat, batter amount, or cook time if waffles are pale or cook unevenly.
Notes
For crisp edges, ensure the waffle iron is hot enough and batter consistency is as thick as heavy cream., Lightly grease the waffle iron even if nonstick for clean release and crispy edges., Do not open the waffle iron early; wait until steam slows to prevent splitting waffles., Store cooked waffles on a wire rack to prevent sogginess before serving or storing., Cooked waffles can be stored in the fridge for 2-3 days in an airtight container and reheated in a 350°F oven for 8-10 minutes or toasted individually., Freeze waffles in a single layer until solid, then store in a freezer bag for up to 2 months; reheat from frozen in a toaster or oven for best texture., For make-ahead batter, keep dry and wet ingredients separate overnight and combine just before cooking to maintain fluffiness., Try mix-ins like fresh/frozen blueberries, chocolate chips, mashed banana, or cinnamon for flavor variations., Use a measuring cup or ladle to pour the batter to avoid spills and ensure consistent waffle size.
- Prep Time: 10 minutes
- Cook Time: 15 minutes
- Category: Breakfast
- Cuisine: Belgian
Nutrition
- Serving Size: 1 waffle
- Calories: Approximately 250 calories per waffle (may vary based on mix-ins and toppings)
- Fat: 10 grams per serving
- Carbohydrates: 30 grams per serving
- Protein: 6 grams per serving