Decadent Dark Chocolate Oatmeal Cups

Making mornings easier has always been a top priority for me, especially when juggling family chaos. There’s something comforting about waking up knowing your breakfast is already ready and waiting in the fridge. These dark chocolate oatmeal cups quickly became my hectic weekday lifesaver. I started whipping them up when I needed a nutritious breakfast that both the kids and I would actually enjoy—a little treat that still packs good-for-you ingredients.
The magic of these oatmeal cups lies in how simple they are to prep the night before. Just mix all the ingredients together, pop them in the oven, and by morning, you have a tasty grab-and-go breakfast. I usually bake a batch on Sunday evenings while prepping lunches for the week. This way, mornings are stress-free and you avoid that last-minute scramble for breakfast. Bonus: they feel like dessert but are still better for you!
Feel free to get creative with toppings, but the dark chocolate variety is our family favorite by far. Sometimes I double the recipe because they tend to fly off the plate!
Mornings can feel like a whirlwind, and that’s why I wanted a breakfast that’s ready to grab as soon as the day starts. These dark chocolate oatmeal cups deliver exactly that: easy to make the night before, kid-friendly, and delightfully indulgent without being too sweet.
Here’s a quick peek at what you’re getting with this recipe. Made from simple pantry staples like oats, peanut butter, honey, and dark chocolate, these cups don’t require oven baking. Instead, they set up in the fridge or freezer, which means you get a fuss-free, portable breakfast or snack all week long.
Stick around because I’ll walk you through everything — a clear shopping list, easy step-by-step assembly, handy troubleshooting tips, smart substitutions, and how to store or freeze them. Plus, a short FAQ to help you feel confident adapting the recipe for your own family’s needs.
- Shopping list & measurements — know exactly what to buy and how much.
- How to assemble — straightforward, step-by-step instructions anyone can follow.
- Pro tips & troubleshooting — avoid common mistakes and get the best texture every time.
- Substitutions & flavor swaps — adjust for allergies, preferences, or vegan diets with ease.
- Storage & freezing — keep these cups fresh longer and know how best to store them.
- Quick FAQs and a printable recipe card for easy reference anytime.
Easy, Nutritious, Kid-Approved
Simply put, these oatmeal cups hit the perfect note of easy, wholesome, and a little indulgent. They’re exactly the kind of recipe that makes busy mornings and snack-time cravings so much simpler, without losing the joy of a treat.
- Make-ahead magic – Whip them up in just 10–15 minutes, chill, and enjoy grab-and-go breakfasts or snacks all week long. They last up to a week in the fridge and freeze beautifully—good for up to three months.
- Low-fuss, no oven needed – No baking required! Just warm, mix, press, and chill. That means fewer dishes, no heating up your kitchen, and less mess.
- 5-ingredient simplicity – Oats, peanut butter, honey, dark chocolate, and coconut oil (plus a pinch of salt) are all you need. No special trips to the store needed!
- Kid-tested and portable – Chocolate and peanut butter always win with the kids. Plus, these cups are perfectly sized for lunchboxes or quick snack grabs.
- Customizable to your pantry – Swap out nut butters, sweeteners, or chocolate to fit your family’s taste or dietary needs. Check the substitutions section for ideas.
- Tastes like dessert, eats like breakfast – Thanks to oats and nut butter, they keep you full, while the dark chocolate brings that dessert vibe so you don’t feel like you’re missing out. For a protein-packed make-ahead breakfast, try High Protein Overnight Oats with Chia.
- Easy on the budget and your schedule – You get several servings out of one batch, and making a double batch on Sundays saves you time and money during the busy week.
In a nutshell: if you want a quick, flexible, and satisfying fix for busy mornings, lunchboxes, or sweet cravings, these dark chocolate oatmeal cups have you covered. They offer the ease of make-ahead prep with the comfort of a delicious treat.
- No-bake goodness – These oatmeal cups come together with zero oven cooking, just mix and chill. Perfect for warm weather when no one wants to heat up the kitchen.
- 5-ingredient magic – Oats, peanut butter, honey, dark chocolate, and coconut oil are probably already sitting in your pantry, making this recipe super convenient.
- Great for meal prep – Store in the fridge for up to a week and have ready-to-go snacks whenever you need them. For another grab-and-go option, try Protein Banana Oat Breakfast Squares.
- Sweetened naturally – Using honey instead of refined sugar keeps these cups wholesome and satisfying when you’re craving something sweet. Prefer fruit-sweetened? These 10-Minute Date Overnight Oats with Chia Seeds are another no-bake favorite.
Ingredients and Measurements
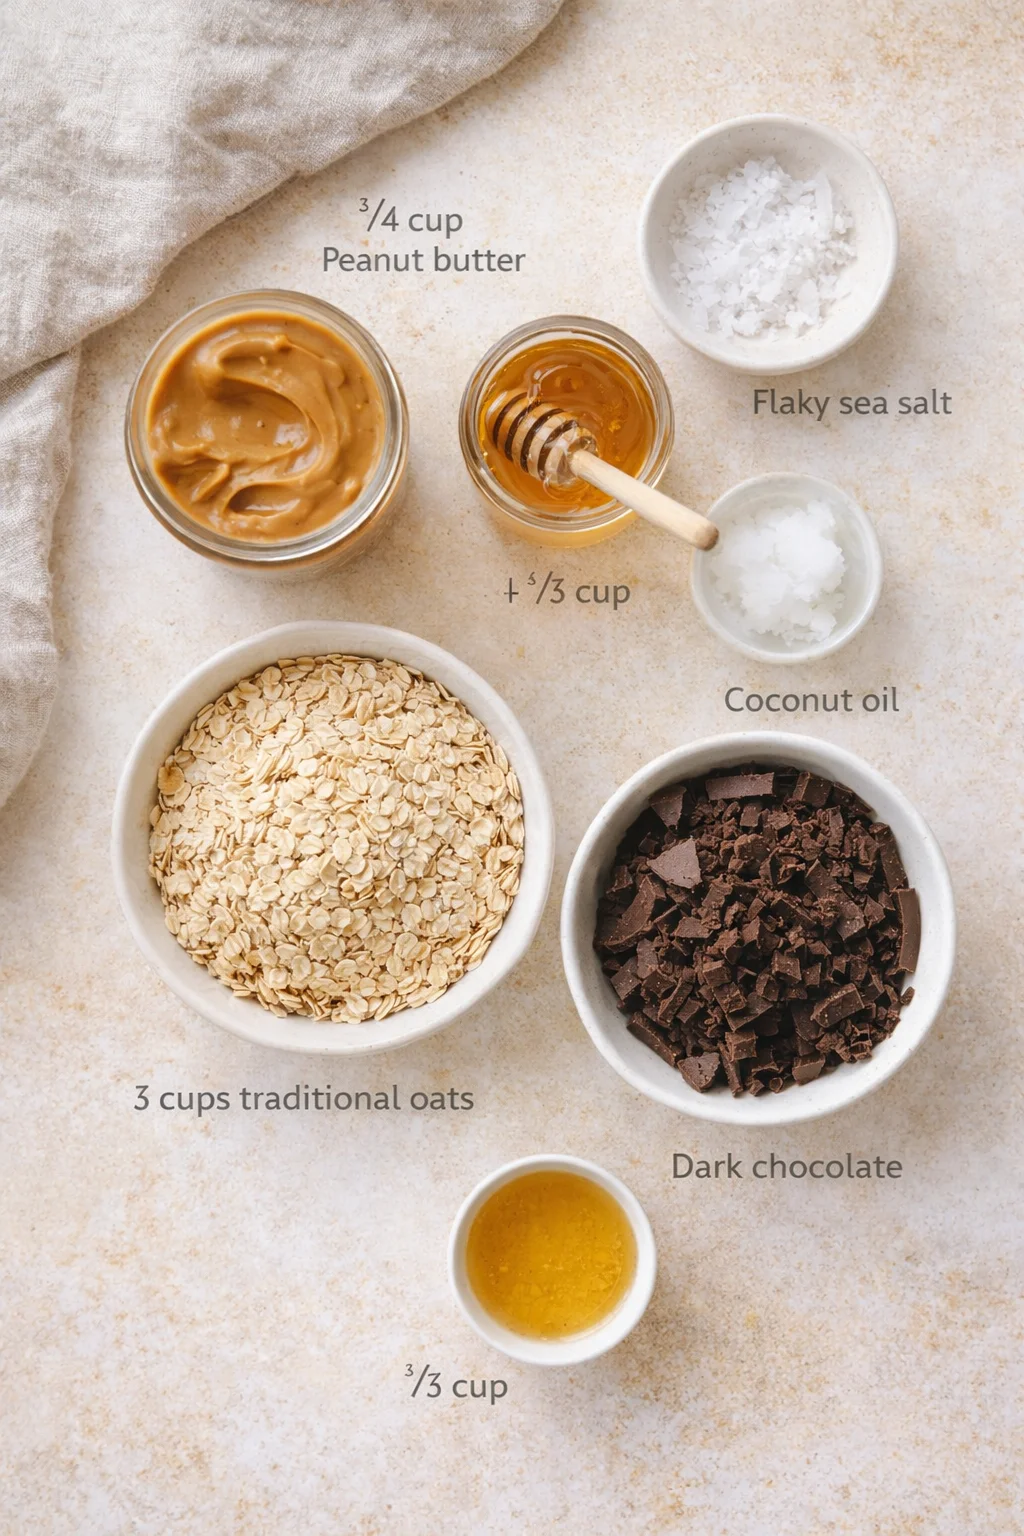
- 3/4 cup peanut butter
- 3 cups traditional oats
- 1/3 cup honey
- Flaky sea salt (like Maldon for a nice gourmet touch)
- 5 oz dark chocolate (chopped finely for smooth melting)
- 1 tbsp coconut oil (extra virgin for a subtle coconut touch)
How to Assemble and Chill
- Warm peanut butter and honey in a small saucepan over medium-low, stirring often, until warm and easy to mix (not super hot), or heat in the microwave in short bursts, stirring between.
- Let the peanut butter–honey mixture cool about 5 minutes before combining with the oats.
- Stir the traditional oats into the peanut butter and honey until every oat is coated and the mixture is well combined.
-
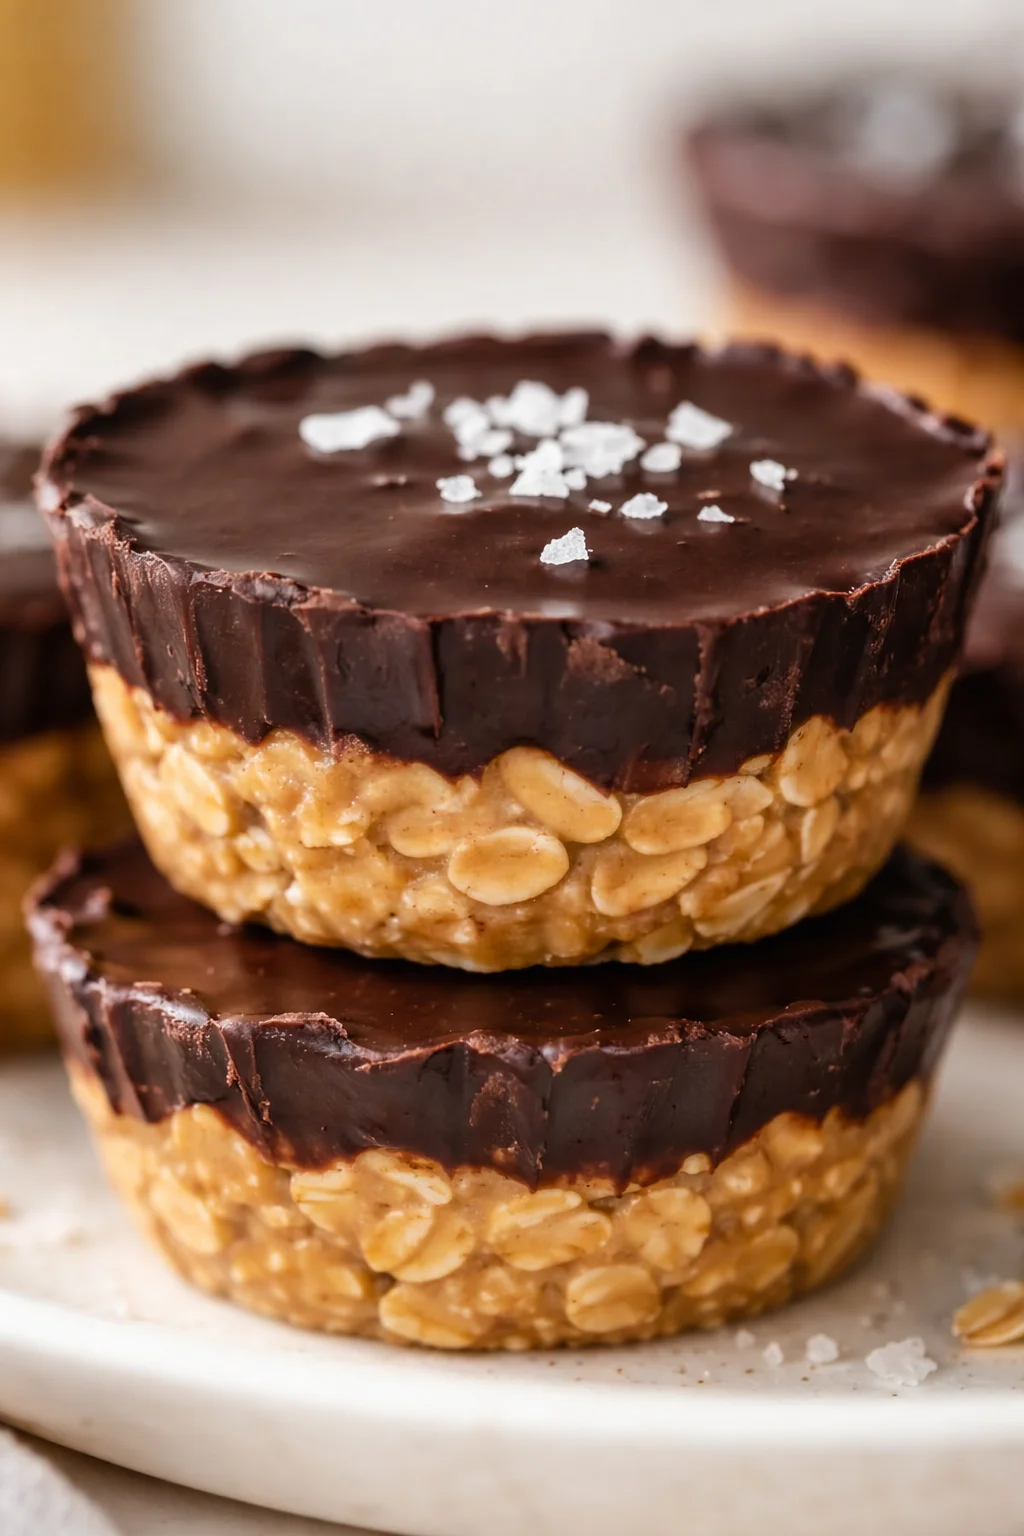
Evenly divide the oat mixture into a silicone or non-stick 12-cup muffin pan, using about 1/3 cup per cup.

- Firmly press the mixture into each muffin cup with a spoon or your fingers to form compact bases.
- Optional: chill the filled muffin pan in the freezer for 10–15 minutes to firm the oat cups before topping.
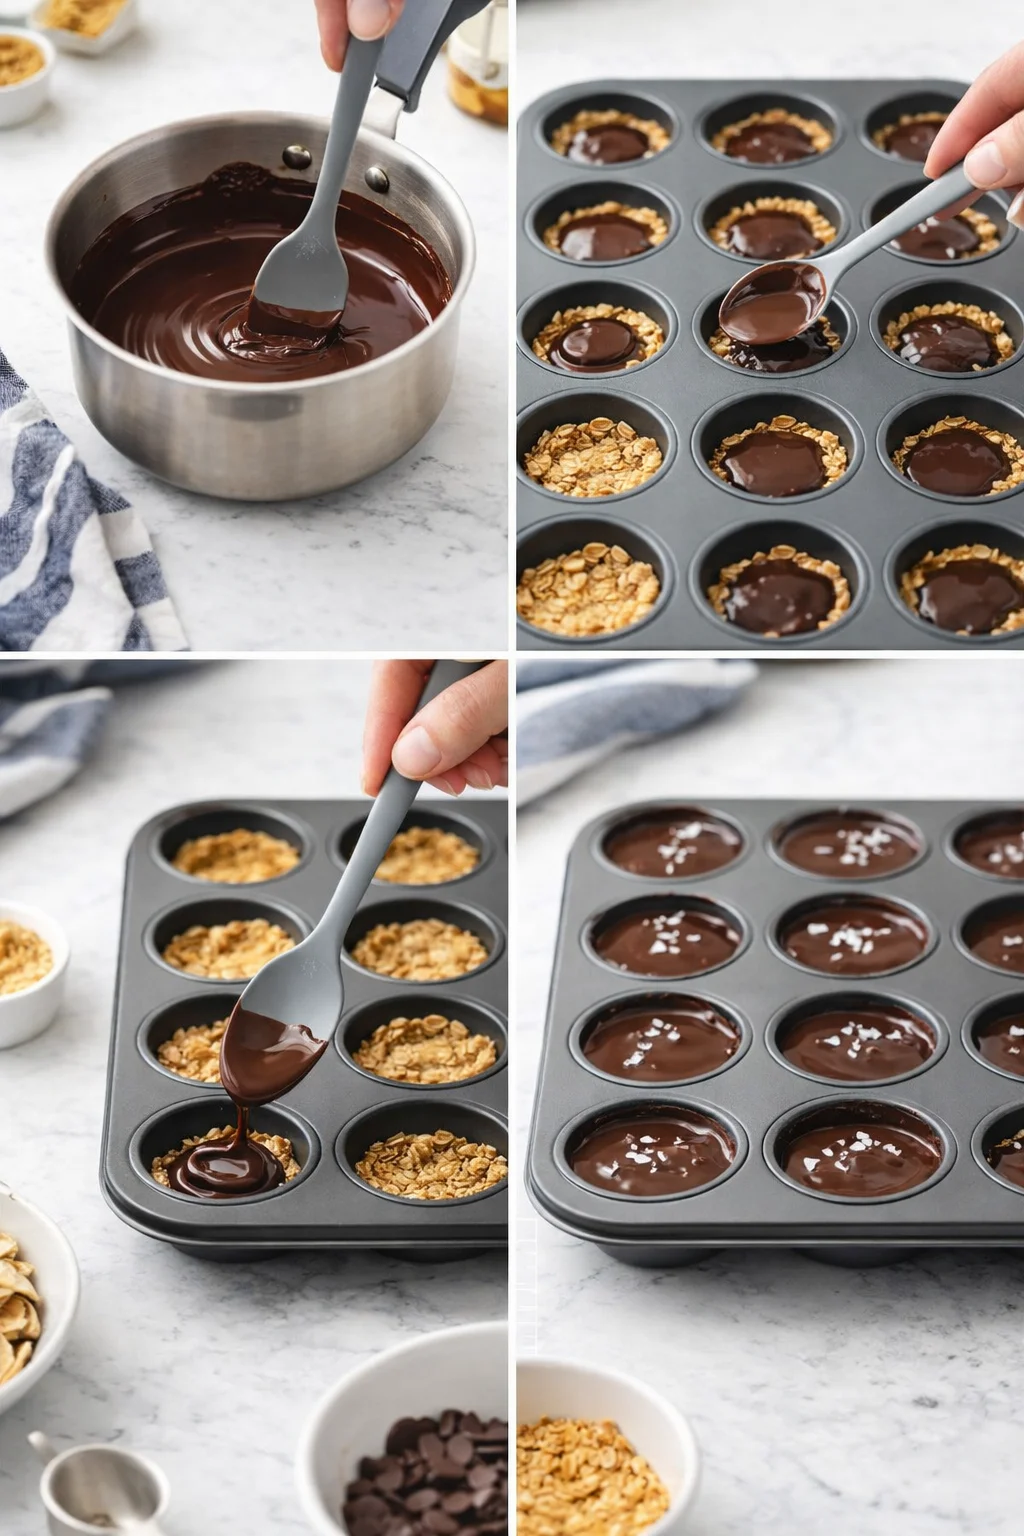
- Rinse the saucepan and return it to the burner.
-
Add the chopped dark chocolate and coconut oil to the saucepan and melt over medium-low, stirring often, until the chocolate is silky smooth.
- Remove the saucepan from the heat as soon as the chocolate is melted.
- Spoon about 1 tablespoon of the melted chocolate onto each oatmeal cup.
- Spread the chocolate evenly to fully cover each cup.
-
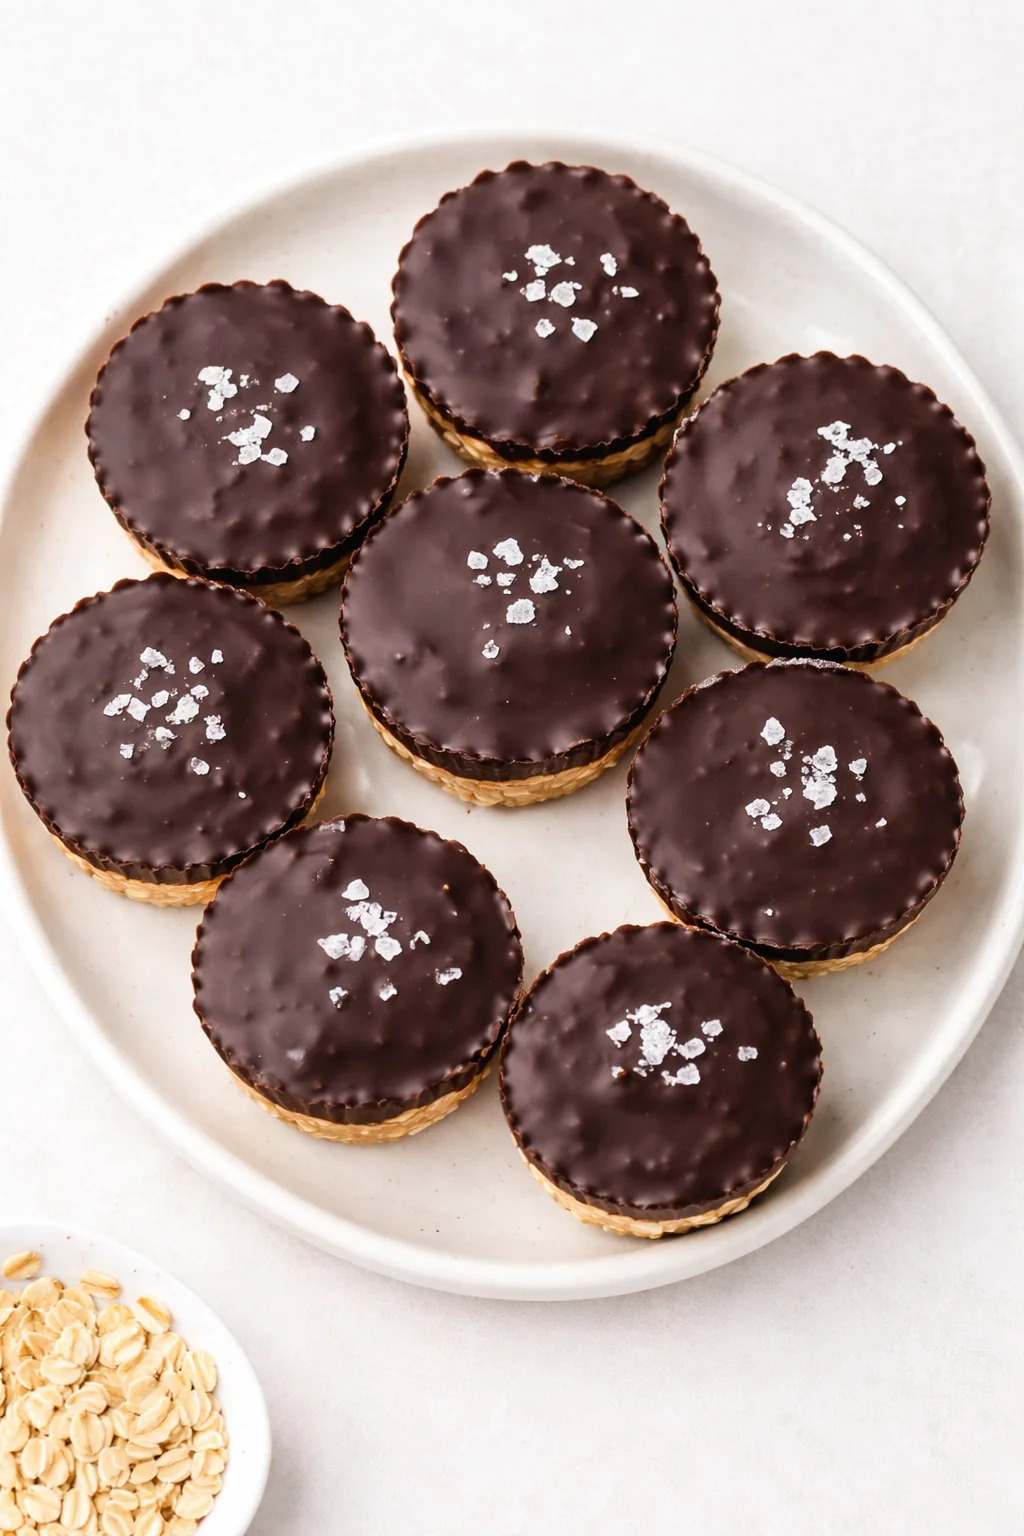
Place the muffin pan in the freezer and chill for at least 1 hour, until the cups are set and firm.
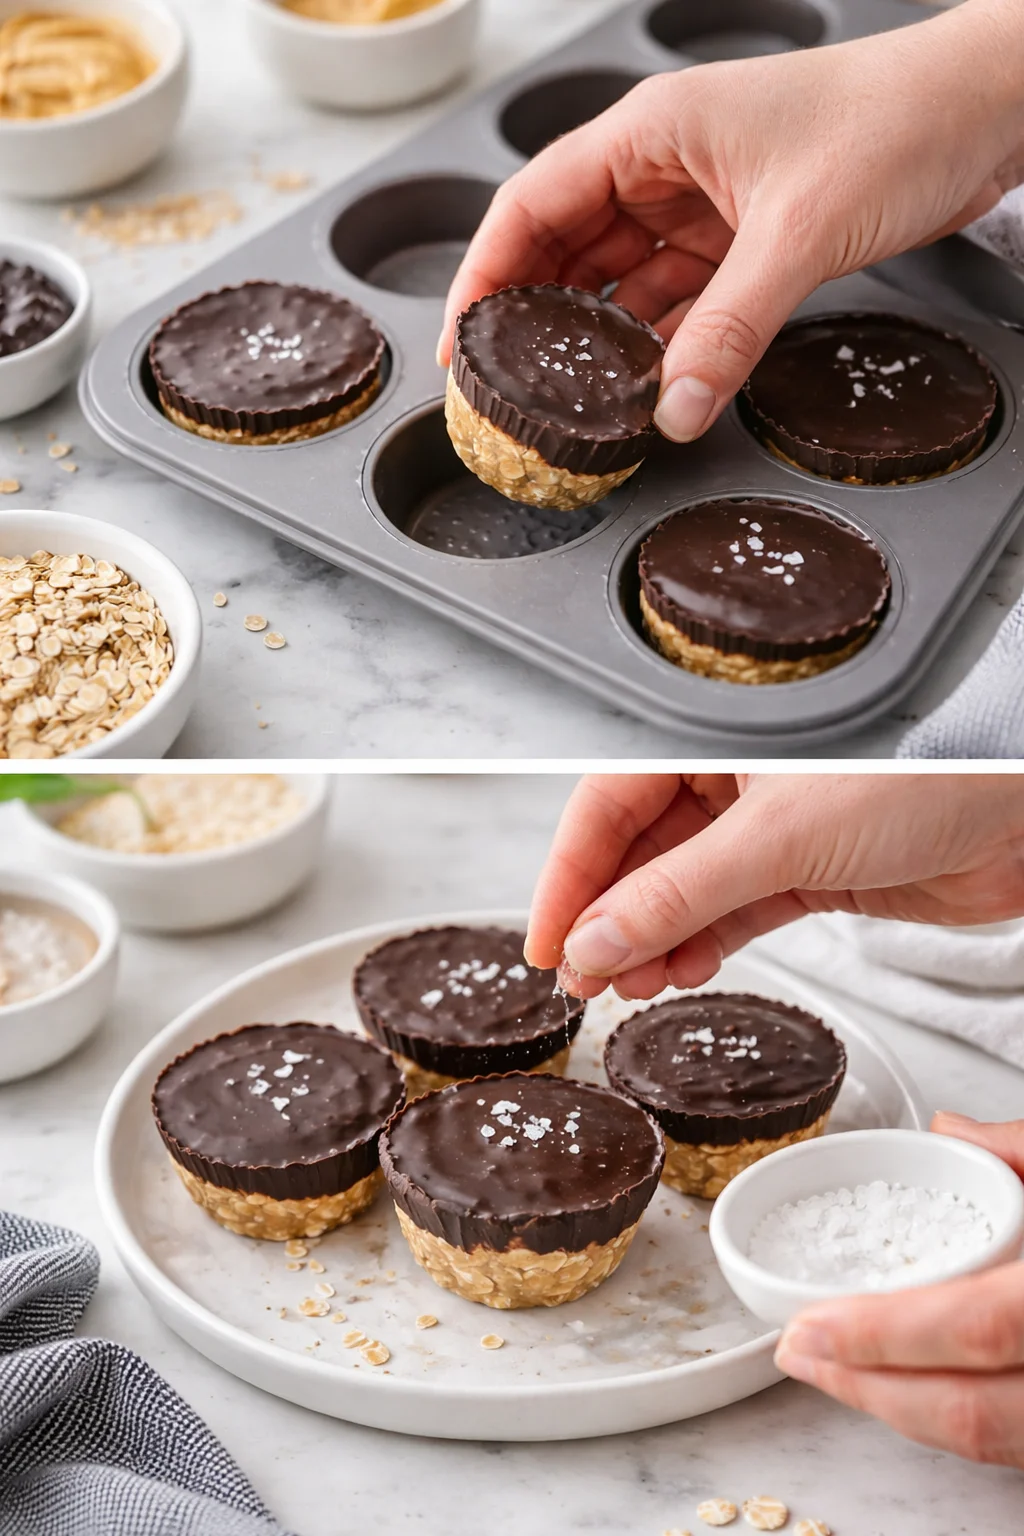
- Gently pop the oatmeal cups out of the pan.
-
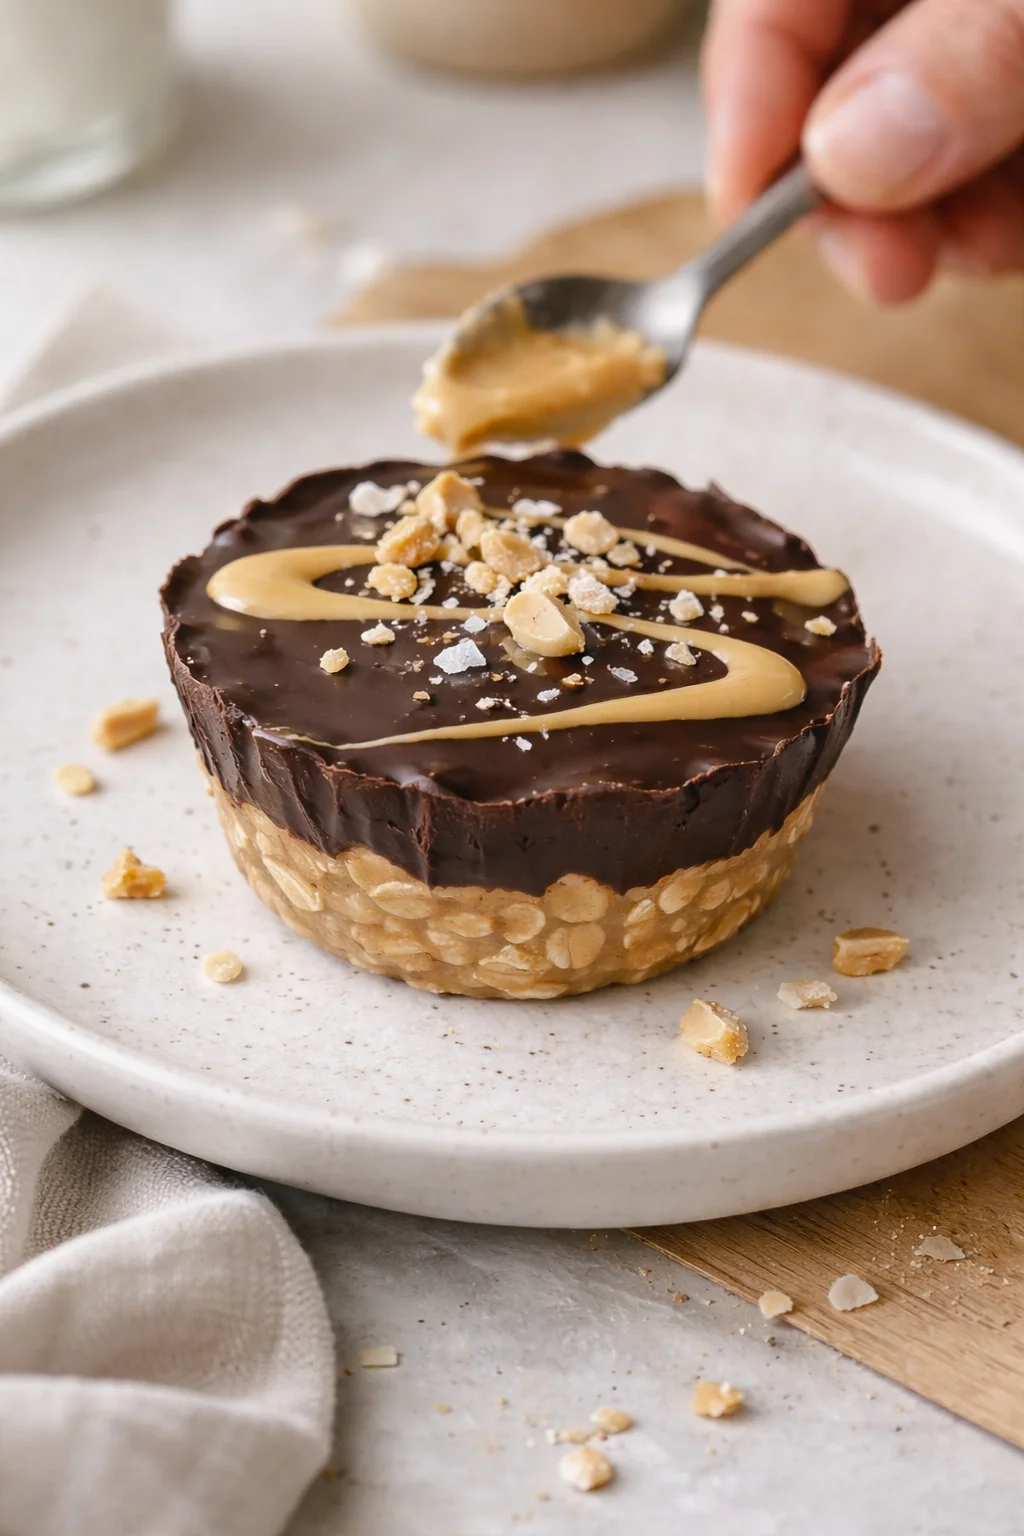
Sprinkle a pinch of flaky sea salt on each cup.
Texture Tips and Chocolate Tricks
The trickiest part with these oatmeal cups is getting the right texture. If the peanut butter and honey mixture is too hot when you add the oats, the cups won’t hold together well. So, give that mixture about 5 minutes to cool slightly before combining.
When melting chocolate, watch out for overheating or any water getting into the pan—that can cause the chocolate to seize and get grainy. Use quick 20-second bursts if microwaving, stirring each time, or melt gently over a double boiler.
For the best sturdiness, press the oat mixture firmly into the muffin cups with a spoon or your fingers. Loose packing leads to crumbly cups that fall apart easily.
One little tip: chill the oats in the freezer for 10-15 minutes before adding the chocolate layer. This helps the chocolate set faster and gives you a nice clean layer separation.
These chocolate oatmeal cups are fantastic as a snack or dessert and go beautifully with your favorite hot drink. A cold glass of milk or a warm coffee cup helps balance the richness of the dark chocolate and peanut butter perfectly. For breakfast, I love pairing them with fresh fruit like strawberries or banana slices to brighten things up. Or try Banana Oat Peanut Butter Cookies for a grab-and-go option with similar flavors. And if you’re packing them for lunches or afternoon snacks, they go perfectly with a handful of mixed nuts or a small yogurt cup for a protein boost.
Enjoy these oatmeal cups with a cold glass of milk or a hot cup of coffee or tea. They pair wonderfully with fresh fruit like berries or banana slices to brighten the meal. For snacks or lunchboxes, pack alongside some nuts or yogurt for a balanced combo, or include a small jar of Peanut Butter Chocolate Granola for extra crunch.
Flavor Swaps and Substitutions
This recipe is very flexible, making it easy to swap ingredients based on what you have or your dietary needs:
- Peanut butter: Not a fan or need a peanut-free option? Almond butter, sunflower seed butter, or cashew butter all work beautifully. Just remember to use smooth varieties since chunky ones might make it harder to press the cups together.
- Honey: Maple syrup is a fantastic vegan alternative that works well here—see this maple brown sugar baked oatmeal for how it sweetens and binds oats. Agave nectar is also an option, but you might want to use a little less since it’s sweeter than honey.
- Traditional oats: Old-fashioned oats are best for texture, but quick oats can substitute in a pinch. Avoid steel-cut oats—they’re too coarse and won’t stick together properly.
- Dark chocolate: Semi-sweet or milk chocolate will work if that’s your preference. Chocolate chips can replace chopped bars, too.
- Coconut oil: If you don’t have coconut oil, butter or any neutral oil like vegetable or canola oil will do just fine.
- Flaky sea salt: Regular kosher salt can be used, though use a little less since it’s finer. You can also leave the salt out if you prefer.
- Try swapping the peanut butter for almond or cashew butter for a different nutty flavor.
- Add a handful of chopped nuts or seeds to the oat mixture for extra crunch and nutrition.
- Sprinkle a little cinnamon or vanilla extract into the oat mixture for a warm, cozy twist (think Cinnamon Roll Overnight Oats).
- Mix in dried fruit like raisins or chopped dates for a natural touch of sweetness.
- Use white chocolate or flavored chocolate as the topping for a different flair.
Storing, Freezing, and Shelf Life
Storing fresh: These oatmeal cups keep well in an airtight container at room temperature for up to five days. If your kitchen tends to be warm, pop them in the fridge to prevent the chocolate from softening too much. To avoid sticking, layer parchment paper between each cup.
Freezing: Planning ahead? These cups freeze like a charm! Store them in a freezer-safe container with parchment paper between layers, and they’ll stay fresh for up to three months. It’s a lifesaver to have these on hand for sudden chocolate cravings or busy mornings. If you like stocking the freezer with oat bakes, try Cinnamon Roll Baked Oatmeal Squares.
Thawing: When ready to enjoy, either move them to the fridge overnight or leave them on the counter for about 30 minutes to thaw. They taste just as delicious as freshly made!
Preparation Time 10-15 minutes Cooking Time 20-30 minutes Total Time 70-90 minutes Level of Difficulty Easy
Keep your oatmeal cups fresh by storing them in an airtight container at room temperature for up to five days. If your kitchen tends to get warm, pop them in the fridge and place parchment paper between layers to prevent sticking. This keeps the chocolate topping firm and tidy.
These cups are perfect for prepping ahead. Make a big batch on the weekend, freeze extra portions, and you’ve got grab-and-go breakfasts or snacks ready when mornings get crazy. Just thaw them overnight in the fridge or for about half an hour on the counter before enjoying. For another grab-and-go option, these Banana Peanut Butter Oatmeal Bars travel well.
Common Questions Answered
For the chocolate, aim for dark varieties between 60-70% cacao. This level hits a great balance of sweetness and rich chocolate flavor. Regular chocolate chips work in a pinch, but chopping a good-quality bar yourself will give you smoother melting and better texture. Just avoid baking chocolate since it’s typically unsweetened and could make your cups taste too bitter.
- Can I make these gluten-free? Yes! Just make sure to use certified gluten-free oats to keep them safe for gluten sensitivities.
- Can I use crunchy peanut butter? I recommend smooth peanut butter for the best texture, but if you only have crunchy, it can work—just expect a little more texture.
- What’s the best way to store these? Keep them in an airtight container in the fridge for up to a week or freeze for longer storage.
- Can I use another sweetener? Yes! Maple syrup and agave are great alternatives if you’re avoiding honey or want to keep it vegan.
- How do I prevent the chocolate from melting? Store the cups in the fridge or freezer, especially if your kitchen is warm. This will keep the chocolate topping firm and delicious.
No-bake oatmeal cups made with oats, peanut butter, honey, and topped with dark chocolate. Easy to prepare the night before for a nutritious, grab-and-go breakfast or snack that’s kid-friendly and indulgent yet wholesome.
- Total Time: 70-90 minutes (including chilling)
- Yield: 12 oatmeal cups 1x
Ingredients
- 3/4 cup peanut butter (smooth)
- 3 cups traditional oats (old-fashioned)
- 1/3 cup honey
- Flaky sea salt (like Maldon), to taste
- 5 oz dark chocolate, finely chopped
- 1 tbsp coconut oil (extra virgin)
Instructions
- Warm peanut butter and honey together over medium-low heat, stirring often, until warmed and easy to mix (not hot). Alternatively, warm in microwave in short bursts, stirring in between.
- Let the peanut butter and honey mixture cool for about 5 minutes.
- Stir the oats into the peanut butter and honey mixture until all oats are evenly coated and combined.
- Divide the oat mixture evenly into a 12-cup silicone or non-stick muffin pan, using about 1/3 cup per cup.
- Press the oat mixture firmly into each muffin cup with a spoon or fingers to form compact bases.
- Optional: Chill the filled muffin pan in the freezer for 10–15 minutes to firm the oat cups before adding chocolate.
- Clean the saucepan, then add chopped dark chocolate and coconut oil to it. Melt over medium-low heat, stirring often until the chocolate is smooth and silky.
- Remove the saucepan from heat immediately once the chocolate is melted.
- Spoon about 1 tablespoon of melted chocolate onto each pressed oat cup.
- Spread the chocolate evenly over each cup to fully cover.
- Place the muffin pan in the freezer and chill for at least 1 hour, until the cups are set and firm.
- Carefully pop the oatmeal cups out of the muffin pan.
- Sprinkle a pinch of flaky sea salt on top of each oatmeal cup.
Notes
Allow the peanut butter and honey mixture to cool slightly before adding oats to ensure cups hold together well., Avoid overheating chocolate or allowing water to get into the pan to prevent grainy texture; melt gently or use microwave bursts with stirring., Press oat mixture firmly into muffin cups to avoid crumbly texture., Chilling oat cups before adding chocolate helps the chocolate set faster and maintain a clean layer separation., Store oatmeal cups in an airtight container at room temperature up to 5 days or in fridge to keep chocolate firm in warm environments., Freeze in a freezer-safe container with parchment between layers for up to 3 months. Thaw in fridge overnight or on counter for 30 minutes., Substitute peanut butter with almond, sunflower seed, or cashew butter (smooth varieties recommended)., Use maple syrup or agave nectar as vegan sweetener alternatives to honey., Quick oats can substitute traditional oats but steel-cut oats are not recommended., Semi-sweet or milk chocolate or chocolate chips can replace dark chocolate as preferred., Coconut oil may be substituted with butter or neutral oils such as vegetable or canola oil., Use kosher salt instead of flaky sea salt (reduce amount)., Add-ins like chopped nuts, seeds, cinnamon, vanilla extract, dried fruit, or different chocolate varieties can be used for flavor variation.
- Prep Time: 10-15 minutes
- Cook Time: 20-30 minutes (chilling time)
- Category: Breakfast
Nutrition
- Serving Size: 1 oatmeal cup
- Calories: Approximately 180-220 calories per oatmeal cup (estimate)
- Fat: Approximately 10-12 g per serving (estimate)
- Carbohydrates: Approximately 20-25 g per serving (estimate)
- Protein: Approximately 5 g per serving (estimate)