Rustic summer dessert: peach galette with flaky crust
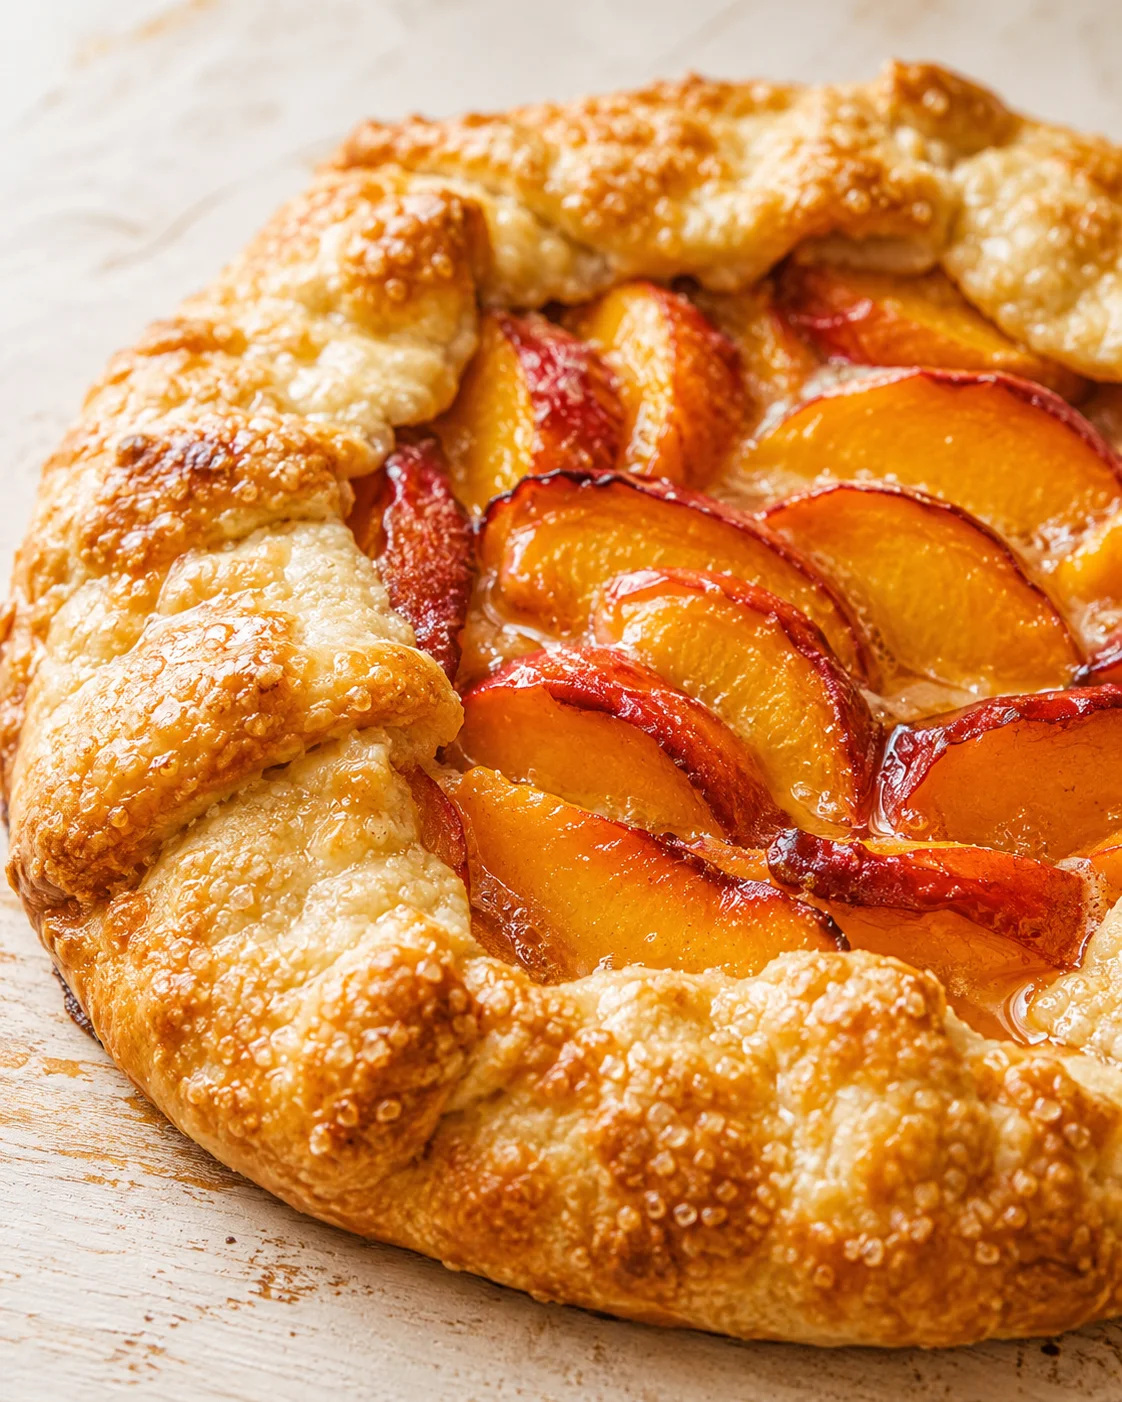
This Peach Galette recipe is just perfect—with a flaky, buttery crust and juicy peaches dusted with cinnamon that warm your heart and your taste buds. Imagine it paired with a big scoop of vanilla ice cream. It’s the kind of summer dessert that feels effortless but tastes like a celebration!
This peach galette has quickly become one of my go-to ways to enjoy fresh summer peaches, especially when I don’t need a big pie or when I just want something that looks a little more rustic and simple.
You can whip up this charming, rustic peach galette in no time at all. But don’t skip that vanilla ice cream or whipped cream on top—it’s magic when it melts a bit into the warm fruit and flaky crust.
Juicy, sun-ripened peaches meet a tender, flaky crust in this simple Peach Galette — a rustic summer dessert that’s as pretty as it is delicious. If you love the flavors of a traditional peach pie but want something quicker and easier, this is the recipe for you! It’s great for smaller gatherings too, so you don’t end up with a ton of leftovers.
Below, I’ll share the full recipe with a concise ingredient list, step-by-step directions (the dough is basically a pie crust but even easier), a handy photo series, plus a how-to video. There are also tips to keep the crust crispy, ideas for easy flavor swaps, advice on storage and reheating, and answers to all the questions I get about galettes.
- What you’ll get: a flaky crust tutorial, cinnamon-spiced peach filling instructions (without peeling the peaches!), how to assemble and bake a perfect galette.
- Included extras: handy ingredient notes, troubleshooting tricks, ways to switch up the flavors, and storage plus reheating tips.
- Why you’ll love it: fuss-free, packed with flavor, perfect for warm-weather desserts, backyard parties, and anytime you want an effortless sweet treat.
Keep scrolling to get the full recipe and pictures — I’ll guide you through every step so you end up with a glorious, bubbling peach galette that’s sure to impress.
What Makes It Special
Every summer, my family and I get to enjoy peaches fresh from my parents’ backyard peach trees. There’s something extra special about using homegrown fruit that’s just sweet and ripe enough to eat straight off the tree. This Peach Galette recipe celebrates those juicy, fresh peaches perfectly.
Honestly, this galette is my top pick for summer desserts. The crust is flaky and crisp—not one bit soggy or tough—and it holds those juicy peaches beautifully. It’s so good, I even included a blueberry galette using the same crust recipe in my Natasha’s Kitchen Cookbook.
I’m all about simple, seasonal desserts like this—things like my Cherry Pie or classic Strawberry Shortcake that showcase fresh fruit and come together fast. Add this peach galette to your summer menus for picnics or cookouts, and it’ll quickly become a favorite.
What You’ll Need
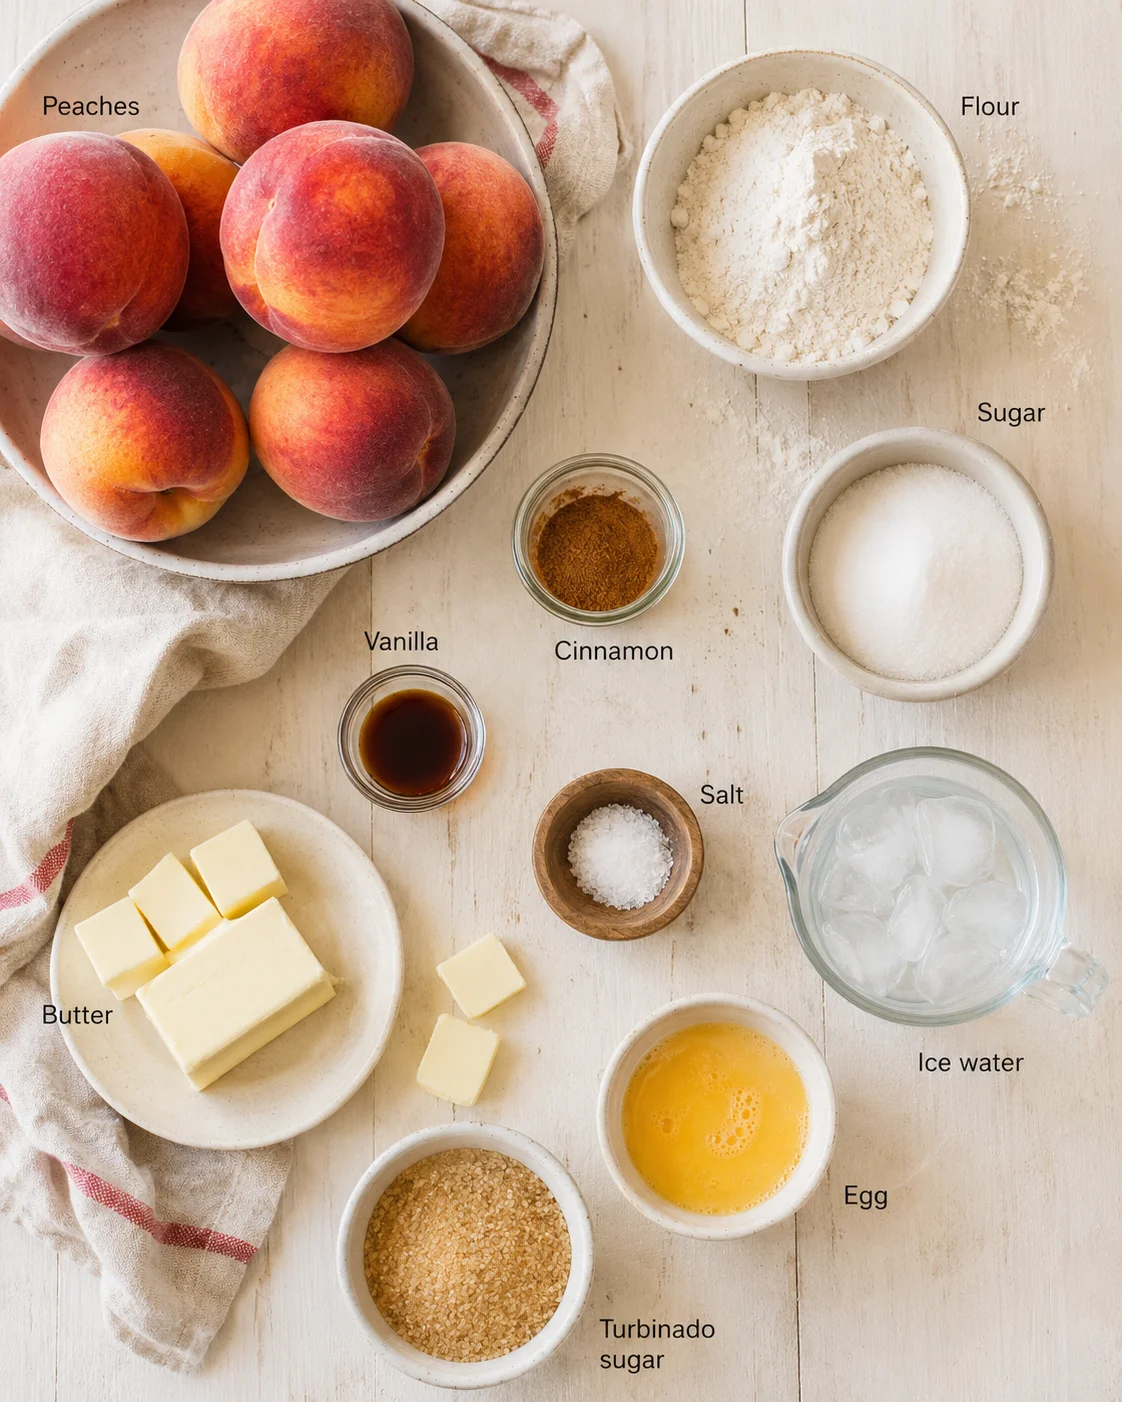
- Peaches (white or yellow; no need to peel)
- Flour (for filling and dough)
- Sugar (for filling and dough)
- Cinnamon
- Vanilla extract
- Butter (cold for dough, plus small pats to dot the peach topping)
- Salt
- 6 tablespoons ice water
- Egg (for egg wash, beaten with a splash of water)
- Turbinado sugar (optional, for sprinkling)
Dough, Filling, and Assembly
- Pulse the flour, sugar, and salt together in a food processor until evenly combined.
- Add cold butter cut into small cubes and pulse until pea-sized pieces form.
- Add ice water, 1 tablespoon at a time, pulsing until the dough starts to hold together when pinched (about 6 tablespoons).
- Shape the dough into a disk, wrap tightly in plastic, and chill in the fridge for at least 1 hour (up to 3 days).
- Preheat the oven to 425°F.
- Roll the chilled dough out on parchment into a 12-inch circle; transfer the parchment with the dough to a rimmed baking sheet and return to the fridge while you prepare the filling.
- Stir together the flour, sugar, and cinnamon in a small bowl.
- Slice the peaches, place them in a medium bowl, toss with the flour mixture, then add the vanilla and mix gently to combine.
- Arrange the peach slices in a neat circular pattern over the dough, leaving a 2-inch border.
- Dot the peach tops with small bits of butter.
- Fold the dough edge up over the peaches, pinching overlapping dough together to seal.
-
Brush the folded crust with an egg wash (egg beaten with a splash of water) and sprinkle with turbinado sugar if using.
- Bake at 425°F for about 25 minutes, or until the crust is golden and the peach juices are thick and syrupy.
Tips for Perfect Galette
This peach galette recipe is one of my favorites for summer: fresh fruit, simple to make, and absolutely delicious. If you’re hosting a BBQ or family gathering, consider doubling the recipe to make two galettes — trust me, the slices go fast! For variety, bake a second galette with a different fruit, like this rhubarb-strawberry galette.
Flavor and Fruit Variations
Want to switch things up or use whatever fruit you have? Here are some easy ways to mix up the flavor:
- Try different fruit: Sub fresh peaches for nectarines, plums, apricots, cherries, or even a mix of stone fruits. Fresh berries like blueberries or blackberries are yummy too — just cut back on sugar if using super-ripe berries. Or go tangy with a rhubarb galette if you love tart flavors.
- Change the thickener: Flour is the classic choice, but if you like a crystal-clear, glossy filling, swap the flour for 1-2 tablespoons of cornstarch or instant tapioca.
- Add flavor: A splash of almond extract in the filling or a sprinkle of sliced almonds on top adds a lovely nutty touch.
- Try toppings: For a crumbly texture, sprinkle streusel over the peach filling before folding the crust. If you need a formula, this easy rhubarb crisp includes a classic streusel topping.
- Speed up with shortcuts: Use a store-bought pie crust or a refrigerated pie dough disk to save time. It won’t be quite as flaky but still delicious.
- Make mini galettes: Divide the dough and filling into smaller portions for individual galettes—just watch the baking time; it’ll be a bit shorter.
- Frozen or canned fruit: See Storage and FAQ below for tips to handle extra juices when using thawed or drained fruit.
Storing and Reheating
Here’s how to keep your peach galette fresh and tasty, and how to enjoy it later:
- Room temperature (short term): Cover a whole baked galette loosely at room temp for up to 24 hours. This helps keep the crust crisp.
- In the fridge: Store leftover slices in an airtight container or wrapped well for 2 to 3 days. Keep the ice cream or whipped cream toppings separate until ready to serve.
- Reheat: Warm slices up in a 350°F oven for 8-12 minutes to crisp the crust back up (longer if cold from fridge). From frozen, bake about 20-30 minutes until heated through. The microwave works but softens the crust.
- Make dough ahead: Chill your dough for at least 1 hour, up to 3 days. For longer storage, freeze wrapped tightly for up to 2 months and thaw in the fridge before rolling out.
- Make assembled galette ahead: You can assemble on parchment, freeze on a baking sheet until firm, then wrap and freeze for 1-2 months. Bake from frozen—add a few minutes to baking time, and tent with foil if crust darkens too fast.
If you’re stocking the freezer with peach desserts, our Easy 3-Ingredient peach dump cake with fresh peaches also keeps well and reheats beautifully.
Frequently Asked Questions
Here are some answers to the questions I get most about making this peach galette:
- Do I need to peel the peaches? Nope! The skin adds beautiful color and helps keep the peach slices together. Peel only if you prefer a silky smooth filling.
- Can I use frozen or canned peaches? Absolutely. For frozen, thaw and drain well, then pat dry. You may want to increase the thickener (extra flour or cornstarch) to handle the extra juices. For canned, drain well and reduce the sugar because canned peaches tend to be sweeter already.
- What thickener works best? Flour is classic and gives an opaque, syrupy filling. Cornstarch or instant tapioca create a clearer, shiny filling (see how cornstarch yields a clear, glossy result in this homemade cherry pie filling). Use 1-2 tablespoons cornstarch instead of flour if you prefer.
- Why is my crust soggy sometimes? To avoid that, keep your dough and butter cold, use a rimmed baking sheet to catch juices, don’t overfill with overly juicy fruit, and bake until juices are thick and bubbly. Reheating helps crisp crust if softened. For additional fruit-pie troubleshooting on preventing soggy bottoms, see these strawberry rhubarb pie tips.
- Can I halve or double this recipe? Yes! The method scales easily—make one galette, double for two, or halve for smaller portions. Bake multiple galettes on separate rimmed sheets to keep juices contained.
- What’s the best way to serve it? Warm, with a scoop of vanilla ice cream or a dollop of whipped cream. It’s especially amazing fresh from the oven when the filling is bubbling and the crust crisp.
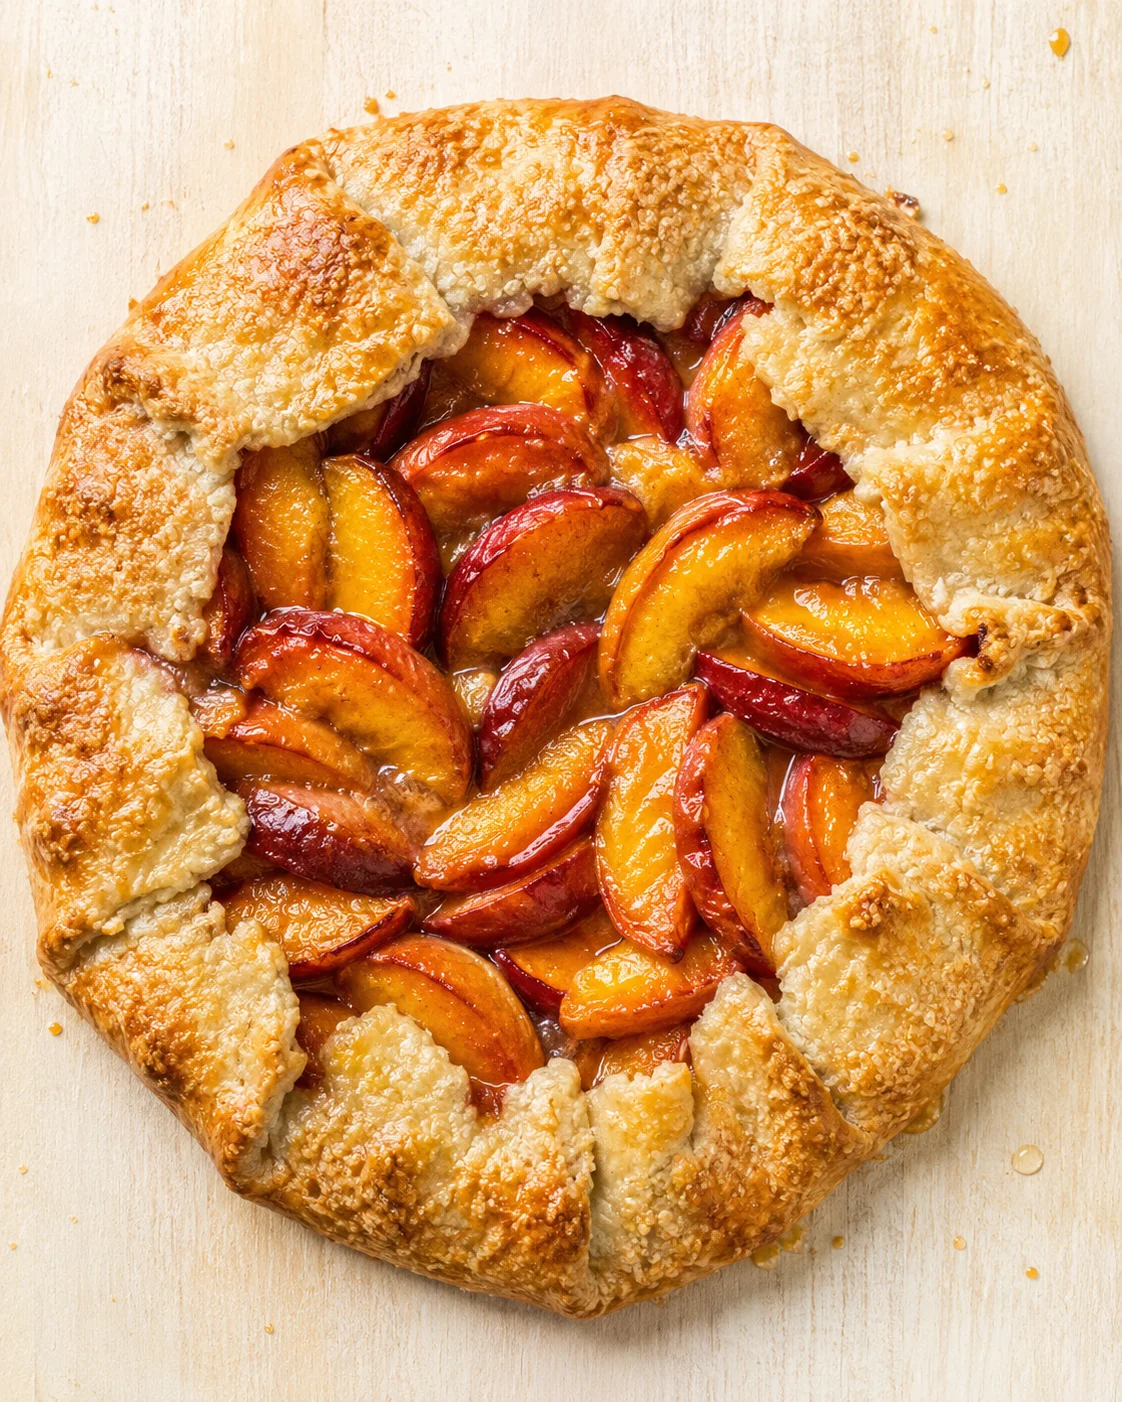
A rustic summer dessert featuring a flaky, buttery crust and juicy, cinnamon-spiced peaches, perfect served warm with vanilla ice cream or whipped cream.
- Total Time: 1 hour 45 minutes (including chilling time)
- Yield: 8 servings 1x
Ingredients
- 1 1/2 cups all-purpose flour (for dough)
- 2 tablespoons sugar (for dough)
- 1/2 teaspoon salt (for dough)
- 1/2 cup (1 stick) cold unsalted butter, cut into small cubes
- 6 tablespoons ice water
- 3–4 ripe peaches (white or yellow; no need to peel), sliced
- 2 tablespoons all-purpose flour (for filling)
- 1/4 cup sugar (for filling)
- 1/2 teaspoon ground cinnamon
- 1 teaspoon vanilla extract
- 1 tablespoon cold unsalted butter, cut into small pats (for topping)
- 1 egg (beaten with a splash of water, for egg wash)
- Turbinado sugar (optional, for sprinkling)
Instructions
- Pulse 1 1/2 cups flour, 2 tablespoons sugar, and 1/2 teaspoon salt together in a food processor until evenly combined.
- Add cold butter cubes and pulse until pea-sized pieces form.
- Add ice water, 1 tablespoon at a time, pulsing until dough starts to hold together when pinched (about 6 tablespoons).
- Shape the dough into a disk, wrap tightly in plastic, and chill in the fridge for at least 1 hour (up to 3 days).
- Preheat oven to 425°F (218°C).
- Roll the chilled dough out on parchment paper into a 12-inch circle; transfer the parchment with the dough to a rimmed baking sheet and chill while preparing filling.
- In a small bowl, stir together 2 tablespoons flour, 1/4 cup sugar, and 1/2 teaspoon cinnamon.
- In a medium bowl, toss peach slices with the flour mixture and vanilla extract, mixing gently to combine.
- Arrange the peaches in a neat circular pattern over the dough, leaving a 2-inch border.
- Dot the peach filling with small pats of cold butter.
- Fold the dough edge up over the peaches, pinching overlapping dough together to seal.
- Brush the folded crust with egg wash and sprinkle with turbinado sugar if using.
- Bake at 425°F for about 25 minutes, or until crust is golden and peach juices are thick and syrupy.
Notes
Serve warm with a scoop of vanilla ice cream or whipped cream for best flavor., Use frozen or canned peaches but drain and pat dry well; increase thickener to handle extra juices., Substitute flour with cornstarch or instant tapioca (1-2 tablespoons) for a clearer filling., Try variations with other stone fruits or berries; adjust sugar accordingly., Dough can be made ahead and chilled up to 3 days or frozen up to 2 months., Assembled galette can be frozen and baked from frozen with adjusted time.
- Prep Time: 20 minutes (plus 1 hour chilling)
- Cook Time: 25 minutes
- Category: Dessert
- Cuisine: American
Nutrition
- Serving Size: 1 slice
- Calories: Approximately 280 kcal per serving
- Fat: 12 g per serving
- Carbohydrates: 38 g per serving
- Protein: 3 g per serving