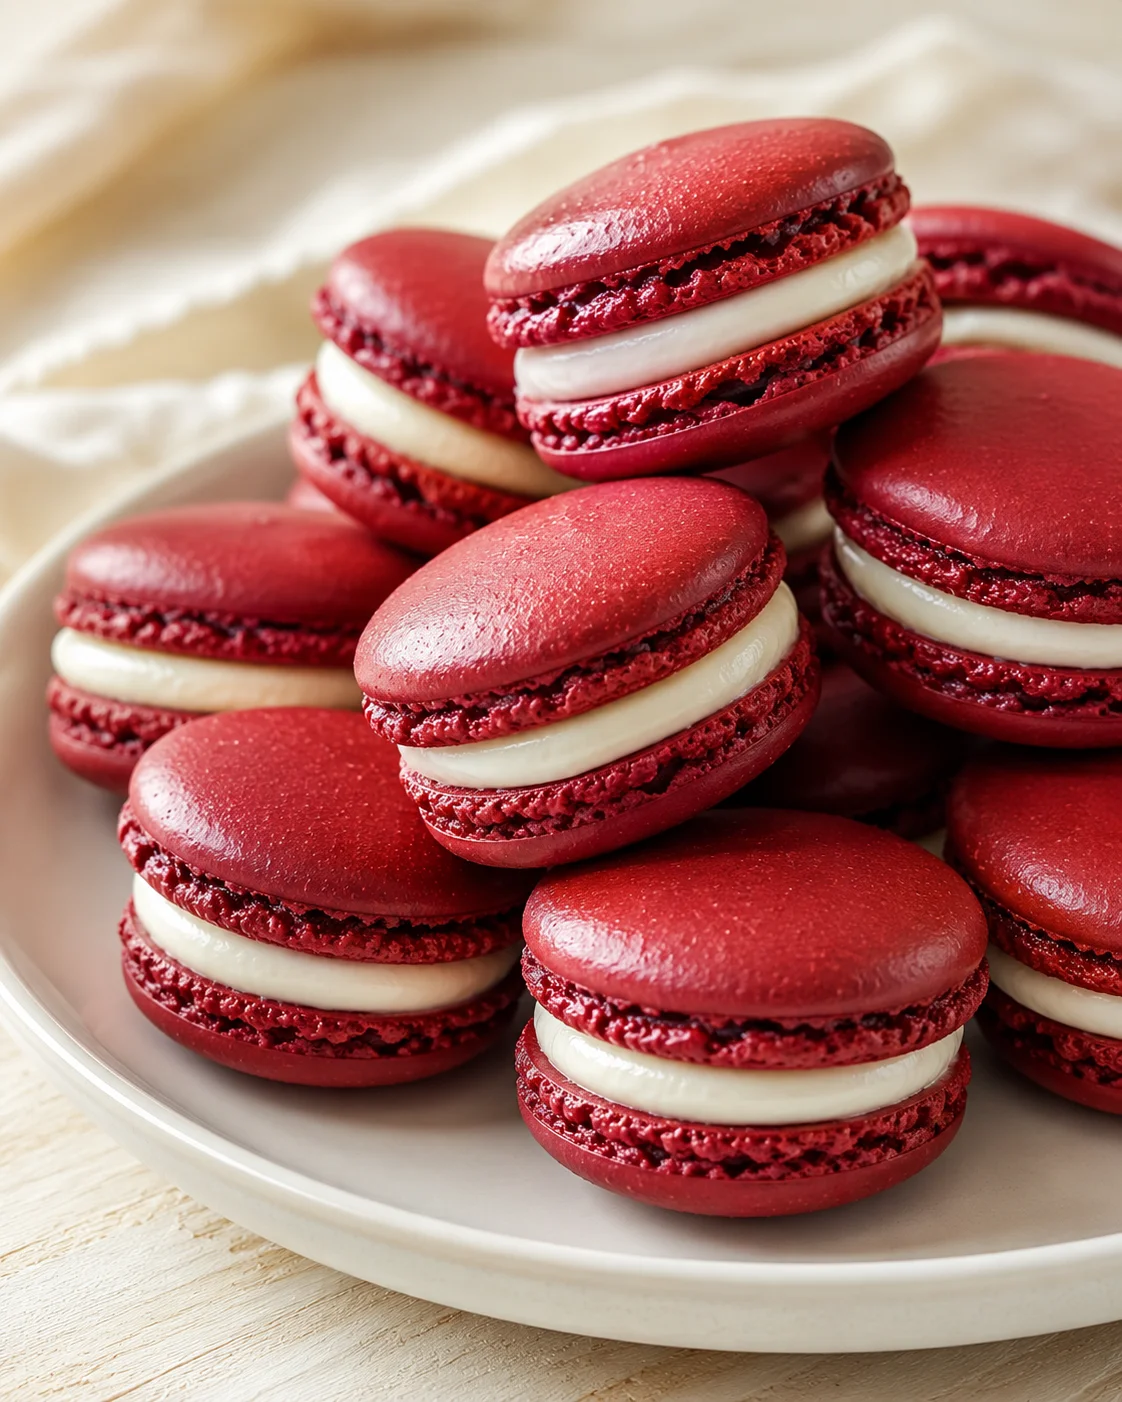
red velvet macarons with Cream Cheese Filling
Step into a world where simple baking meets elegant indulgence with these homemade Red Velvet Cake Macarons! These little gems combine a soft, chewy shell with a luscious cream cheese center that’s pure happiness in every bite. Whether you’re looking to brighten up a party or just treat your family to something special, these macarons bring a fun, fancy twist to the classic red velvet flavor. And the best part? They’re much easier to make than you’d expect. So, let’s roll up our sleeves and get ready to bake a batch of these charming, crowd-pleasing sweets!
Making Red Velvet Cake Macarons is more than just following a recipe—it’s a little adventure in your kitchen that rewards you with delicious results. The smooth, tender shells paired with a rich cream cheese filling create a luxurious aroma and taste that will have everyone asking for more. Whether it’s a treat for yourself after a hectic day or a show-stopping dessert for friends, these macarons capture that cozy, special feeling we all love. Ready to add some joy and creamy pleasure to your day? Let’s get started!
Notes
- Using properly aged egg whites really makes a difference in creating a stable meringue.
- Be patient with the resting step — the shells need to develop a skin to prevent cracking and ensure nice feet.
- For an extra special touch, melt some white chocolate and drizzle it over the shells once cooled.
- Prep Time: About 30 minutes
- Cook Time: Around 11 minutes
- Category: Dessert
- Method: Baking
- Cuisine: French-inspired
Nutrition
- Serving Size: 1 macaron
- Calories: 150
- Sugar: 10g
- Sodium: 50mg
- Fat: 7g
- Saturated Fat: 4g
- Unsaturated Fat: 2g
- Trans Fat: 0g
- Carbohydrates: 18g
- Fiber: 0g
- Protein: 2g
- Cholesterol: 25mg
Welcome! Today, I’m excited to share how you can transform the warm, comforting flavor of red velvet cake into delicate little red velvet macarons. These beauties pair tender, cocoa-flavored shells with a tangy cream cheese filling, creating a dessert that looks stunning but feels familiar and welcoming. Whether you want a thoughtful gift, a charming party treat, or a pick-me-up for yourself, these macarons fit the bill perfectly.
Through this recipe, I’ll guide you with step-by-step instructions, including prep and bake times (Prep Time: 30 minutes; Cook Time: 11 minutes) and practical tips for everything from prepping your tools to resting the batter at the right time. You’ll also find advice on making the filling, assembling, maturing, and storing your macarons. Plus, I’ll share useful troubleshooting hints, simple substitutions, and even some ideas on how to present your red velvet macarons like a pro. Let’s make baking fun and achievable, shall we?
- What to expect: a detailed ingredient list and clear, easy-to-follow instructions.
- Technique tips: aging egg whites for better volume, mastering proper piping, letting the macarons rest to get those signature feet, and maturing filled macarons for full flavor.
- Extras: ideas for variations, storing tips, and answers to your common questions about red velvet macarons.
Why These Are Worth Making
Do you ever crave a dessert that feels special but doesn’t require an entire day in the kitchen? These Red Velvet Cake Macarons are exactly that kind of treat! Prefer something fruitier? Try strawberry lemon macarons with Lemon Buttercream and Strawberry Jam for a bright, tangy spin. They pack all the rich, chocolatey goodness and subtle tang of cream cheese in petite, elegant bites that are as cute as they are tasty. Plus, this recipe is straightforward enough for busy home cooks. You get that wow factor with minimal hassle, which I know is a total win in any kitchen! For another fast red velvet fix, bake a batch of Easy Hershey’s Red Velvet Blossoms Cookies.
Ingredients You’ll Need
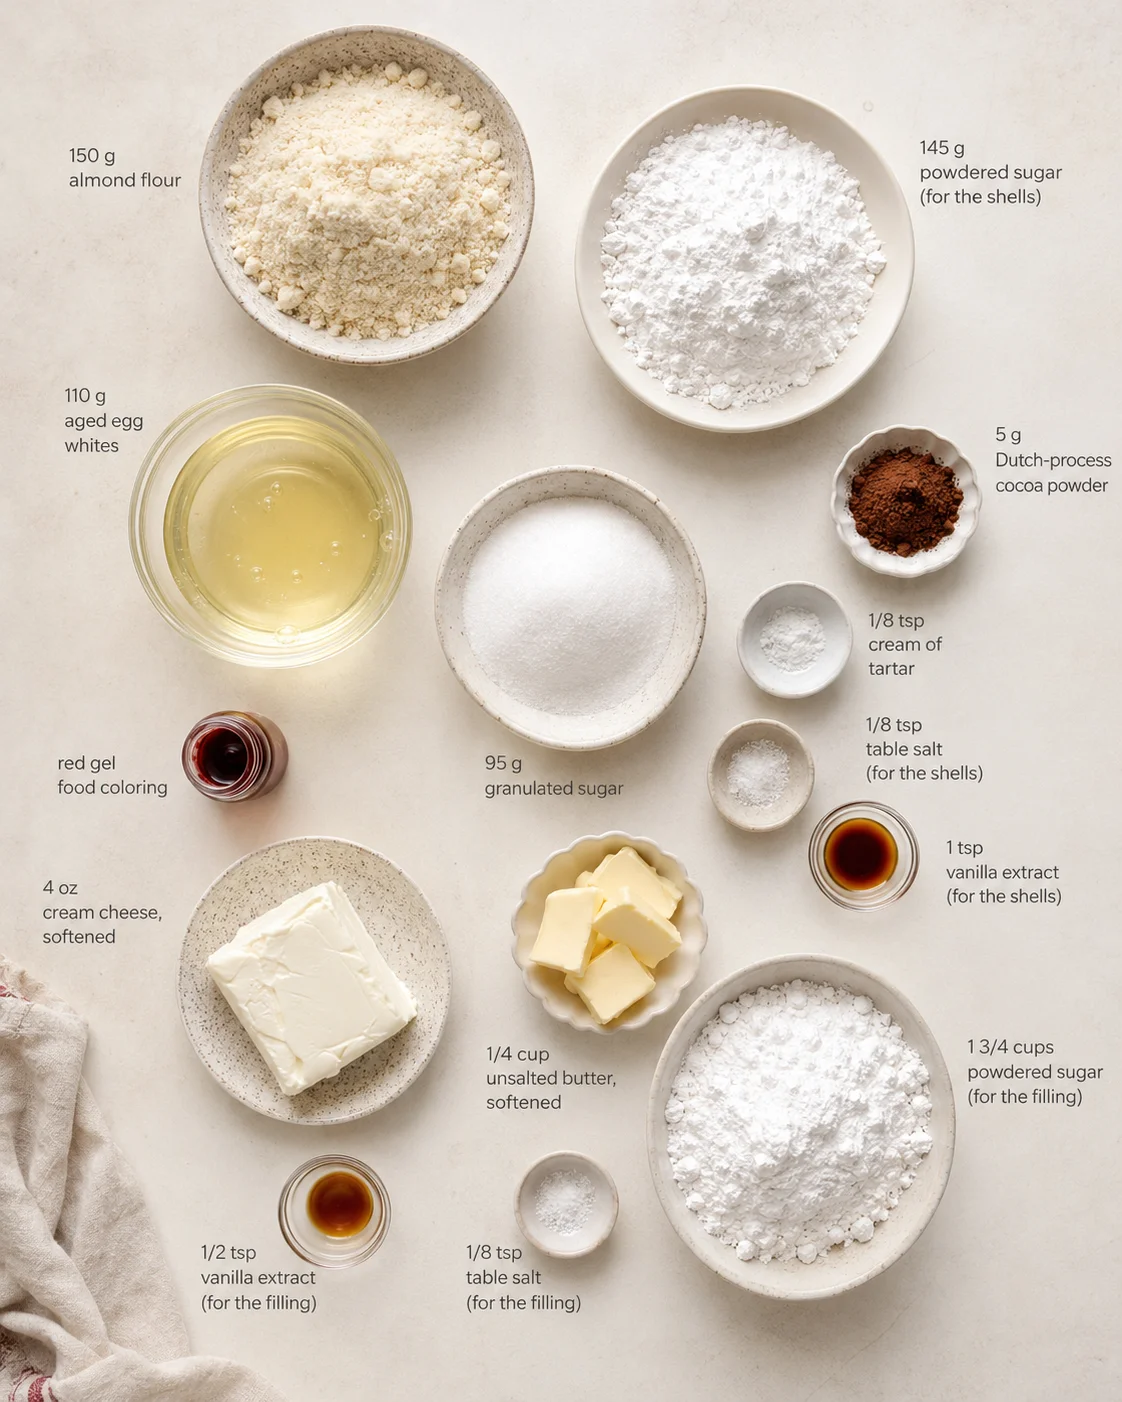
- 150 grams almond flour (about 1 ¼ cup)
- 145 grams powdered sugar (a little less than 1 ¼ cup)
- 5 grams Dutch-process cocoa powder (around 1 Tablespoon)
- 110 grams aged egg whites (roughly 3 eggs, or ½ cup)
- 95 grams granulated sugar (slightly less than ½ cup)
- ⅛ teaspoon cream of tartar (optional but helpful)
- ⅛ teaspoon table salt
- 1 teaspoon vanilla extract
- Red gel food coloring (for vibrant color)
- 4 oz cream cheese, softened
- ¼ cup unsalted butter, softened (4 Tablespoons)
- ½ teaspoon vanilla extract
- ⅛ teaspoon table salt
- 1 ¾ cups powdered sugar
Make the Shells and Filling
- Clean and dry all bowls, utensils, and baking sheets; line baking sheets with parchment paper or silicone mats.
- Sift almond flour, powdered sugar, and Dutch-process cocoa powder together.
- Whip aged egg whites until foamy.
- Add cream of tartar if using and continue whipping.
- Gradually add granulated sugar while whipping until stiff, glossy peaks form.
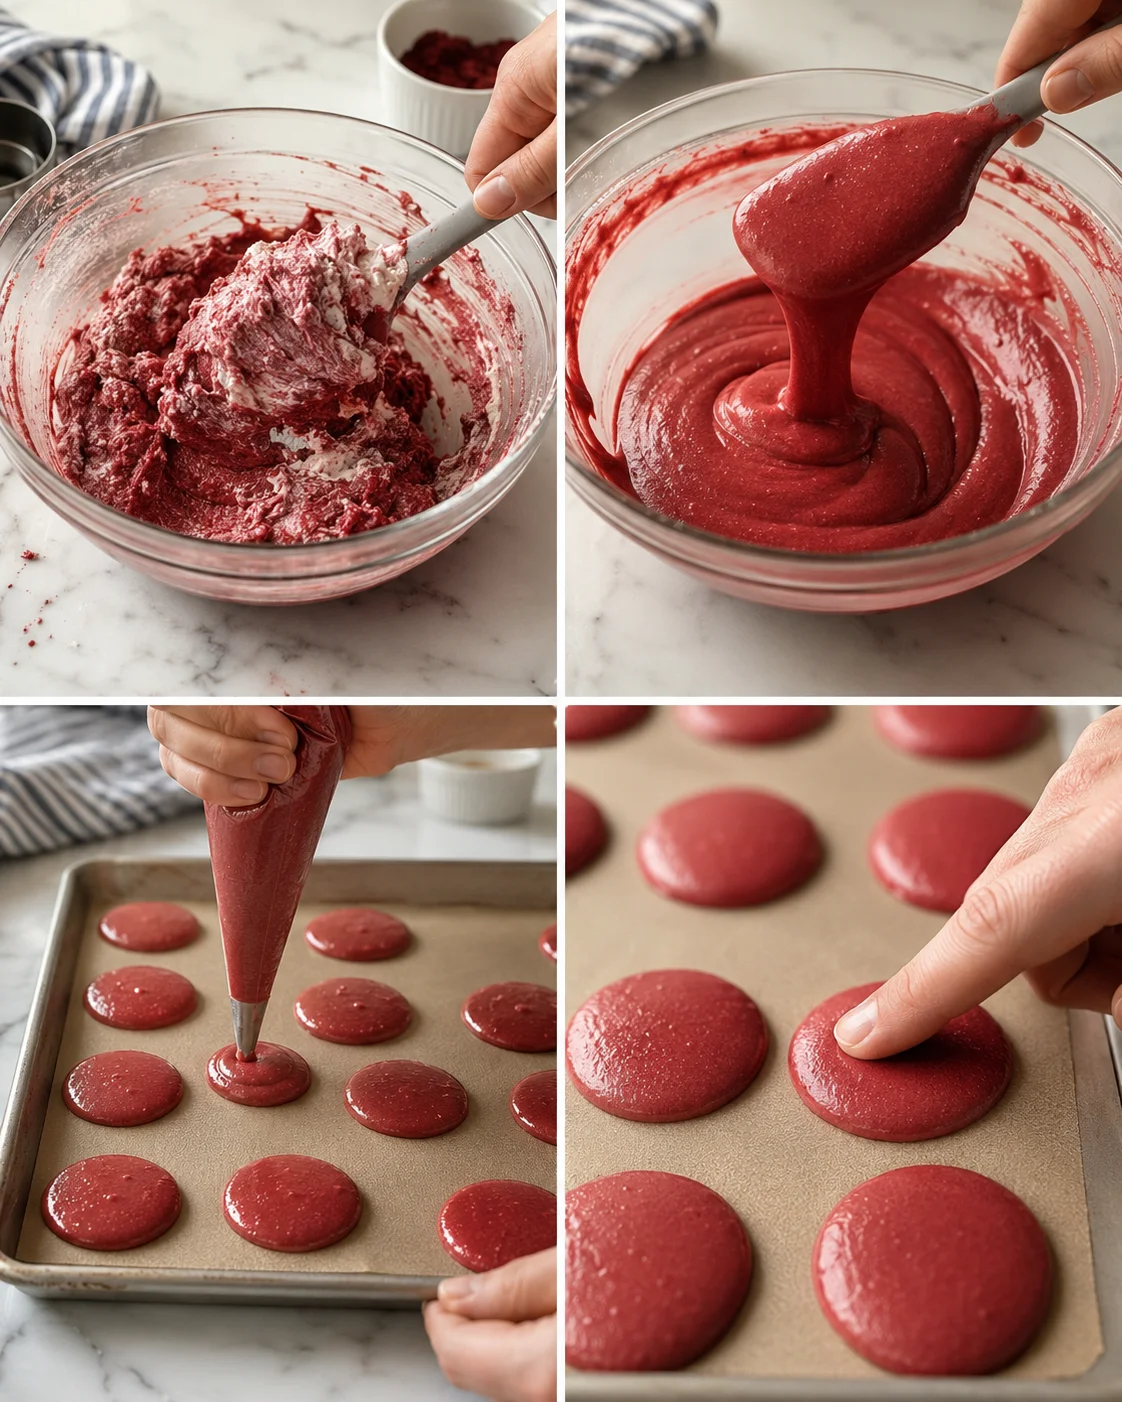
- Stir in vanilla extract, table salt, and red gel food coloring until evenly combined.
- Gently fold the dry ingredients into the meringue in three additions until the batter falls in thick ribbons.
- Transfer batter to a piping bag and pipe 1½-inch circles about 2 inches apart onto the prepared sheets.
- Tap the baking sheets firmly on the counter several times to release air bubbles.
-
Let the piped shells rest at room temperature until the tops are dry to the touch.
- Preheat oven to 325°F (160°C) and bake one tray at a time for 10–11 minutes until tops are smooth and uncracked.
- Cool the shells completely on the baking sheet before handling.
- Beat softened cream cheese and butter until smooth, then add vanilla and salt and gradually beat in powdered sugar until spreadable.
- Pipe filling onto one shell, sandwich with another, and press gently to adhere.
- Chill assembled macarons in the refrigerator for 24 hours to let flavors meld and texture improve.
Pro Tips for Flawless Results
- Always use aged egg whites for a strong, stable meringue that creates perfect shells.
- Measuring ingredients by weight is a game changer — precision matters when making macarons!
- Don’t skip or rush the resting step. It’s essential to get those classic macaron feet and smooth tops.
- Invest in a quality piping bag to get evenly sized and shaped macarons easily.
- Feel free to experiment with colors or even alternate fillings to make these red velvet macarons your own creative project—for inspiration, try peach macarons with fresh peaches and cream.
- If you don’t have a piping bag handy, a sturdy zip-top bag with a corner snipped can work well in a pinch.
- You can use either parchment paper or silicone baking mats — both keep your macarons from sticking.
- Use clean, dry mixing bowls — any lingering moisture can mess with your meringue.
- A hand mixer works fine if you don’t have an electric one, but electric beaters save significant time and effort.
- A food scale helps keep measurements exact and consistent, especially useful for beginners.
- Pair these macarons with a cup of rich coffee or a creamy latte to balance the sweetness.
- They’re fantastic served next to scoops of vanilla ice cream for an extra special treat.
- Arrange on a pretty cake stand or dessert tray to impress guests or family.
- For a pop of color, add fresh berries on the side or as a garnish.
- Drizzle melted chocolate on top of cooled macarons for extra indulgence—or go all in with dark chocolate raspberry macarons, if you like!
Flavor Swaps and Substitutions
- Cocoa-Free Version: Simply replace the cocoa powder with extra almond flour to keep your red velvet macarons bright and nutty without any chocolate.
- Nut-Free Adaptation: If nuts are off the table, sunflower seed flour is a handy substitute. It keeps the texture and flavor lovely without the almonds.
- Vegan Twist: Swap egg whites for aquafaba (the liquid from a can of chickpeas) and use vegan cream cheese in the filling. You’ll still get that creamy, dreamy bite, vegan-style!
- Chocolate Drizzle: For chocolate fans, drizzle melted dark or white chocolate on your macarons after they cool. Or, for a tropical twist, try coconut macarons with white chocolate coconut ganache.
- Spiced Red Velvet: Add a pinch of cinnamon or nutmeg to the batter to give your red velvet macarons a unique, cozy twist that pairs beautifully with the cream cheese filling.
Storage and Serving Advice
Keeping your red velvet cake macarons fresh and tasty is easier than you think! After assembling, store your macarons in a single layer or separated with parchment paper inside an airtight container in the fridge. They’ll stay perfect for up to one week. Before serving, take them out and let them warm to room temperature for about 20–30 minutes so the filling softens and the shells are just right—no one likes a cold, hard macaron!
- Short-term storage (unfilled shells): You can keep cooled, unfilled shells in an airtight container at room temperature for up to two days—just avoid humidity and sunlight to maintain their texture.
- In the fridge (assembled): Once filled, your macarons do best chilled for up to a week. Use parchment layers if stacking, and seal tightly to prevent fridge smells from sneaking in.
- Freezing (longer term): For extra storage, freeze shells or assembled macarons by placing them in a single layer on a tray until firm. Then move to airtight, freezer-safe containers or bags. They’ll keep great for up to a month.
Thawing and serving tips: Defrost frozen macarons overnight in the fridge, then bring them to room temperature for about half an hour before enjoying. Avoid reheating in the microwave, which can ruin the texture and filling. For a complementary bite on a chilled dessert tray, serve them alongside White Chocolate Strawberry Truffles.
- Make-ahead tips: You can bake shells up to two days before assembly and keep them at room temperature or in the freezer. Prepare cream cheese filling ahead and keep refrigerated for up to three days or freeze. For the best taste and texture, assemble and chill your macarons for a full 24 hours before serving. If you’re building a cookie box, they pair beautifully with Buttery Lemon Sandwich Cookies with Tangy Lemon Curd.
- Handling advice: Always store macarons in a single layer or with parchment paper between stacks to avoid any smearing or breakage, and keep containers tightly closed to lock in freshness and smells.
Troubleshooting and FAQs
Can I make Red Velvet Cake Macarons ahead of time?
Definitely! In fact, letting them rest in the fridge for 24 hours before serving really amps up the flavor and mouthfeel. Once filled, store them airtight in the fridge for up to a week. Just remember to bring to room temperature before serving for the best experience.
What should I do if my macarons crack while baking?
Cracks are usually a sign of oven temperature that’s too high or insufficient resting time. Make sure your oven thermometer is accurate, and try lowering the heat slightly if cracks appear. Don’t rush the resting step—letting a smooth skin form helps avoid unsightly cracks during baking.
Is liquid food coloring okay instead of gel?
You can use liquid food coloring, but gel is definitely preferred as it gives stronger color without thinning your batter. Gel keeps your red velvet macarons looking bold and vibrant.
Why do I need aged egg whites?
Aged egg whites lose some moisture over time, which means they whip up better and hold their shape longer. This leads to a more stable meringue and those lovely puffed-up shells with perfect feet.
Can I swap out the cream cheese in the filling?
Of course! Mascarpone or Greek yogurt make great substitutions if you want a lighter or slightly different flavor. You can also tuck a tiny dot of homemade cherry pie filling into the center for a fruity contrast that pairs beautifully with red velvet. Just know they will change the taste a bit, but your red velvet macarons will still be delicious.
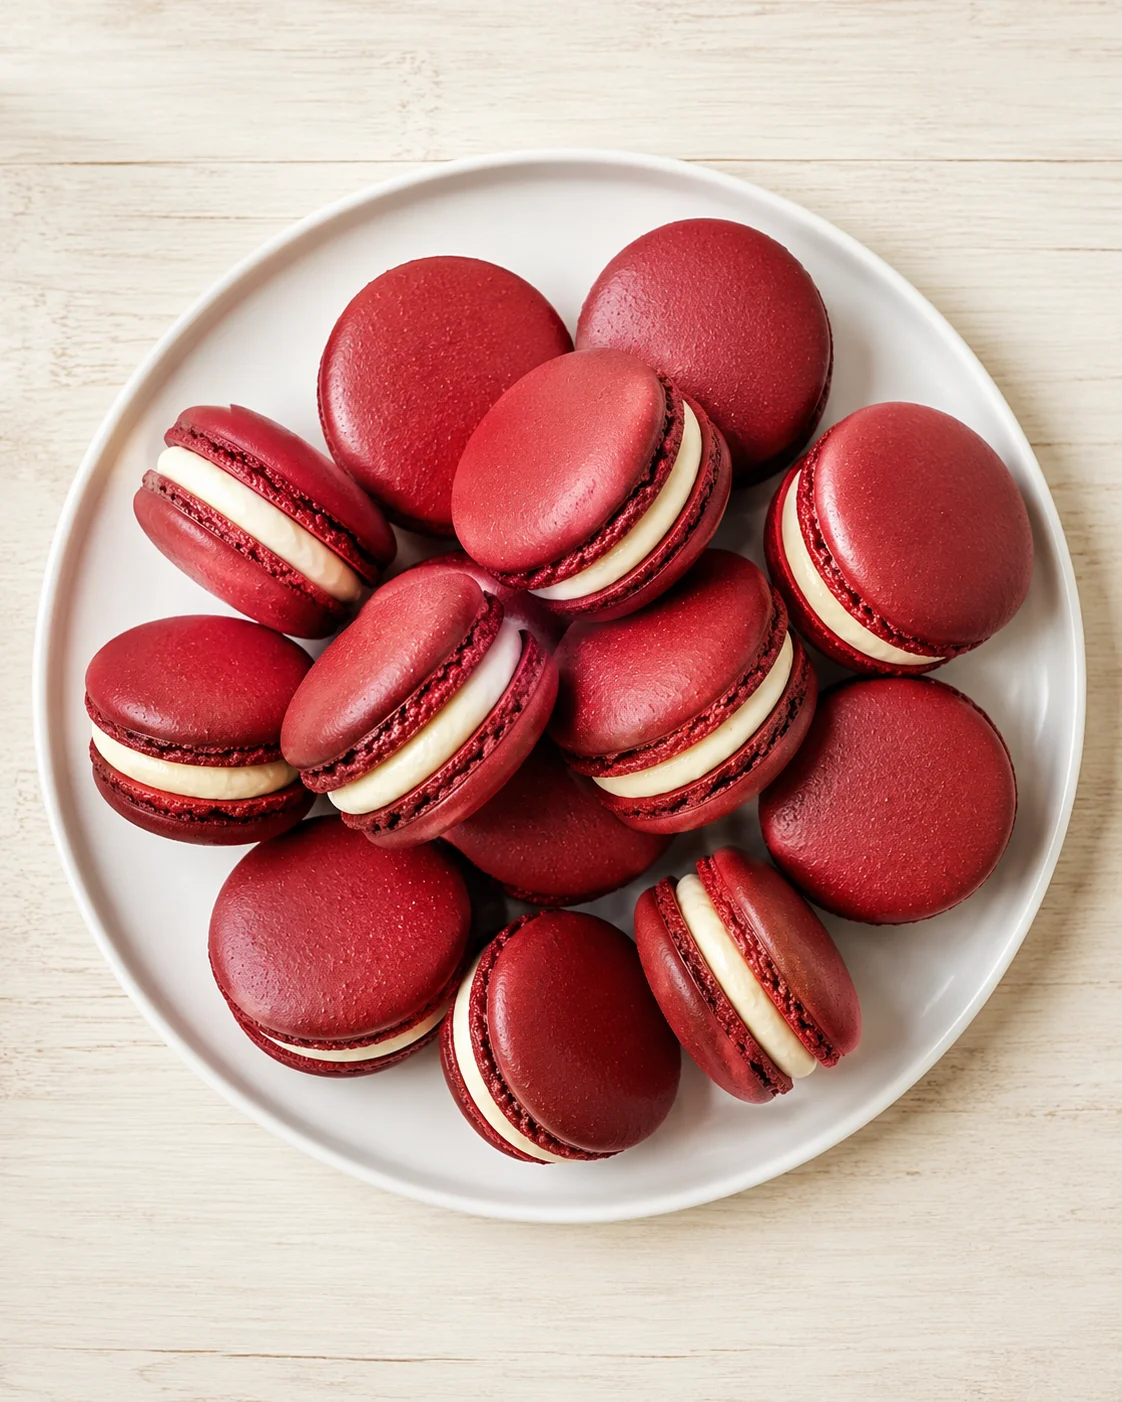
Elegant, delicate red velvet macarons featuring smooth cocoa-flavored shells paired with a luscious cream cheese filling. Perfect for special occasions or a fancy treat at home, with a rich flavor and chewy texture.
- Total Time: 41 minutes (excluding chilling time)
- Yield: Approximately 20-24 macarons 1x
Ingredients
- 150 grams almond flour (about 1 ¼ cup)
- 145 grams powdered sugar (a little less than 1 ¼ cup)
- 5 grams Dutch-process cocoa powder (around 1 Tablespoon)
- 110 grams aged egg whites (roughly 3 eggs, or ½ cup)
- 95 grams granulated sugar (slightly less than ½ cup)
- ⅛ teaspoon cream of tartar (optional but helpful)
- ⅛ teaspoon table salt
- 1 teaspoon vanilla extract
- Red gel food coloring (for vibrant color)
- 4 oz cream cheese, softened
- ¼ cup unsalted butter, softened (4 Tablespoons)
- ½ teaspoon vanilla extract
- ⅛ teaspoon table salt
- 1 ¾ cups powdered sugar
Instructions
- Clean and dry all bowls, utensils, and baking sheets thoroughly; line baking sheets with parchment paper or silicone mats.
- Sift almond flour, powdered sugar, and Dutch-process cocoa powder together to remove lumps.
- Whip aged egg whites until foamy.
- Add cream of tartar if using and continue whipping.
- Gradually add granulated sugar while whipping until stiff, glossy peaks form.
- Stir in vanilla extract, table salt, and red gel food coloring until evenly combined.
- Gently fold the dry ingredients into the meringue in three additions until batter falls in thick ribbons when lifted with a spatula.
- Transfer batter to a piping bag and pipe 1½-inch circles about 2 inches apart onto prepared sheets.
- Tap baking sheets firmly on the counter several times to release air bubbles.
- Let piped shells rest at room temperature until tops are dry to the touch to develop a skin.
- Preheat oven to 325°F (160°C) and bake one tray at a time for 10 to 11 minutes until tops are smooth and uncracked.
- Cool the shells completely on the baking sheet before handling.
- Make the cream cheese filling by beating softened cream cheese and butter until smooth; add vanilla and salt, then gradually beat in powdered sugar until silky and spreadable.
- Pipe filling onto one shell, sandwich with another, and press gently to adhere.
- Chill assembled macarons in the refrigerator for 24 hours to let flavors meld and improve texture.
Notes
Using properly aged egg whites helps create a stable meringue and better shells., Be patient with the resting step to develop the skin on shells, which prevents cracking and ensures macarons develop feet., For extra flair, drizzle melted white or dark chocolate over cooled macarons., Measure ingredients precisely by weight for best macaron results., Use clean, dry mixing bowls to avoid adding moisture which can affect meringue., Piping bag quality affects macaron size and shape uniformity., Macarons pair well with coffee or vanilla ice cream and can be garnished with fresh berries.
- Prep Time: 30 minutes
- Cook Time: 11 minutes
- Category: Dessert
- Cuisine: French-inspired
Nutrition
- Serving Size: 1 macaron
- Calories: 150 per macaron
- Fat: 7g per macaron
- Carbohydrates: 18g per macaron
- Protein: 2g per macaron