Mint Chocolate Kiss Blossom Cookies
These Mint Chocolate Kiss Blossom Cookies are seriously the cutest treats for Christmas, and they taste absolutely divine! If you love the combo of mint and chocolate, you’re going to be head over heels for these soft, melt-in-your-mouth cookies crowned with a classic Hershey’s kiss.

Seriously, have you ever seen a cuter Christmas cookie? I’m completely smitten with these!
I had been dreaming about making these Mint Chocolate Kiss Blossom Cookies for a while, so when I finally made a batch for my kid’s class, they were a total hit! Imagine sitting in algebra class with cookies instead of graphing inequalities – I’d be in love too!

At first, I had big dreams for these cookies, thinking they’d be absolutely perfect. But my very first batch? Yeah, they turned out gorgeous but dry — dry enough to crumble in your mouth! Plus, they tasted way too much like toothpaste. Definitely not the minty dream I imagined.
Then I tried another recipe that came out too flat and pancake-like. Not exactly Instagram-worthy!
I refused to give up because these cookies had to be perfect. Thankfully, after a few more tries, I nailed it — and the third batch was the charm!

Now they’re perfectly puffy, fabulously minty, and honestly just beautiful. These cookies are total holiday magic!

Why should I use real butter in baking?
One thing that makes these cookies so tender and delightful is the powdered sugar. It gives the cookies a wonderful texture — kind of between shortbread and a classic cookie — which is what melts them right on your tongue.
But the real secret to these cookies? Real, honest-to-goodness butter. I’m a total dairy fan and firmly believe that nothing beats baking with real butter. Here’s why:
- The ingredient list on a stick of butter is super simple: just cream. If it’s salted butter, you get cream and salt. No mystery ingredients—just pure milk goodness that you can trust in your food.
- Butter alternatives often have less fat and more water, which can throw off the texture and consistency of your cookies. If you want that perfect bite, real butter is the way to go every time.
- And let’s be honest, nothing beats the rich, creamy flavor of real butter. It’s the best! No other product can match that buttery taste that makes your baking so special.

Can I omit food coloring in cookies?
I remember when I was in high school, my mom took me to a modest restaurant. The waitress asked if I wanted butter or margarine. My mom only bought real butter once a year at Christmas to make her special pastries, so mom steered me to real butter despite my hesitation. I had never tasted it before and wasn’t very adventurous back then. But after that, I fell in love and haven’t bought margarine since!
Butter is truly where it’s at. Trust me, once you go real butter, you won’t look back!
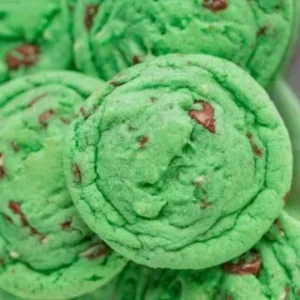
Now about that gorgeous green color: start with just a few drops of green food coloring and add more little by little until you get the shade you love. It’s easy to add more but impossible to take it out! If you’re not a fan of food coloring, no worries at all — just skip it and enjoy the exact same delicious flavor. The cookies won’t be green, but they’ll still be amazing.

If you want to add a little sparkle, you can roll your dough balls in granulated sugar before baking. It adds such a nice texture and pretty sparkle to your cookies. But if you’re after simple and quick, feel free to skip that step!
By the way, some of the photos here are from my very first round of cookies — there are some pretty cracks on those — which, while kind of charming, didn’t taste great. The non-cracked, smooth cookies you see come from the recipe I’m sharing below. Just be sure not to overbake, and your cookies will come out looking perfect.

When should I add a chocolate kiss to blossom cookies?
I love digging into baking details like this, so here’s the scoop to save you some research time!
Once your cookies come out of the oven, let them rest on the baking sheet for about 1 to 2 minutes. Then, gently press a chocolate kiss into the center of each cookie. The kiss will soften a bit but won’t lose its shape if you don’t touch it too much. After adding the kisses, move the cookies onto a wire rack to cool completely.
If you add the kiss too soon, it can melt and get messy. But if you wait too long, the cookies get firm and may crack when you try to press the kiss in. Timing is everything!

Cookies and milk are always good snacks!
It’s getting chilly and dark here on the dairy farm, and whenever my boys come inside after working outside, they are always ravenous! I think their bodies burn extra calories staying warm in the cold because I can’t seem to keep them full no matter what!
My boys might as well be cookie experts, and they swear by a glass of ice-cold milk with these cookies – or really, any of my cookie recipes. Their favorites include The Best Chocolate Snickerdoodles, Coconut Cream Cookies, Mint Chip Sugar Cookies, No-Bake Caramel Cookies, and if you haven’t yet, you absolutely have to try my Christmas Sugar Cookie Bars. Milk and cookies are just a timeless combo that never goes out of style!

Soft and melt-in-your-mouth Mint Chocolate Kiss Blossom Cookies perfect for Christmas, featuring a tender texture with a delightful mint and chocolate combo, crowned with a classic Hershey’s kiss.
- Total Time: 26 mins
- Yield: 24 cookies 1x
Ingredients
- 10 Tablespoons butter, room temperature
- 1 cup powdered sugar
- 1 whole egg
- 1 egg yolk
- 1 teaspoon peppermint extract (use less for a milder mint flavor)
- 6–12 drops green food coloring
- 2 cups all-purpose flour
- 3/4 teaspoon baking powder
- 1/4 teaspoon Kosher salt
- 24 chocolate kisses
Instructions
- Preheat your oven to 350°F and line a baking sheet with parchment paper, a silicone mat, or spray it with nonstick baking spray.
- Cream together the butter and powdered sugar until light and fluffy.
- Add the whole egg, egg yolk, peppermint extract, and 6 drops of green food coloring. Mix until smooth, adding more food coloring a few drops at a time until reaching the desired green shade.
- Mix in the flour, baking powder, and Kosher salt until just combined.
- Roll the dough into 1-inch balls and place them spaced apart onto the prepared baking sheet.
- Bake the cookies for 7 to 9 minutes (8 minutes is ideal) to achieve soft, not dry cookies.
- Remove the cookies from the oven and let them rest on the baking sheet for about 2 minutes.
- Gently press a chocolate kiss into the center of each cookie.
- Transfer the cookies to a wire rack to cool completely.
Notes
Optionally, roll the dough balls in granulated sugar before baking for a sparkle and added texture., Watch baking times carefully; underbaking slightly is better than overbaking to keep cookies soft and tender., If you prefer not to use food coloring, you can omit it; the flavor remains delicious though the cookies won’t be green., Add the chocolate kiss after a slight cooling period to avoid melting or cracking the cookies.
- Prep Time: 10 mins
- Cook Time: 16 mins
- Category: Dessert
- Cuisine: American
Nutrition
- Serving Size: 1 cookie
- Calories: 125 kcal
- Fat: 6 g
- Carbohydrates: 16 g
- Protein: 2 g