Cheesy Taco Sticks – The Ultimate Party Snack
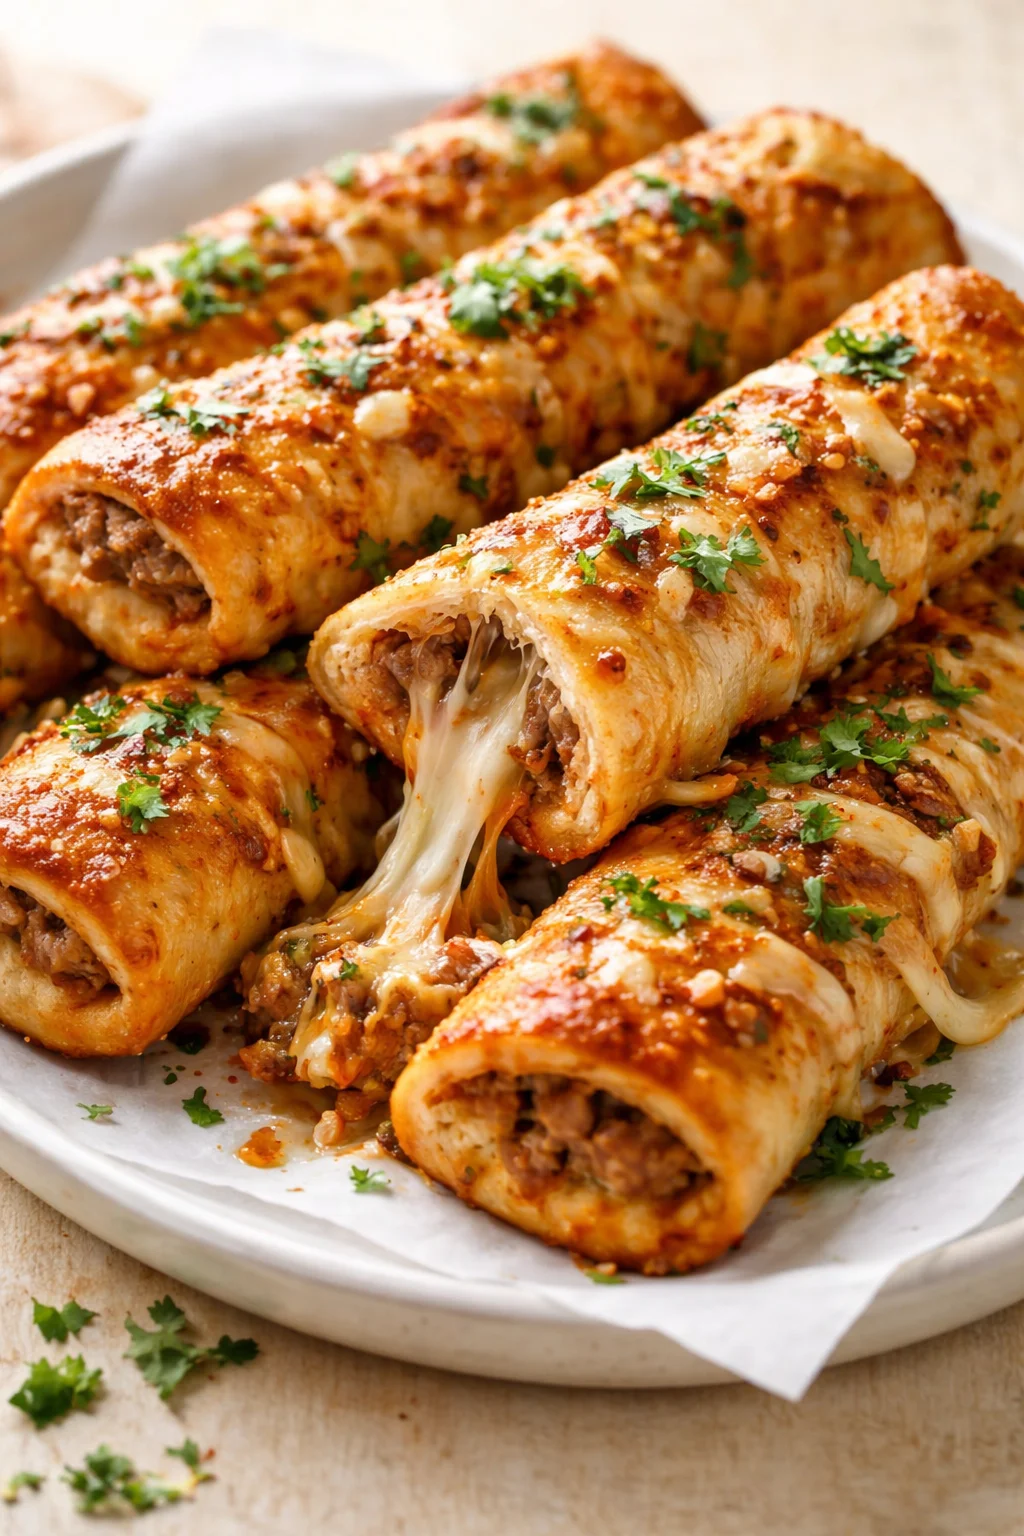
At their heart, cheesy taco sticks are breadsticks filled with seasoned taco meat and lots of melty cheese, baked until they turn golden and crispy. Think of them as a fun mashup of tacos, pizza rolls, and cheesy breadsticks—all those tasty flavors you know and love wrapped up in a neat, handheld snack.
Unlike traditional tacos that can get messy fast, taco sticks are tidy and super portable. The dough seals everything inside, keeping the cheesy filling intact while giving you that satisfying crunch on the outside. They’ve really taken off lately, popping up all over social media as the perfect game-day treat or easy family dinner.
Kids can’t get enough of them because they’re like comfort food made bite-sized and fun, and adults love how easy they are to customize. It’s no surprise these sticks have become a go-to favorite in kitchens everywhere—simple to make but bursting with flavor every single time.
Cheesy taco sticks aren’t your classic cultural dish. They’re a modern mashup snack that mixes bold Mexican-inspired flavors with good old-fashioned American comfort food. They’re not about authenticity; they’re all about kitchen creativity and delicious fun.
Their story is easy to follow: tacos became taco pizza, taco pizza inspired stuffed breads, and then someone had the brilliant idea to stuff taco meat and cheese inside breadsticks. The end result? An easy, delicious snack that fits perfectly into today’s fast-paced snack love.
Cheesy taco sticks shine in busy family kitchens where quick, flavorful meals matter most. They’re also a hit for casual entertaining—easy to make in batches, fun to eat, and familiar enough to please picky eaters. Thanks to viral foodies and recipe bloggers, there are now tons of creative twists, making these golden treats even more popular.
Equipment
- Skillet to brown the meat
- Baking sheet or pizza stone
- Parchment paper
- Pastry brush for buttery garlic topping
- Sharp knife or pizza cutter
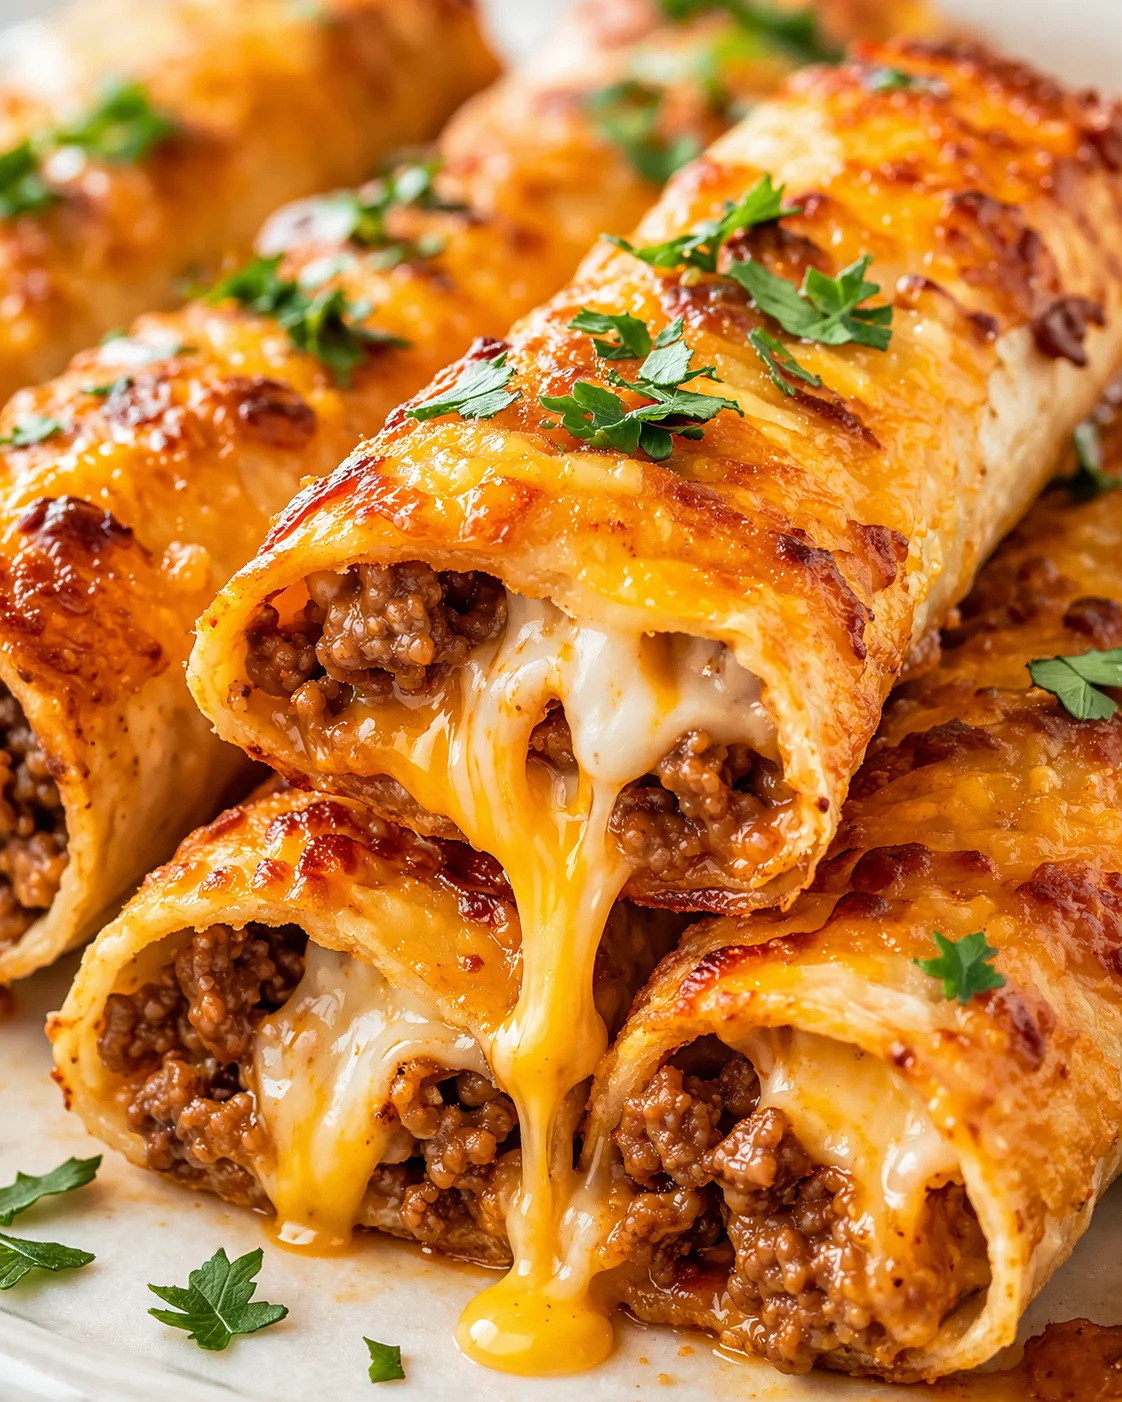
Cheesy taco sticks are the perfect handheld comfort food—soft bread or pizza dough wrapped around seasoned taco meat and gooey melted cheese, baked until golden and flaky. They combine the best of tacos, pizza rolls, and cheesy breadsticks in one easy-to-eat snack. These sticks are ideal for game nights, parties, quick dinners, or even packed lunches. This recipe makes about 8 servings (around 2–3 sticks per person) and takes roughly 35 minutes from start to finish (20 minutes prep and 15 minutes baking).
Keep reading and you’ll get everything you need to make these confidently at home:
- The best ingredients and simple tools to bring it all together (think pizza dough, your choice of ground meat or vegetarian options, and delicious cheese combos).
- Easy-to-follow steps for cooking the filling, putting the sticks together, and baking them to golden perfection.
- My top tips to stop soggy dough, prevent filling leaks, and ensure even baking—plus a quick tip for a test bake.
- Fun flavor variations, how to prep ahead and freeze, plus secrets for reheating while keeping them crispy.
- Answers to common questions so you can tweak ingredients, adjust seasonings, and store leftovers like a pro.
No matter if you follow the recipe exactly or use it as a base for your own creative mix-ins and spices, you’ll be whipping up gooey, crowd-pleasing cheesy taco sticks every time.
Why You’ll Crave These
Picture biting into a warm, golden-brown breadstick that reveals stretchy melted cheese and perfectly seasoned taco beef inside. That’s the magic of cheesy taco sticks—a delicious fusion snack that mixes comforting flavors with bold, crave-worthy taste.
These hand-held gems check all the snack boxes: crispy crust, cheesy center, savory filling, and endless ways to customize. Kids love them because they’re bite-sized fun, they’re guaranteed party pleasers, and they freeze beautifully for busy nights when you need dinner fast.
What truly makes cheesy taco sticks stand out is their adaptability. Make a big batch and stash extras in the freezer, swap in your favorite veggies or cheeses, or serve with a lineup of tasty dips for a winning snack spread.
In this guide, I’ll take you through everything—from where these sticks came from, to what flavors shine best, to step-by-step instructions that guarantee a golden, cheesy success in your kitchen. Whether you’re new or looking to improve your version, these sticky, cheesy bites will quickly become a staple.
What makes these cheesy taco sticks so irresistible is the perfect balance of textures and flavors packed into every delicious bite.
- Crunchy exterior: The bread bakes up nice and golden, giving that perfect crisp to contrast soft filling.
- Cheesy interior: Mozzarella gets you that ooey-gooey stretch, while cheddar adds a sharp, flavorful kick.
- Savory filling: The taco-seasoned beef brings smoky, zesty flavors with spices like cumin, chili powder, and paprika, making every bite bold and satisfying.
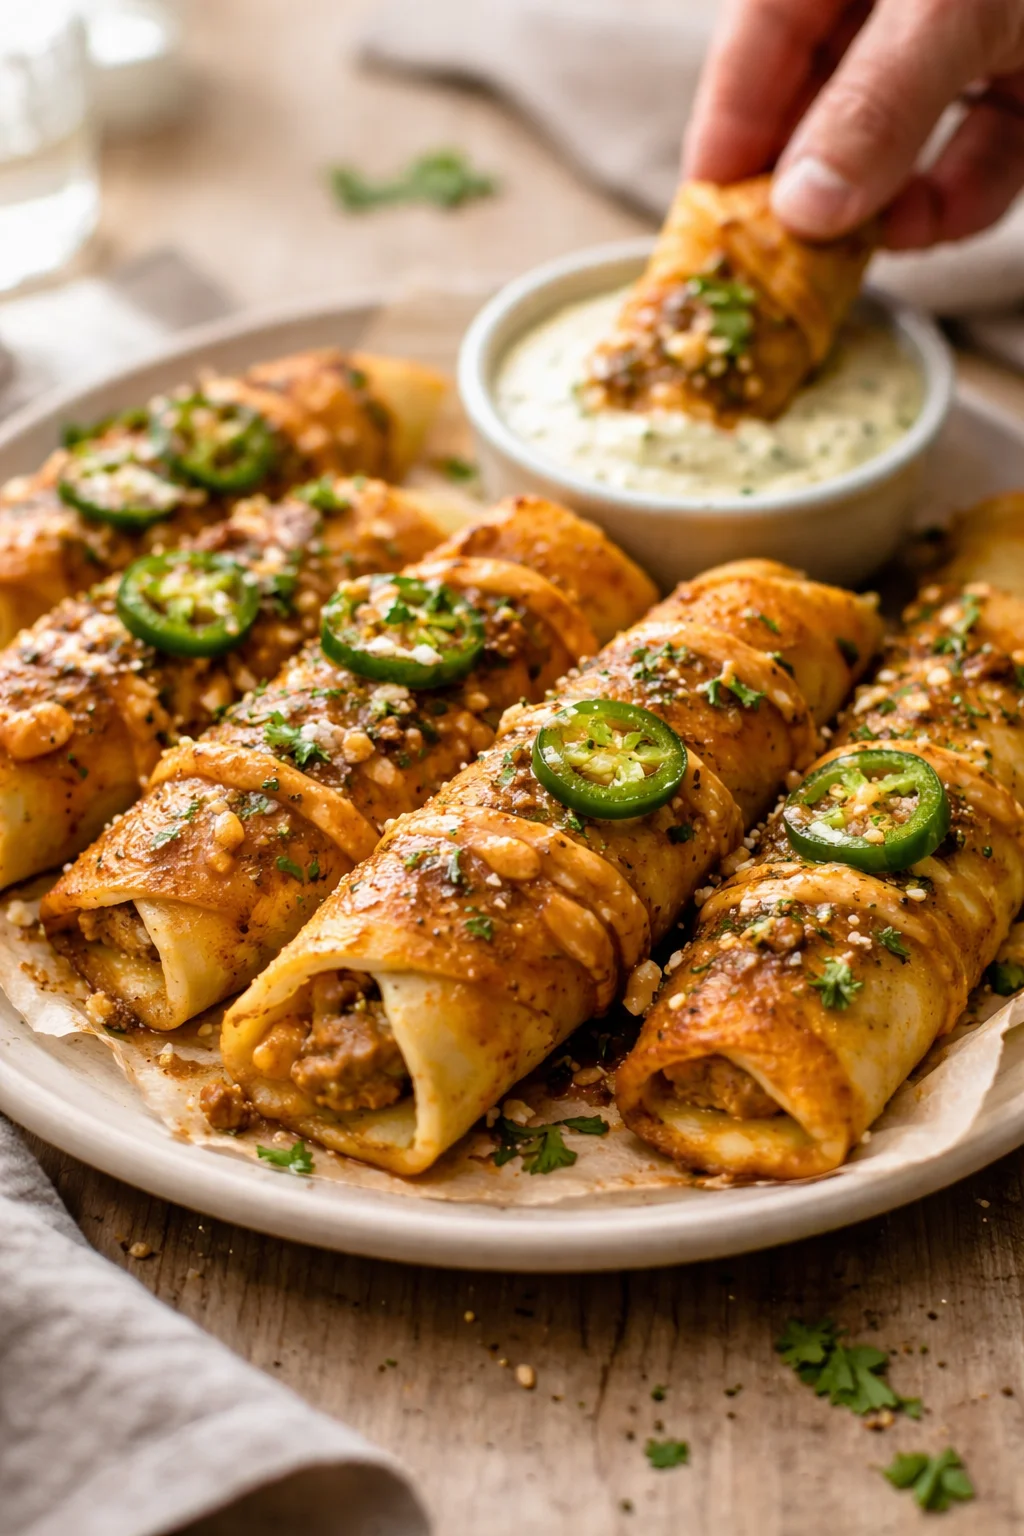
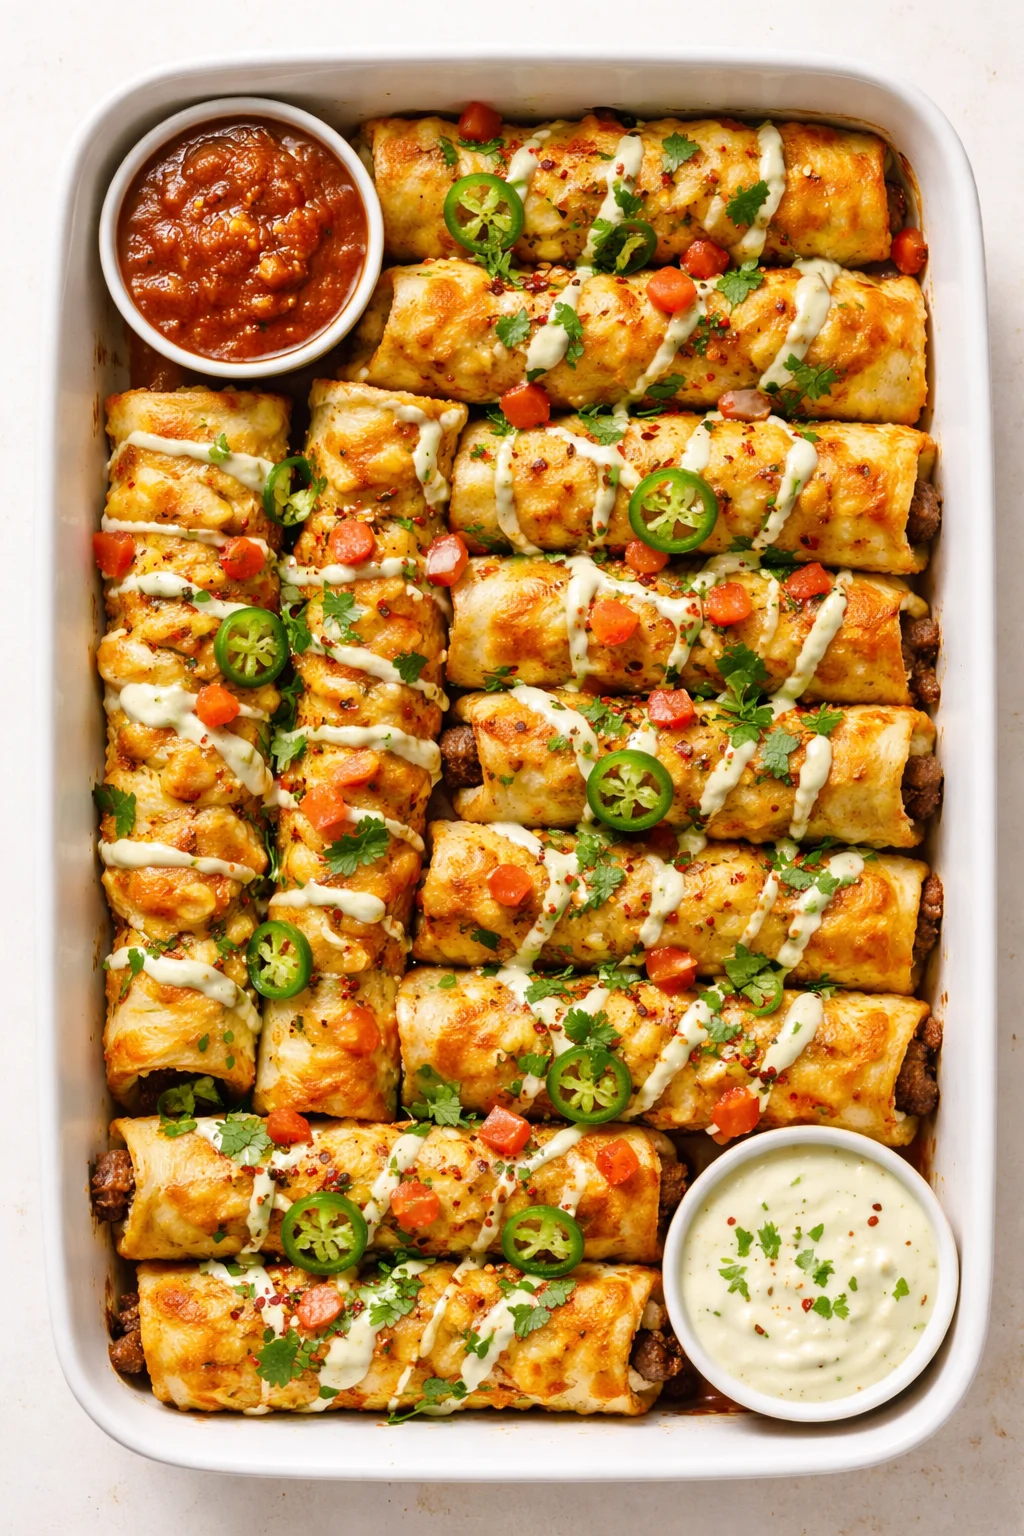
All together, these layers create a snack that feels cozy yet exciting. A buttery brush on top adds richness, and optional extras like jalapeños or olives let you play with the flavor to suit your mood.
It’s this perfect team of crunchy, cheesy, and savory that makes cheesy taco sticks more than just a snack – they’re downright addictive. One taste and you’ll see why they’ve become a family favorite everywhere.
Ingredients and Best Substitutions
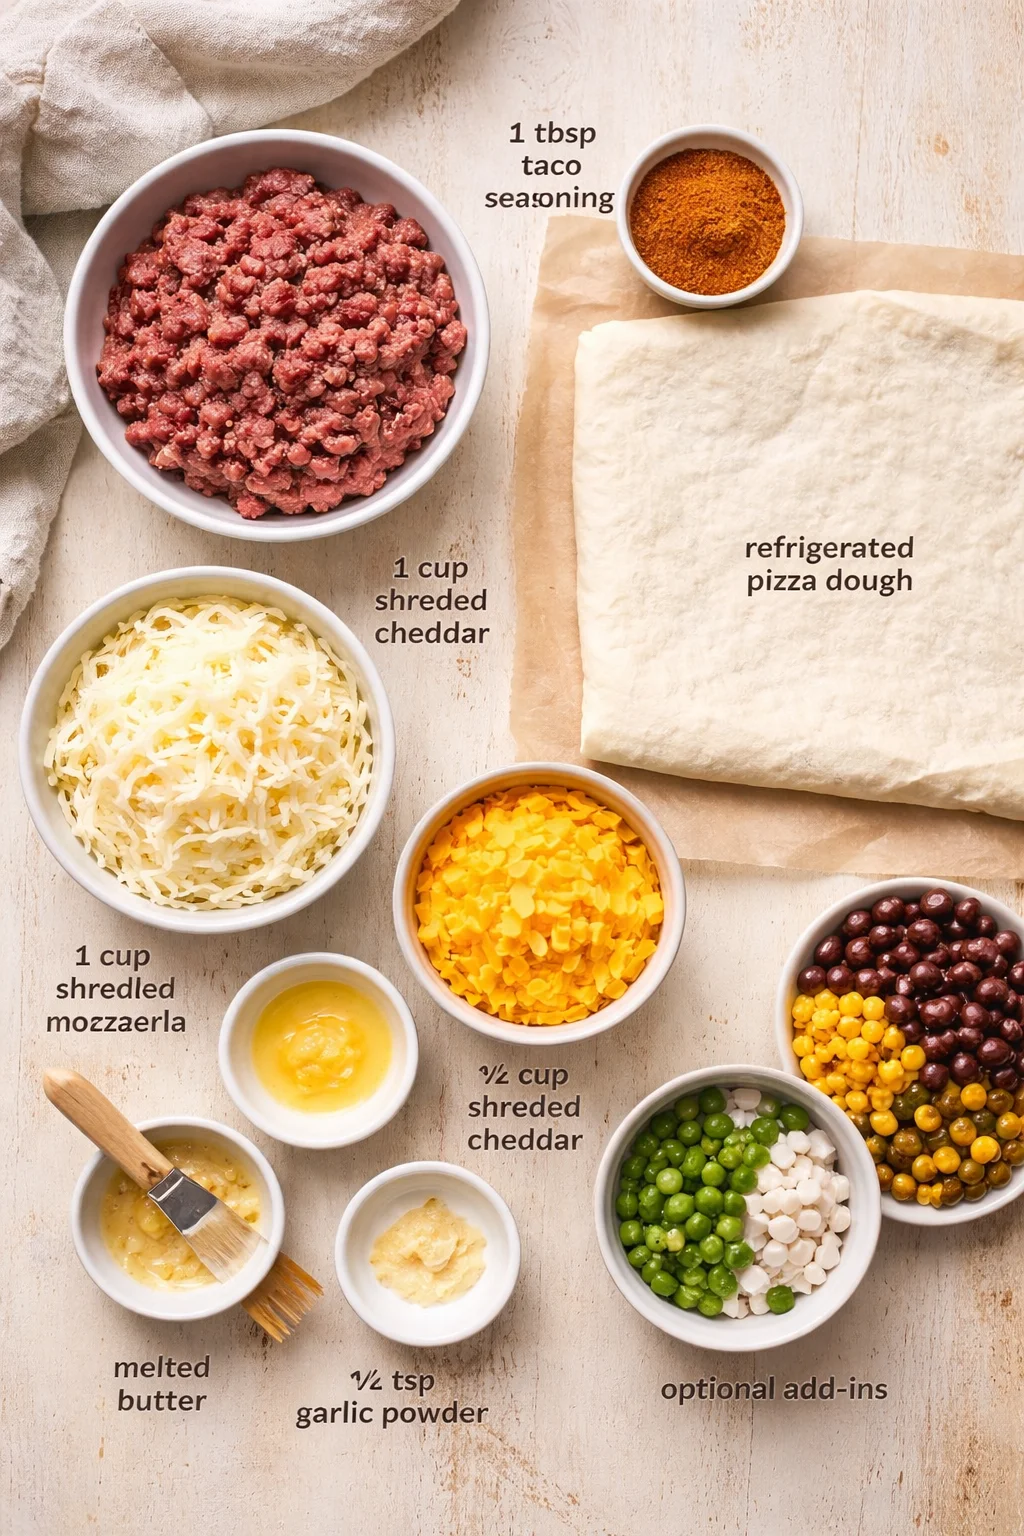
- 1 lb (450 g) ground beef, turkey, or chicken
- 1 tbsp taco seasoning (store-bought or homemade blend works great)
- 1 sheet refrigerated pizza dough or crescent roll dough
- 1 cup shredded mozzarella cheese
- ½ cup shredded cheddar cheese (optional but adds nice sharpness)
- 1–2 tsp melted butter
- ½ tsp garlic powder (optional for brushing on top)
- Optional add-ins: diced jalapeños, onions, black beans, corn, olives
Assemble, Fill, and Bake
- Brown ground meat in a skillet over medium heat; drain excess fat.
- Stir in taco seasoning and a splash of water; cook until meat is fully coated and slightly saucy, then set aside to cool slightly.
- Preheat oven to 375°F (190°C) and line a baking sheet or pizza stone with parchment paper.
-
On a lightly floured surface, roll out pizza or crescent dough and cut into rectangles or strips.
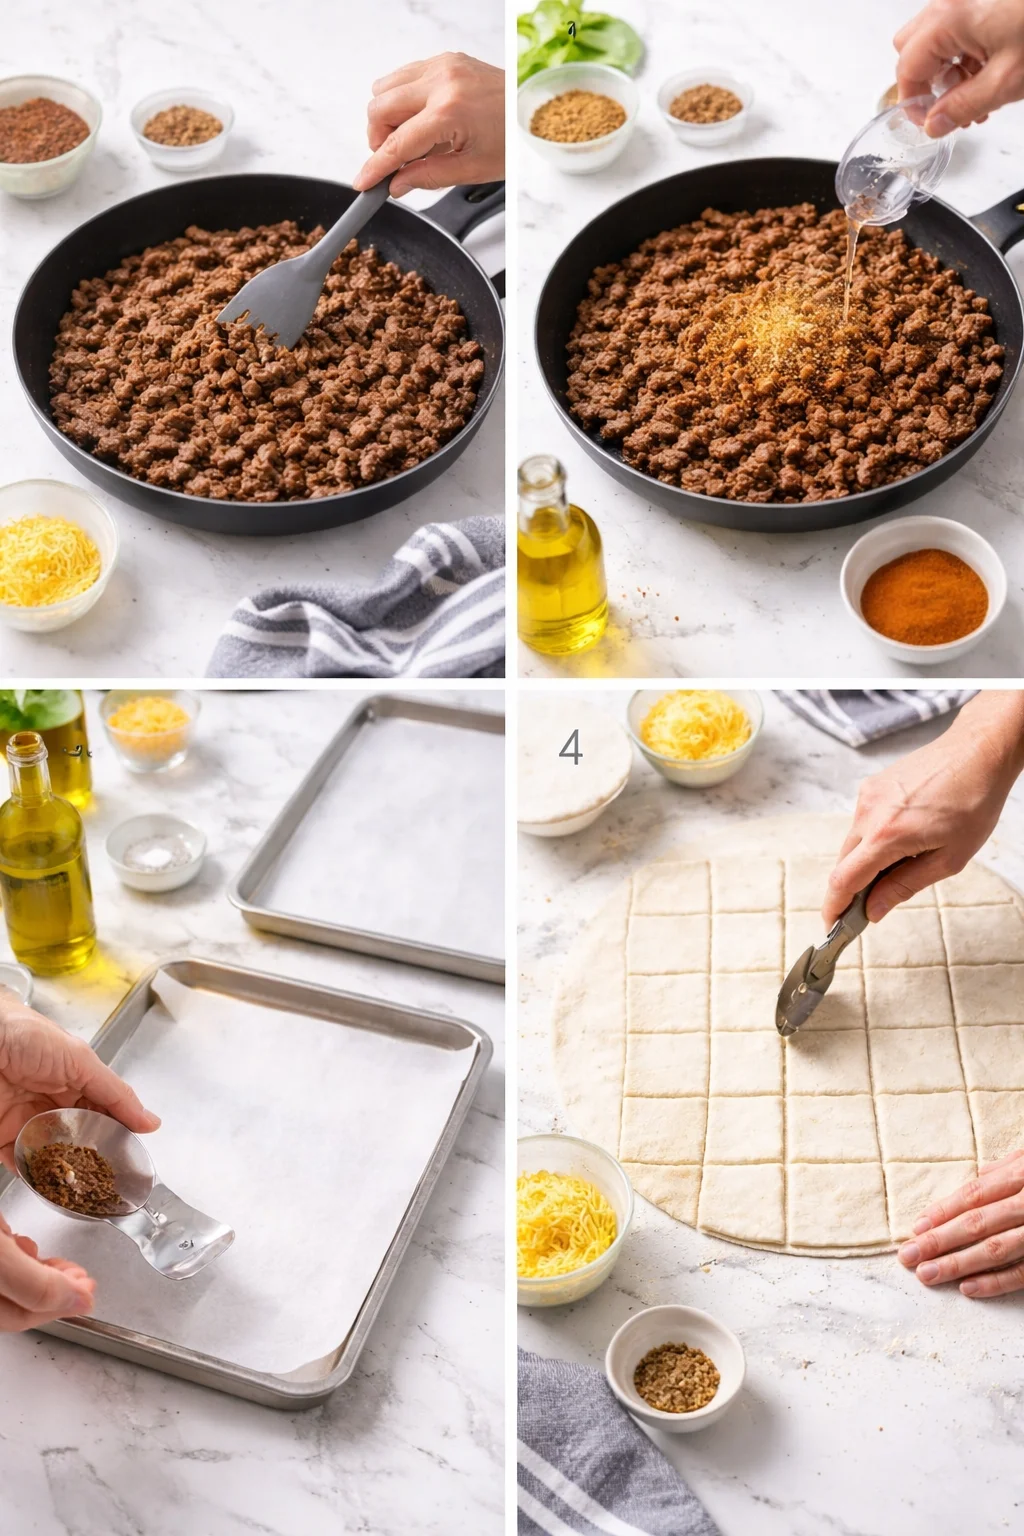
- Spoon about 1 tablespoon of cooled seasoned meat onto each piece of dough and sprinkle with shredded mozzarella (and cheddar if using) and any optional mix-ins.
- Fold the dough over the filling and pinch or crimp the edges tightly (use a fork) to seal.
- Place the stuffed sticks seam-side down on the prepared parchment-lined baking sheet, keeping sizes consistent.
-
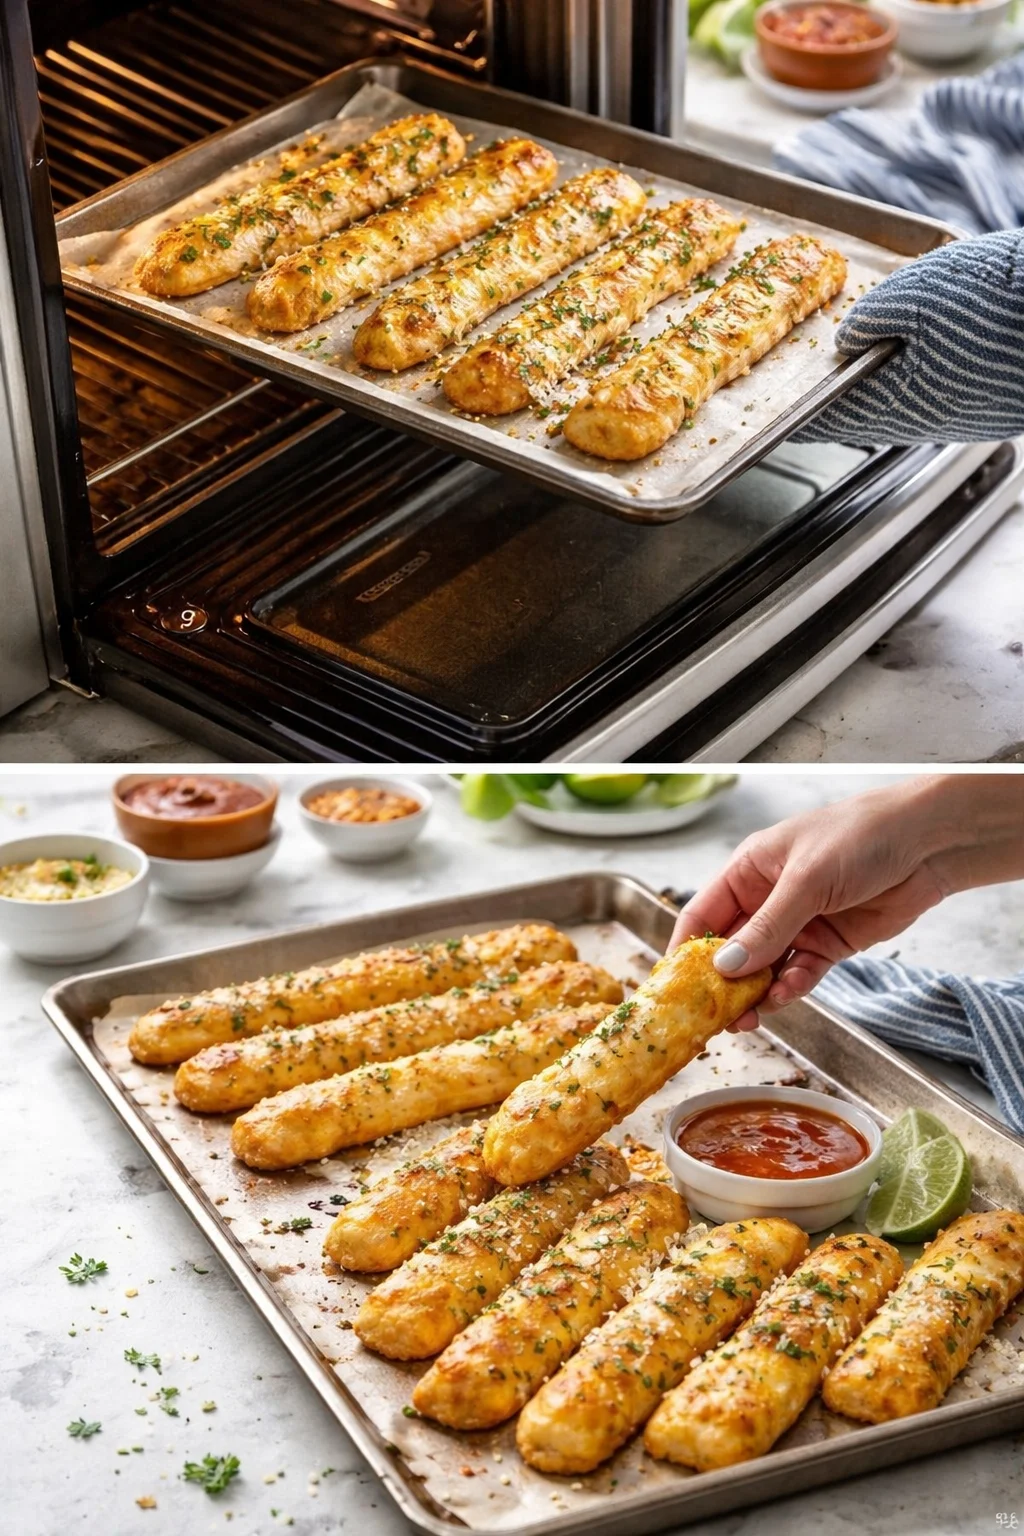
Brush the tops with melted butter mixed with garlic powder (or use an egg wash for a shiny finish).

- Bake in the preheated oven at 375°F (190°C) for 12–15 minutes, until they puff up and turn golden brown.
-
Let the sticks cool for a few minutes before serving.
Tricks for Flaky, Non-Soggy Sticks
Small details make a big difference when it comes to cheesy taco sticks. Let your cooked taco meat cool a bit before filling the dough so it won’t steam and make things soggy. Use a modest amount of filling—about a tablespoon per strip—to get a nice gooey center without leaks. Pinch and crimp the edges tightly (a fork works wonders) and place the sticks seam-side down on the baking sheet to help keep everything sealed.
Brush the tops with melted butter mixed with a little garlic powder, ranch seasoning, or Italian herbs to boost flavor and color. For an extra shiny, golden finish, try using an egg wash instead.
- Bake one stick first as a test to check seasoning and size before baking them all.
- Drain any excess fat from the meat and avoid adding watery fillings inside the sticks (leave fresh salsa or wet toppings for dipping).
- Keep stick sizes consistent. Thinner sticks bake evenly and get crispier, so avoid making them too thick.
- If you freeze unbaked sticks, flash-freeze them on a tray first so they don’t stick together.
Creative Flavor and Filling Ideas
- Dough options: Swap in crescent roll dough for fluffier sticks, puff pastry for a flaky crust, or homemade pizza dough when you want a chewier base.
- Protein swaps: Use ground turkey or chicken for a lighter version, or seasoned plant-based crumbles or mashed black beans for a meat-free take.
- Cheese choices: Try pepper jack to add extra heat, Monterey Jack for mild meltiness, or combine mozzarella and cheddar for stretchy and sharp flavors.
- Flavor twists: Kick it up with diced or pickled jalapeños, add texture with corn and black beans, or switch taco seasoning for BBQ rub, buffalo sauce, or fajita spices for something new.
- Size variety: Make mini sticks for parties or larger pockets like calzones to serve as a casual meal with a salad.
- Serving style: Leave salsa out of the filling, then top baked sticks with fresh pico de gallo, cilantro, and a squeeze of lime for a bright, fresh finish.
How to Store and Reheat
Make ahead: Assemble your sticks and keep them in the fridge for up to 24 hours before baking. For longer storage, place unbaked sticks on a tray, freeze until firm, then transfer to a labeled freezer bag for up to 2 months.
Baking from frozen: Bake the sticks straight from the freezer on a parchment-lined sheet, adding about 3–5 extra minutes. Watch for a lovely golden color and fully set dough.
Storing cooked sticks: After baking and cooling, store in an airtight container in the fridge for up to 3 days. Reheat in the oven or air fryer to bring back the crispness.
- Oven reheating: Heat oven to 350°F (175°C) and warm sticks on a baking sheet for 8–10 minutes until crisp and heated through.
- Air fryer: Heat at 330–350°F (165–175°C) for 3–6 minutes, checking halfway for perfect crispness.
- Microwave: Not the best choice—it heats fast but softens the crust. If you need to microwave, heat briefly then finish in the oven or air fryer for a minute to regain some crunch.
- Thawing: For best results, thaw frozen unbaked sticks overnight in the fridge before baking; if baking from frozen, just add a few extra minutes to baking time.
Common Baking and Serving Questions
- Can I make these vegetarian? Definitely! Swap out the meat for seasoned black beans, refried beans, lentils, or plant-based ground meat. Just make sure to drain any wet fillings well so the dough stays crisp.
- Do I need to cook the meat before filling? Yes, this step is important. Brown your ground meat fully, drain fat, and season well before stuffing. It keeps things safe and stops raw dough from getting soggy.
- How do I prevent the sticks from leaking? Cool the filling a bit before using, keep the filling amount moderate, press and crimp seams tightly, and place sticks seam-side down on the baking sheet to hold everything inside while baking.
- Can I use store-bought taco seasoning? Absolutely. It’s a quick and tasty option. You can also make your own seasoning to adjust salt and spice to your liking.
- What internal temperature should the filling reach? For ground beef or other meats, cook until the filling reaches 160°F (71°C) for food safety.
- How long do leftover baked sticks keep? Store leftovers in an airtight container in the fridge for up to 3 days. Reheat in the oven or air fryer for crispness.
- Can I freeze fully baked sticks? Yes! Freeze cooled, baked sticks in a single layer on a tray until firm, then transfer to a freezer bag. They keep for 1–2 months. Reheat frozen sticks in a 350°F (175°C) oven for 10–15 minutes until warmed through.
Breadsticks filled with seasoned taco meat and melty cheese, baked golden and crispy—combines flavors of tacos, pizza rolls, and cheesy breadsticks in a handheld snack.
- Total Time: 35 minutes
- Yield: 8 servings (2–3 sticks per person) 1x
Ingredients
- 1 lb (450 g) ground beef, turkey, or chicken
- 1 tbsp taco seasoning (store-bought or homemade)
- 1 sheet refrigerated pizza dough or crescent roll dough
- 1 cup shredded mozzarella cheese
- ½ cup shredded cheddar cheese (optional)
- 1–2 tsp melted butter
- ½ tsp garlic powder (optional, for brushing)
- Optional add-ins: diced jalapeños, onions, black beans, corn, olives
Instructions
- Brown ground meat in a skillet over medium heat and drain excess fat.
- Stir in taco seasoning and a splash of water; cook until meat is fully coated and slightly saucy, then let cool slightly.
- Preheat oven to 375°F (190°C) and line a baking sheet or pizza stone with parchment paper.
- On a lightly floured surface, roll out dough and cut into rectangles or strips.
- Place about 1 tablespoon of cooled seasoned meat onto each dough piece; sprinkle with mozzarella, cheddar (if using), and any optional mix-ins.
- Fold dough over filling and pinch or crimp edges tightly (using a fork) to seal.
- Place sticks seam-side down on prepared baking sheet, keeping sizes consistent.
- Brush tops with melted butter mixed with garlic powder (or use an egg wash for shiny finish).
- Bake for 12–15 minutes until dough puffs and turns golden brown.
- Let cool for a few minutes before serving.
Notes
Let cooked meat cool before filling to prevent sogginess., Use moderate filling amounts (~1 tablespoon) to avoid leaks., Pinch and crimp edges tightly; bake seam-side down to keep sealed., Brush tops with butter mixture or egg wash for flavor and color., Bake a test stick first to check seasoning and size., Drain excess fat from meat and avoid watery fillings inside sticks., Freeze unbaked sticks on a tray before bagging to prevent sticking., Refrigerate unbaked sticks up to 24 hours before baking., Bake frozen sticks adding 3–5 minutes to baking time., Store baked sticks in airtight container for up to 3 days; reheat in oven or air fryer to retain crispness.
- Prep Time: 20 minutes
- Cook Time: 15 minutes
- Category: Snack
Nutrition
- Serving Size: 2–3 sticks
- Calories: Approx. 250-300 calories per serving (estimate)
- Fat: Approx. 12-15 g per serving (estimate)
- Carbohydrates: Approx. 20-25 g per serving (estimate)
- Protein: Approx. 15-20 g per serving (estimate)