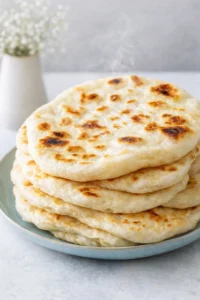
Fluffy Greek Pita
There’s something so comforting about the smell of fresh bread baking, right? This Greek pita recipe brings that cozy feeling straight to your kitchen without any extra hassle. With basic pantry staples like flour, yeast, milk, water, salt, and olive oil, you’ll have the dough ready in less than ten minutes. Then, just let it rise and cook soft, pillowy pitas right on your stovetop—no fancy tools required.
I’ll guide you through every step, from waking up the yeast to kneading the dough, giving it a short rise, shaping perfect rounds, and cooking those beautiful pitas in a skillet. Plus, I’ll share my tips on picking the right flour, fixing puffing issues, and finishing your pita with garlic butter or a splash of olive oil. This recipe makes about eight pitas, and I’ll cover how to store and freeze them too, so you can always have some on hand.

I absolutely adore that fresh bread aroma, and this Greek pita recipe is the easiest way to bring that warm, just-baked feeling into your home with hardly any fuss. All you need are simple ingredients you probably already have on hand—flour, yeast, milk, water, salt, and olive oil. You mix the dough up in under ten minutes and cook soft, puffy pitas on the stove—no oven or special gadgets necessary.
The process is simple: bloom your yeast, knead the dough just a bit, let it rest for a short rise, then divide and shape it into perfect circles. Cooking is quick, too—you’ll gently cook each pita in a hot skillet until it puffs up and gets a nice golden color. Along the way, I’ll give you tips for choosing the best flour, troubleshooting why some pitas won’t puff up, and ways to jazz them up with garlic butter or olive oil.
This batch will give you about eight pitas, and they’re wonderful for meal prep—you can freeze extras and warm them up whenever you’re ready. Keep reading for detailed steps, timing tips, and pro tricks to get tender, soft, and pillowy pitas that are perfect for stuffing, dipping, and enjoying.
Why These Pitas Shine
Wondering why you should make these pitas today? Let me share the highlights—the kind of things you’ll notice right away when you bake a batch.
- Quick with very little hands-on time – The dough whips up in less than 10 minutes, then you just wait for it to rise. The actual work is easy and fast, so it fits nicely even on busy weeknights.
- Everyday ingredients – Only flour, yeast, milk, water, salt, and olive oil are needed. No special flours or gadgets, just basics you likely have tucked in your pantry.
- No oven or special pans required – Cook these pitas in a hot skillet or cast-iron pan right on the stove. You’ll get those signature puffy pockets without needing an oven or baking stone.
- Puffy pockets perfect for fillings – When done right, these pitas puff up and form pockets, perfect for stuffing with gyros, grilled chicken, fresh veggies, or dipping into your favorite hummus, tzatziki, or a creamy spinach artichoke dip.
- Awesome for freezing and meal prep – You get about 8 pitas per batch, and they freeze beautifully (just stack with parchment paper in between). Make a big batch and have homemade pita ready when you want.
- Budget-friendly and tastes way better – These cost way less than what you’d buy at the store and taste fresh and flaky, with so much better texture.
- Super flexible and customizable – You can swap in half whole wheat flour, use different kinds of milk or oils, or even instant yeast to tweak flavor or texture while sticking to this simple method.
- Quick finishing touches make them special – A quick brush of garlic butter or drizzle of olive oil and fresh parsley turns these warm pitas into something that feels restaurant-worthy.
- Easy-to-find pantry ingredients – Flour, yeast, salt, milk, and olive oil are probably hanging out in your kitchen already, so no extra shopping is needed.
- Homemade bread you can’t mess up – Making pita from scratch is simpler than it sounds, and that smell of fresh baked bread filling your kitchen? Totally worth it!
- Perfect for prepping ahead – These pitas freeze really well, so you can make a big batch and have fresh bread ready any time for sandwiches, gyros, or dipping.
- Easy on the wallet – Store-bought pita can add up, but homemade costs just pennies per piece—and tastes fresher, too.
Dough Ingredients and Extras

- 2 cups flour (I always reach for King Arthur all-purpose flour for consistent results)
- 1 tbsp yeast
- 1 tsp salt
- 1/2 tsp sugar
- 1/4 cup milk (warm but not hot, about 105°F to 115°F to get the yeast happy and active)
- 1/2 cup water
- 2 tbsp olive oil
- 1-2 tablespoons olive oil (for cooking)
- olive oil (I love Bertolli extra virgin for a mild yet flavorful finish)
- garlic butter (optional, but wow, does it add richness!)
- fresh parsley, chopped (for a bright, fresh garnish, totally optional)
Make the Dough and Cook
- Mix flour, salt, and sugar in a large bowl until evenly combined.
- Pour lukewarm milk (about 105–115°F) into a smaller bowl and sprinkle the yeast over the surface.
- Let the yeast sit 2–3 minutes until bubbly/foamy.
-
Add the water to the yeast mixture and stir to combine.

- Pour the yeast mixture into the flour bowl and stir until a rough, shaggy dough forms.
- Add 2 tablespoons olive oil and knead the dough in the bowl or on a floured surface for about 8–10 minutes until smooth and elastic, adding flour a tablespoon at a time if too sticky.
- Transfer the dough to a clean bowl lightly coated with olive oil and turn to coat all sides.
-
Cover the bowl with a damp towel or plastic wrap and let the dough rise in a warm, draft-free spot for about 1 hour, or until roughly doubled in size.

- Turn the risen dough out onto a floured surface and gently press to deflate any large air bubbles.
- Divide the dough into 8 equal pieces and roll each into a tight ball.
- Flatten each ball with a rolling pin or your hands into a 1/4-inch-thick circle about 7–8 inches across.
-
Let the rolled dough circles rest for 5–10 minutes before cooking.

- Heat a large skillet or cast-iron pan over medium-high heat and drizzle in 1–2 tablespoons olive oil, swirling to coat the surface.
- When the pan is hot, lay a pita circle gently in the skillet and cook the first side 1–2 minutes until bubbles form and the underside is golden.
- Flip the pita and cook the other side 1–2 minutes until it puffs and is light golden all over.
-
Remove the cooked pita to a plate and repeat with the remaining dough circles.

-
While pitas are still warm, brush with garlic butter (optional) and sprinkle with chopped parsley if desired.

Tips for Puffy, Soft Pitas
One of the biggest mistakes is using liquids that are either too hot or too cold. Make sure your milk and water feel warmish to the touch, around 110°F. Anything hotter will kill your yeast, and colder won’t wake it up properly.
Lots of folks skip resting dough circles before cooking, but giving them 5 to 10 minutes to rest after rolling helps the pitas puff much better in the pan.
Also, cook your pitas over medium-high heat, not medium or low. You want a really hot skillet before placing the dough in to get that magic puff and golden crust—the same principle that makes simple homemade naan puff beautifully.
And here’s a big one: don’t press down on the pitas as they cook. Pressing lets out the steam that’s causing them to puff, so if you want those iconic pockets, let them cook undisturbed.
Greek pita is a total winner for stuffing with all kinds of fillings or for scooping dips and spreads. I love mine piled with grilled chicken, cool tzatziki, chopped tomatoes, cucumber, and red onion—instant gyro goodness! You can also serve these alongside hummus, baba ganoush, a classic spinach dip, or a crisp Greek salad with feta and olives. If you want to keep it simple, just brush warm pitas with garlic butter and serve with crumbled feta and a drizzle of olive oil for dipping. Yum!
These puffy Greek pitas are perfect for stuffing or dipping. I love piling mine with grilled or roasted chicken, cool tzatziki sauce, crisp cucumber, tomato, and red onion for a quick gyro-style meal.
They’re also fantastic alongside creamy hummus, smoky baba ganoush, or a chilling Greek salad with feta and olives. Just brush warm pitas with garlic butter and sprinkle fresh parsley for an easy appetizer or side dish. The pockets also make these pitas great for sloppy sandwiches or even as a vehicle for breakfast eggs and cheese.
Substitutions and Mix-In Ideas

If you’re missing something or want to shake things up a bit, here are some swaps and tweaks you can try:
- All-purpose flour: You can replace up to half the flour with whole wheat for a nuttier taste and extra fiber. Just know your pitas might puff less and be a bit on the denser side.
- Milk: Any milk works here—go with dairy, almond, oat, soy—you name it. You could even use just water instead of milk, though your pitas might be slightly less soft.
- Olive oil: Don’t have olive oil? No worries! Vegetable oil, canola, or melted butter will all work, with some subtle changes in flavor but still great texture.
- Active dry yeast: If instant yeast is what you have, use the same amount but mix it straight with the dry ingredients—no need to bloom it first. Just watch for a slightly quicker rise.
- Salt: Don’t skip it! Salt adds flavor and regulates yeast activity. If you only have kosher salt, increase the amount to about 1.5 teaspoons since it’s less dense than table salt.
Feel free to play around with this simple recipe—or, if you’re cooking without an oven, try a similar stovetop flatbread like no-oven Turkish bread (bazlama). For a heartier bite, swap half the all-purpose flour with whole wheat flour—it adds a lovely nuttiness but can make the pitas a bit denser.
You can also add herbs like dried oregano or za’atar into the dough for an herby kick. For a dairy-free version, swap the milk for any plant-based alternative like almond or oat milk, or just use water.
Want a fluffier pita? Try mixing in a teaspoon of vinegar or lemon juice with the liquids to help tenderize the dough a bit more. And if you love a soft crust, brush the cooked pitas with melted butter or olive oil right after cooking, or make a quick garlic butter for extra flavor.
Storing, Freezing, and Reheating
Store: To keep pitas fresh, stack them with parchment paper between each one and store in an airtight container or zip-top bag at room temperature for up to 2 days. If you want to stretch that, pop them in the fridge—they’ll keep for about a week there.
Freeze: These pitas freeze beautifully! Let them cool fully, stack with parchment paper in between, then tuck them into a freezer bag. They’ll keep for up to 3 months, which is great for quick meals whenever you want.
Warm Up: Bring them back to life by wrapping in a damp paper towel and microwaving for 20-30 seconds, or warm gently in a dry skillet over medium heat about a minute per side. If frozen, let them thaw on the counter first, or heat straight from frozen in a 350°F oven for about 5 minutes.
Preparation Time 90-120 minutes Cooking Time 15-20 minutes Total Time 105-140 minutes Level of Difficulty Medium Servings 8 pieces
Want to keep those pitas fresh and soft? The best way is to layer them with parchment paper between each pita, then store them in an airtight container or resealable bag. At room temperature, they’ll stay lovely for 1-2 days. If you don’t plan to eat them quickly, pop them in the fridge—they last about a week there without losing their softness.
For longer storage, freezing works like a charm! Stack your pitas with parchment paper in between so they don’t stick, seal tightly in a freezer bag, and keep them in the freezer for up to 3 months. When you’re ready to eat, just thaw or warm them in the microwave or skillet.
Making these pitas ahead is a total time-saver! You can prepare the dough the day before and keep it covered in the fridge overnight; it will rise slowly and develop even better flavor. Just take it out for about an hour to come to room temperature before shaping and cooking.
Or, bake a big batch of pitas and freeze extras as I mentioned earlier. That way, you’ve got homemade pita bread ready anytime for quick dinners or snacks. I often make a double batch so I’m never caught without fresh bread for gyros or dipping into a warm spinach artichoke dip.

Troubleshooting and FAQs
All-purpose flour is your best bet for making Greek pita at home since it has the right protein content to create a dough that’s soft, stretchy, and puffs easily. If you want a bit more chew and a more authentic bite, you can try swapping half the all-purpose flour for whole wheat. Bread flour also works if that’s what’s in your pantry—just know it might give a chewier pita than the classic ones. Make sure your flour is fresh and stored in a cool, dry place because old flour can affect how well your dough rises and, ultimately, how tasty your pitas turn out!
- Why didn’t my pita puff up? Often it’s the temperature of the liquid—make sure your milk and water are around 110°F. Also, letting the dough circles rest for 5 to 10 minutes before cooking allows steam to build inside and puff them nicely.
- Can I use instant yeast instead of active dry yeast? Yes! Just mix instant yeast directly with the flour (skip the blooming step), and watch the rise time—it might be a bit quicker.
- Why is my dough sticky or too dry? Humidity and flour brands vary, so adjust by adding more flour a tablespoon at a time if sticky, or a splash of water if too dry, until the dough feels soft and elastic (here are visual cues for that texture).
- Can I bake these pitas in the oven instead of stovetop? You sure can! Preheat your oven with a baking stone or sheet at 475°F and bake the rolled dough circles for 3-5 minutes until puffed and golden.
- How should I store leftover cooked pitas? Keep them wrapped with parchment paper in an airtight container at room temperature for a couple of days or freeze for longer storage as described above.