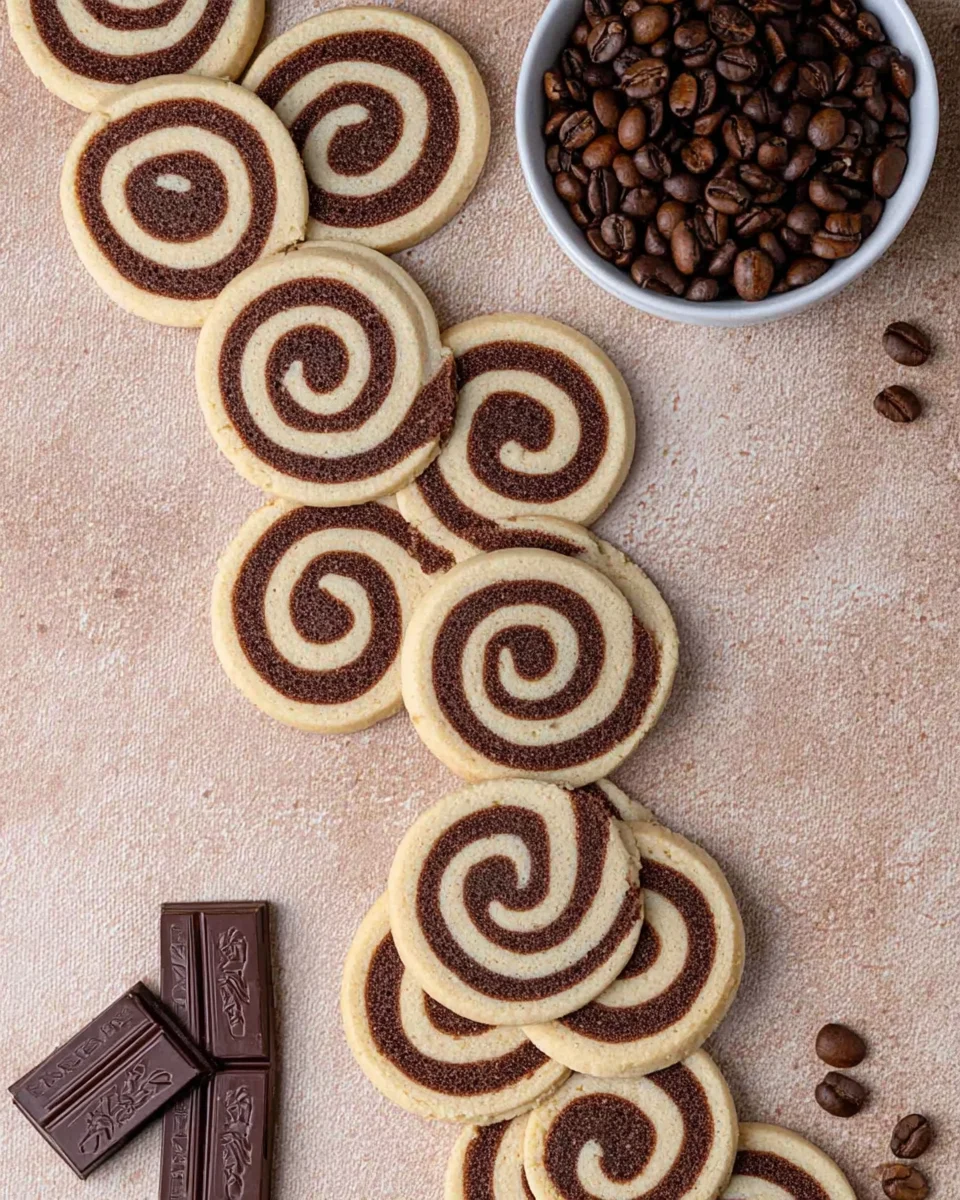
Espresso Chocolate Pinwheel Cookies
Nothing says cozy holiday vibes quite like these easy espresso chocolate pinwheel cookies! With swirls of sweet vanilla dough twirled together with rich chocolate espresso dough, every bite bursts with flavor. They come out crisp around the edges but stay tender and chewy right in the center—exactly how fresh cookies should be. Plus, their charming swirl design makes them the star of any holiday party or a sweet, thoughtful gift for your family and friends.

Reasons to Bake These Pinwheel Cookies
These soft, buttery cookies combine two simple doughs—a classic vanilla and a deep espresso chocolate. They come together with an easy slice-and-bake method that always works like a charm. Even though the swirl looks impressive, I’ve broken it down into simple steps so you can create beautiful pinwheel cookies without any fuss.
The mix of vanilla and chocolate espresso flavors creates a cozy and sophisticated taste. You’ll taste the rich chocolate and espresso notes shining through, perfectly balanced with a touch of sweet vanilla to round it all out.
If you’re on the hunt for other festive treats, don’t miss my Pistachio Shortbread Cookies and Cranberry Orange Cookies. And everyone always raves about my Peppermint Snowball Cookies too—perfect for your holiday dessert lineup!
Chocolate Pinwheel Cookie Ingredients
Here’s what you’ll need to bake these delightful cookies:
- Instant Espresso: A pinch adds a lovely coffee kick that really boosts the chocolate flavor, but you can skip it if coffee’s not your thing.
- Unsweetened Chocolate: Melted chocolate gives these cookies their rich taste and helps keep the dough soft and easy to work with.
- Unsalted Butter: Softened butter is key for a moist, tender crumb that melts in your mouth.
- Granulated Sugar: This sugar helps form those perfectly crisp edges and gives the cookies a pretty golden finish.
- Pure Vanilla Extract: Using high-quality vanilla makes a big difference—it adds warmth and just enough sweetness to the vanilla dough.
Check out the recipe card at the end for exact measurements and step-by-step instructions.
Make the Pinwheel Cookie Dough
Step 1: Start by sifting your all-purpose flour into a big bowl, then whisk in the baking powder and salt. This makes sure everything mixes evenly and your cookies bake perfectly.

Step 2: In your mixer bowl, beat the butter and sugar together on medium-low until fluffy, about one minute. Be sure to scrape down the sides once or twice so it all flakes together nicely.

Step 3: Add in the egg and vanilla extract, then mix on medium speed until everything’s smooth and fully combined.
Step 4: Slowly pour in your dry flour mixture and mix on low speed. Keep going until the dough just comes together into a soft ball—don’t overmix.

Step 5: Once your dough is ready, weigh out half of it (about 280 grams) and set it aside as your vanilla dough.

Step 6: To the remaining dough, add the espresso powder and melted unsweetened chocolate. Mix on medium speed until the dough is completely blended.

Step 7: Shape each dough portion into rough rectangles or squares. Don’t stress about perfection here—you’ll smooth things out in the next step.
Step 8: Tear off four 14-inch sheets of wax paper. Place the vanilla dough on one sheet, then cover it with another sheet. Roll the dough out evenly to about 1/8-inch thickness, aiming for a 9×9 inch square. Trim any rough edges and save the scraps to tidy up the corners.

Step 9: Leave the vanilla dough sandwiched in the wax paper and repeat the rolling and shaping with the chocolate espresso dough.

Step 10: Now stack the two dough squares (still between their wax paper) on a baking sheet or board, then pop them into the fridge for about 20 minutes. This chill helps the dough firm up and makes rolling the pinwheel a breeze.
Step 11: After chilling, it’s time for the fun part—rolling your cookies into that classic pinwheel shape!
How To Roll the Pinwheel Dough
Step 12: Pull your chilled vanilla and chocolate dough out of the fridge.

Step 13: Gently peel away one side of the wax paper from the vanilla dough, then press the dough back onto the paper. Flip that dough over, and remove the top wax paper piece so it’s ready for assembly.

Step 14: Carefully lift the chocolate dough using the wax paper and lay it right on top of the vanilla dough, lining up the edges as neatly as you can.

Step 15: With the wax paper underneath, start rolling the dough into a tight log. This is where your beautiful swirl takes shape! Trim the ends off to give your roll a clean, even look.

Step 16: Wrap the log snugly in wax paper and twist the ends to seal it up.
Step 17: Chill the wrapped dough in the fridge for about 60 to 90 minutes so it firms up enough to slice neatly.
Slice and Bake the Pinwheel Cookies

Step 18: Unwrap your chilled dough and cut it into even 1/4-inch thick rounds. These pinwheel slices are your soon-to-be cookies!
Step 19: Arrange the cookie rounds on parchment-lined baking sheets with about 1 inch of space between them.
Step 20: Bake at 350°F for 10 to 12 minutes. They’re done when the edges just start to turn a lovely light golden. Keep the rest of your slices chilled in the fridge while you bake in batches.
Step 21: Cool your cookies on the baking sheet for a couple of minutes, then gently transfer them to a wire rack to cool completely. I love this part—it’s when they firm up perfectly!
How to Store the Baked Cookies
These pinwheel cookies keep really well in an airtight container at room temp for up to 10 days, making them perfect to bake ahead of holiday gatherings or cookie swaps. Just a little heads-up—their crisp edges soften a bit over time, but the flavor stays just as delicious.

How to Store the Cookies
To keep your cookies tasting fresh, store them in a sealed container at room temperature. They’ll stay great for about 10 days, but if you love crisp edges, pop them into the oven at 300°F for a few minutes right before serving to revive that crunch.
Troubleshooting Pinwheel Cookies
- Gaps show up between the vanilla and chocolate dough. Gently press the layers together when stacking to push out any trapped air. Take your time rolling so the edges tuck in tight and your swirl stays neat.
- Dough sticks to the wax paper. No worries! Just pop it back in the fridge for 10 minutes to firm up, then try again—it gets a lot easier to handle.
- Dough layers aren’t lining up evenly. That’s totally normal! Just trim the edges with a sharp knife or pizza cutter to get nice, straight sides.
- Cookies come out dry: Watch your bake time closely and pull them from the oven as soon as the edges turn golden. Overbaking is usually what dries cookies out.

If you bake these espresso chocolate pinwheel cookies, I’d be thrilled if you left a rating and shared your baking experience in the comments. Nothing makes me happier than hearing from you guys!

Make-Ahead Tips
These pinwheel cookies are a dream to make ahead. You can prepare the dough and roll it into logs, then wrap and freeze the logs for up to a month. When you’re ready to bake, just thaw the dough overnight in the fridge, slice, and bake as usual. This take-the-stress-out-of-holiday-baking hack saves you time and lets you enjoy more of the festivities!
Variations
Want to mix it up? Try swapping the espresso powder for a teaspoon of cinnamon or pumpkin pie spice for a cozy fall twist. You can also swap semi-sweet chocolate for unsweetened for a less intense chocolate flavor, or add a handful of finely chopped nuts like toasted pecans or walnuts inside the dough for some crunch. Feel free to experiment—this recipe is super forgiving!
Serving Suggestions
These espresso chocolate pinwheel cookies are lovely on their own with a cup of coffee or hot cocoa, but don’t be shy to dress them up. Serve them with whipped cream or a drizzle of salted caramel sauce for a simple, extra-special dessert. They’re also a fantastic cookie to pack in lunchboxes or to bring to holiday parties for sharing.
Recipe FAQs
- Can I use regular brewed espresso instead of instant espresso powder? I don’t recommend it since the dough might get too wet, but a small amount of strong espresso extract could work if you adjust your flour slightly.
- How do I keep the swirl neat when rolling the dough log? Keep your dough chilled and roll slowly, using the wax paper to help guide and tuck the edges in tight.
- Can I make these cookies gluten-free? Yes! Swap the all-purpose flour for a gluten-free blend that measures cup for cup, but be sure it includes xanthan gum for structure.
- Do these cookies freeze well after baking? Absolutely! Store completely cooled cookies in a freezer-safe container for up to 3 months. Thaw at room temperature before serving.
Delicious espresso chocolate pinwheel cookies featuring swirls of vanilla and chocolate espresso dough, crisp edges, and chewy centers – perfect for holiday treats or gifting.
- Total Time: 1 hour 45 minutes (including chilling times)
- Yield: About 36 cookies 1x
Ingredients
- 350 grams all-purpose flour (about 2 3/4 cups)
- 1/2 teaspoon baking powder
- 1/4 teaspoon salt
- 227 grams unsalted butter, softened (1 cup)
- 200 grams granulated sugar (1 cup)
- 1 large egg
- 1 teaspoon pure vanilla extract
- 1/2 teaspoon instant espresso powder (optional)
- 60 grams unsweetened chocolate, melted and cooled (about 1/2 cup)
Instructions
- Preheat oven to 350°F (175°C). Line baking sheets with parchment paper.
- Sift the all-purpose flour into a large bowl, then whisk in baking powder and salt.
- In a stand mixer bowl, beat the softened butter and granulated sugar on medium-low until fluffy, about 1 minute, scraping down sides as needed.
- Add the egg and vanilla extract to the butter mixture and beat on medium speed until completely combined.
- Slowly add the dry flour mixture into the wet ingredients and mix on low until the dough just comes together; do not overmix.
- Divide the dough in half (about 280 grams each). Set one half aside as the vanilla dough.
- To the remaining half, add the instant espresso powder and melted unsweetened chocolate; mix on medium speed until fully incorporated.
- Shape each portion of dough into rough rectangles.
- Tear off four 14-inch sheets of wax paper. Place the vanilla dough between two sheets and roll out evenly to about 1/8-inch thickness, forming a 9×9 inch square. Trim edges and save scraps.
- Repeat the rolling and shaping with the chocolate espresso dough using another two sheets of wax paper to form another 9×9 inch square.
- Stack the two dough squares, still between the wax paper sheets, on a baking sheet or board and refrigerate for 20 minutes to chill and firm up.
- After chilling, peel one side of wax paper from the vanilla dough and flip it over, removing the top wax paper sheet.
- Carefully lift the chocolate dough (with wax paper) and place it on top of the vanilla dough, aligning the edges.
- Using the wax paper, roll the two dough layers tightly into a log shape, trim the ends for clean edges.
- Wrap the dough log tightly in wax paper, twisting the ends to seal.
- Chill the wrapped dough in the refrigerator for 60 to 90 minutes until firm enough to slice.
- Unwrap the chilled dough and slice into even 1/4-inch thick rounds.
- Place cookie rounds on parchment-lined baking sheets spaced about 1 inch apart.
- Bake in the preheated oven for 10 to 12 minutes, until edges turn light golden and the centers remain tender.
- Cool cookies on the baking sheet for a few minutes before transferring to a wire rack to cool completely.
Notes
Instant espresso powder enhances chocolate flavor but is optional., Do not overmix dough to maintain tender texture., Keep dough chilled to make rolling and slicing easier., Store baked cookies in an airtight container at room temperature for up to 10 days., To crisp softened cookies, reheat in a 300°F oven for a few minutes before serving., The dough logs can be frozen for up to 1 month; thaw overnight in refrigerator before slicing and baking., Variations include swapping espresso powder for spices like cinnamon or pumpkin pie spice, using semi-sweet chocolate instead of unsweetened, or adding chopped nuts for texture., Use gluten-free flour blend with xanthan gum to make gluten-free cookies., Baked cookies freeze well for up to 3 months; thaw at room temperature before eating.
- Prep Time: 30 minutes
- Cook Time: 10-12 minutes per batch
- Category: Dessert, Cookies
- Cuisine: American
Nutrition
- Serving Size: 1 cookie
- Calories: Approximately 120 calories per cookie
- Fat: 6g per cookie
- Carbohydrates: 18g per cookie
- Protein: 2g per cookie