Easy Homemade Bread
There’s something truly special about the smell of fresh bread baking in your kitchen. This Easy Homemade Bread recipe is a real winner for both kitchen newbies and baking pros. It comes out soft and fluffy inside with a lovely golden crust that has just the right amount of crispiness. Whether you love it as-is, slathered with butter, or packed into a sandwich, this loaf is sure to become a family favorite in no time.

Why You’ll Love This Homemade Bread
Baking bread from scratch is such a satisfying experience, and you end up with a loaf that tastes way better than anything you can grab at the store. This recipe is straightforward, using simple ingredients that you probably already have tucked away. It makes bread that’s tender but with enough chew to be truly delightful.
The Benefits of Baking Your Own Bread
There are so many great reasons to try making your own bread:
- Better Ingredients – When you bake at home, you decide exactly what goes in, so no weird preservatives or artificial extras sneak in.
- Incredible Freshness – Nothing beats the joy of pulling a warm, fresh loaf out of the oven and slicing into it right away.
- Cost-Effective – Baking bread yourself often saves money compared to fancy bakery breads.
- Customizable – You can easily swap flours, add seeds, herbs, or whatever you love to make your bread truly your own.
This bread is wonderfully soft with just a little chewiness and has a rich buttery note that makes it so versatile. It’s fantastic for sandwiches, toast, or just to enjoy by itself with some butter and honey. Let’s dive into the ingredients and step-by-step instructions so you can get baking.
Ingredients for Easy Homemade Bread
All you need for this tasty bread are a handful of simple ingredients that create that perfect loaf texture and flavor.
- All-Purpose Flour or Bread Flour – Bread flour has more protein, which means more chewiness, while all-purpose makes a softer crumb. Either works great depending on what you prefer.
- Warm Water – It wakes up the yeast and helps the bread rise well. Aim for 100-110°F (37-43°C) so it’s warm but not hot.
- Active Dry Yeast or Instant Yeast – This ingredient is what makes your bread rise and become fluffy. If you use active dry yeast, be sure to proof it first in warm water.
- Sugar or Honey – Just a little sweetness helps activate the yeast and adds subtle flavor.
- Salt – This brings out the flavors and gently slows down fermentation so the dough behaves well.
- Butter or Oil – Adding melted butter gives rich flavor, while oil keeps the bread soft and moist. Both work wonderfully.

How to Make Easy Homemade Bread
Don’t worry if you’re new to bread baking — this method is easy to follow, and with a little patience, you’ll be surprised how perfect your loaf turns out. Let’s go through it step-by-step.
Step 1: Activate the Yeast
Start by mixing your warm water, yeast, and sugar or honey in a big bowl. Let it sit for 5-10 minutes until it gets foamy on top — that’s your yeast waking up and ready to go. If you don’t see foam, your yeast might be expired, so you’ll want to try fresh yeast.
Step 2: Mix the Dough
Next, add the flour, salt, and melted butter or oil to your foamy yeast mixture. Stir everything together until it starts forming a shaggy dough. This is where the magic begins!
Step 3: Knead the Dough
Turn your dough out onto a lightly floured surface and knead it with your hands for about 8-10 minutes. You want it smooth and stretchy. If you’re using a stand mixer, switch it to medium speed and knead with the dough hook for 5-6 minutes. This helps develop the gluten and gives your bread great structure.
Step 4: First Rise
Pop your dough into a greased bowl and cover it with a clean kitchen towel. Let it rise in a warm spot for around 1 to 1½ hours until it’s doubled in size. This slow rise makes your bread light and airy.
Step 5: Shape the Dough
Once your dough has risen, gently punch it down to release the air bubbles. Then shape it into a loaf form — kind of like a long oval — and place it in a greased 9×5-inch loaf pan. This shaping step is easier than it sounds and really helps the bread bake evenly.
Step 6: Second Rise
Cover your shaped dough and let it rise again for another 30 to 45 minutes. This final proof makes your bread puff up and get that wonderful soft texture we all love.
Step 7: Bake the Bread
Preheat your oven to 375°F (190°C). Bake for 25-30 minutes until your bread is golden brown on top and sounds hollow if you tap the bottom. That’s a sure sign it’s baked just right.
Step 8: Cool and Enjoy
Take the bread out of the oven and let it sit in the pan for 10 minutes so it firms up a bit. Then move it to a wire rack to cool fully before slicing. Waiting for it to cool makes slicing easier and preserves the tender crumb inside.
This straightforward bread is soft, full of flavor, and perfect for so many uses. I’ll also share some handy baking tips, storage ideas, and ways to serve it fresh!
How Long to Bake Homemade Bread
The baking time really matters to get that beautiful crust and texture, so here’s a quick guide to help:
- Standard Loaf (9×5-inch pan) – Bake at 375°F (190°C) for 25-30 minutes until golden and hollow-sounding when tapped.
- Smaller Loaves or Rolls – These usually need 15-20 minutes at the same temperature.
- Larger Loaves or Artisan Breads – Sometimes a bit longer, about 30-35 minutes, depending on how thick the dough is.
To be absolutely sure your bread is done, you can use a kitchen thermometer—the inside should register 190-200°F (88-93°C). This step can save you from any guesswork.
How to Store Homemade Bread
If you’re lucky enough to have leftovers, storing homemade bread the right way keeps it tasting fresh and delicious:
- Room Temperature – Wrap your bread in a kitchen towel or place it in a bread box for 2-3 days. Avoid plastic wrap here because it traps moisture and makes the crust soft.
- Refrigerator – Not the best place for bread because it can dry out, but you can keep it airtight for up to a week if needed.
- Freezer – Slice your loaf before freezing and stash slices in a freezer bag for up to 3 months. Just toast or warm slices before serving—they taste almost like fresh!
Tips for Perfect Homemade Bread
Want to make sure your bread turns out amazing every time? Here are some friendly pointers:
- Use Fresh Yeast – If your yeast doesn’t foam up during activation, it might be past its prime. Always check the date for best results.
- Measure Flour the Right Way – Using a kitchen scale for your flour gives you the best accuracy and stops your bread from being too dense or dry.
- Knead Just Right – Too little kneading means weak bread, too much can make it tough. Aim for about 8-10 minutes by hand or 5-6 minutes with a stand mixer.
- Let it Rise Fully – The dough should double in size on both rises. Rushing this step leads to a heavy loaf.
- Brush with Butter After Baking – For a beautiful soft crust, brush melted butter over your loaf as soon as it comes out of the oven.
This homemade bread is fantastic for so many uses—sandwiches, breakfast toast, or simply enjoyed with butter and jam. Next, you’ll find a convenient printable recipe with every detail you’ll need!

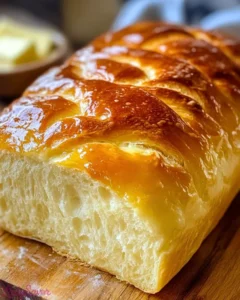
Easy Homemade Bread with a tender and fluffy crumb and golden crust, perfect for sandwiches, toast, or enjoying with butter and jam.
- Total Time: 2 hours 25 minutes
- Yield: 1 loaf (9x5 inch) 1x
Ingredients
- 3 ½ cups all-purpose flour or bread flour
- 1 ¼ cups warm water (100-110°F / 37-43°C)
- 2 ¼ teaspoons active dry yeast (1 packet)
- 2 tablespoons sugar or honey
- 1 teaspoon salt
- 2 tablespoons melted butter or vegetable oil
Instructions
- Activate the Yeast – Combine warm water, yeast, and sugar or honey in a large bowl. Let it sit for 5-10 minutes until foam appears.
- Mix the Dough – Add flour, salt, and melted butter or oil to the yeast mixture. Stir until a rough dough forms.
- Knead the Dough – Turn dough onto a floured surface and knead for 8-10 minutes until smooth and stretchy. Using a stand mixer, knead with dough hook for 5-6 minutes.
- First Rise – Place the dough in a greased bowl, cover, and let it rise in a warm spot for 1-1.5 hours or until doubled in size.
- Shape the Dough – Punch down to release air, shape into a loaf, and place in a greased 9×5-inch loaf pan.
- Second Rise – Cover and let dough rise again for 30-45 minutes until puffy.
- Bake – Preheat oven to 375°F (190°C) and bake for 25-30 minutes until golden brown and hollow-sounding when tapped.
- Cool & Serve – Let bread cool in the pan for 10 minutes, then transfer to a wire rack to cool completely before slicing.
Notes
Bread flour gives more chewiness; all-purpose flour yields a softer crumb; choose based on preference., Use fresh yeast and proof it properly to ensure risen bread., Use kitchen scale for accurate flour measurement to avoid dense or dry bread., Knead the dough adequately to develop gluten, but avoid over-kneading., Allow dough to rise fully twice until doubled in size for light, airy bread., Brushing with melted butter after baking adds a soft crust and richer flavor., Store bread wrapped in a kitchen towel or bread box for 2-3 days at room temperature; avoid plastic wrap to keep crust crisp., Freeze sliced bread in freezer bags for up to 3 months; toast or warm before serving.
- Prep Time: 15 minutes
- Cook Time: 25 minutes
- Category: Bread
- Cuisine: American
Nutrition
- Serving Size: 1 slice
- Calories: Approximately 120 calories per slice (depending on slice size and ingredients)
- Fat: Approximately 3g per slice
- Carbohydrates: Approximately 22g per slice
- Protein: Approximately 4g per slice
More in easy meals

Cottage Cheese Waffles
Easy Homemade Bread

Lemon Cake Mix Cookies