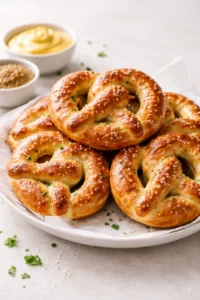
Copycat Olive Garden Breadsticks
Let me tell you, these breadsticks smell absolutely divine while they bake, filling the whole house with warm garlic and butter vibes.
Now, I’ve been to culinary school and learned all about the science behind bread, but this recipe? It’s straightforward and no-nonsense.
Just 7 ingredients, no intimidating rests or complicated rises. It’s truly one of the easiest ways to make fresh, homemade breadsticks at home.

Every time I make these, I’m taken back to those fun family dinners at Olive Garden where breadsticks were basically my whole meal—and now I can make them anytime I want, right at home.
This copycat breadstick recipe beats the restaurant version hands down. Trust me, your family will ask for these again and again, especially alongside a warm bowl of soup or your favorite sauce for dipping.
No fancy tools or bread-baking expertise required—just some love, a few ingredients, and patience while they rise. But fair warning…
These breadsticks are seriously addictive!


3 Tips for Perfect Breadsticks:
- Water: Make sure your water is warm but not hot — about 100-110°F. Too hot will kill the yeast and your breadsticks won’t rise properly.
- The Sugar: A little sugar is a must! It wakes up the yeast and helps keep the breadsticks soft and tender, don’t skip it. They won’t taste sweet at all, promise.
- Measure carefully: Getting your flour right is key. I recommend a kitchen scale to nail the measurements, but if you don’t have one, use the spoon-and-level method to avoid packing too much flour.
Do I Have to Use Bread Flour? Can I Use All-Purpose Flour Instead?
Bread flour has more protein than all-purpose flour, which means it creates breadsticks that are taller, chewier, and fluffier.
If you don’t have bread flour, no worries! Use the same amount of all-purpose flour instead. Just know that you’ll need to knead the dough a bit longer to build good gluten, and your breadsticks might come out a little softer and less chewy.
Are Olive Garden Breadsticks Vegan?
These Copycat Olive Garden Breadsticks aren’t vegan because of the butter. But a few readers have had success swapping in plant-based butters like Country Crock’s avocado oil version or olive oil in the dough with Earth Balance for brushing on top. If you try other vegan swaps, please share how it went in the comments—I’d love to hear!
Which Yeast Should I Use for Breadsticks?
- This recipe uses instant yeast (also called rapid rise or quick rise), which is a real time-saver.
- Instant yeast lets you skip proofing—it goes straight in with the other ingredients.
Help! I Only Have Active Dry Yeast!
If you don’t have instant yeast, you can swap in active dry yeast 1:1. Just remember the rise will take about 20% longer.
If you want to speed things up, dissolve the active dry yeast in warm water with a pinch of sugar and wait about 5 minutes until it gets bubbly before mixing it into the dough.
Can I Knead the Dough By Hand?
Absolutely! While I use a stand mixer with a dough hook to save some elbow grease, kneading by hand works just as well. Just be ready to knead for about 15-20 minutes until the dough gets nice and elastic so your breadsticks hold up perfectly.
How to Tell When Dough Is Risen

- After kneading, shape your dough into a smooth ball.
- Drop it into a lightly oiled bowl. I like glass bowls so I can take a peek at how much it’s puffing up.
- Cover the bowl with plastic wrap, foil, or a kitchen towel and place it in a warm spot free of drafts. The sweet spot is between 80°F and 90°F. If your room is cooler, it’ll just take a bit longer to rise.
- The dough is ready when it’s doubled in size and passes the “ripe test.” Press two fingers gently into the dough up to your second knuckle and pull away. If the little indentations remain, you’re good to go. If not, cover and give it more time.
How to Shape Breadsticks

- Gently press the dough down after it’s risen to knock out some air.
- Place the dough on a clean, dry surface—no flour needed.
- Cut the dough into 12 pieces. They don’t have to be perfect, but if you want to be precise, weigh the total dough and divide by 12 before portioning.
- Roll each piece into an 8-inch log. Don’t stress about perfect shapes—rustic is charming here!
How to Make Breadsticks Ahead of Time
You can totally prepare this bread dough in advance! Yeast dough actually benefits from some chill time to boost flavor and texture.
Fridge method:
Once your dough has risen and shaping is done, cover the breadsticks tightly so they don’t dry out and pop them in the fridge for up to 24 hours.
Before baking, bring them back to room temperature while you preheat the oven. If they still look a bit small, give them some extra time to puff up before baking.
Freezer method:
For longer storage, freeze shaped dough logs after the first rise.
Freeze them on a parchment-lined tray until firm, then transfer to an airtight container or freezer bag. They’ll keep for up to 2 months.
When you’re ready to bake, thaw them on a parchment-lined tray at room temp. Let rise until the dough springs back slowly to the touch. Then bake as in the recipe.
Can I Double This Recipe?
Yes! If your stand mixer holds at least 6 quarts, you’re all set to double. But many home mixers are smaller and can struggle with big batches, sometimes even overheating.
If that’s the case, just make two separate batches—easy and no mess.
How Long Will These Breadsticks Keep?
Fresh breadsticks are best eaten warm and right out of the oven, but leftovers stay good for up to 3 days in an airtight container.
To warm them back up, place on a baking sheet and reheat in a 425°F oven for 4-5 minutes, until soft and cozy again. Feel free to brush with more butter and sprinkle garlic powder and salt while reheating for extra flavor.
How to Freeze Breadsticks
Once baked and cooled, pop your breadsticks into an airtight container and freeze for up to 2 months.
Thaw at room temperature for a few hours, then warm them in a 425°F oven for 4-5 minutes before serving. Brushing with melted butter and a touch of garlic powder makes them taste just like fresh from the oven!
What to Serve with Copycat Olive Garden Breadsticks:
- Simple green side salad for a fresh touch
- A bowl of warm marinara sauce for dipping
- Creamy soups like tomato bisque or broccoli cheddar
- Your go-to pasta dish for a cozy combo

Storage Tips
After baking, keep your breadsticks fresh by storing them in an airtight container at room temperature for up to 3 days. To bring back that just-baked warmth, pop them in the oven at 425°F for about 4-5 minutes, brushing on some butter and a sprinkle of garlic powder for extra flavor. Avoid refrigerating as it can dry them out faster.
Make-Ahead Tips
Life gets busy, I get it! Prepare your dough ahead and refrigerate the shaped breadsticks for up to 24 hours. Just bring them to room temperature before baking so they can puff up nicely. For longer storage, freeze the shaped breadsticks after the first rise; thaw and rise again before popping into the oven. This way, you can enjoy fresh breadsticks whenever the craving hits!
Variations
Feeling adventurous? Mix in some shredded mozzarella or parmesan cheese on top before baking for a cheesy twist. Try brushing the breadsticks with herb-infused olive oil instead of butter for a fresh, fragrant change. You can also sprinkle on dried Italian herbs like rosemary or oregano to amp up the flavor. These tweaks keep things exciting while staying simple.
Serving Suggestions
- Pair these breadsticks with a crisp Caesar or garden salad for a light balance.
- Serve alongside hot, cheesy marinara or your favorite pizza sauce for dipping.
- They’re perfect friends to creamy soups like tomato basil or potato leek.
- Of course, they shine next to classic pasta dishes—think fettuccine Alfredo or spaghetti Bolognese!
Recipe FAQs
- Can I make these gluten-free?
Gluten-free flours behave very differently, so this recipe isn’t a straight swap. However, with some trial and error and a good gluten-free bread flour blend, you might get close. - How do I store leftover dough?
Dough can be refrigerated after the first rise, covered tightly. Use it within 24 hours for best results. - What if my breadsticks don’t rise?
Check your yeast’s expiration date and make sure water isn’t too hot. Also, give the dough more time in a warmer spot to rise. - Can I add fillings?
Absolutely! Try wrapping small pieces of string cheese or herbs inside each roll before shaping for a fun surprise.
Copycat Olive Garden Breadsticks – buttery, garlicky, soft and chewy homemade breadsticks made with simple ingredients and easy steps.
- Total Time: 2 hours 45 minutes to 3 hours (including rising times)
- Yield: 12 breadsticks 1x
Ingredients
- For the dough:
- 1 cup plus 2 tablespoons (250 grams) warm water (100-110°F)
- 1 1/2 teaspoons instant yeast
- 2 tablespoons (25 grams) granulated sugar
- 3 tablespoons (42 grams) unsalted butter, melted
- 1 3/4 teaspoons fine sea salt
- 3 cups (381 grams) bread flour, plus more as needed
- For the topping:
- 2 tablespoons (28 grams) unsalted butter, melted
- 1/2 teaspoon kosher salt
- 1/4 teaspoon garlic powder
Instructions
- Line two baking sheets with parchment paper and set aside.
- In a stand mixer fitted with a dough hook, combine warm water, yeast, sugar, melted butter, and salt. Gradually add bread flour while mixing on low speed.
- Knead the dough on medium speed for 10-15 minutes until tacky and elastic, adding more flour if too sticky.
- Transfer dough to a lightly oiled bowl, cover with plastic wrap, and let rise in a warm spot until doubled in size, about 1 to 1 1/2 hours.
- Divide dough into 12 pieces, roll each into 8-inch logs, and place on prepared baking sheets spaced 2 inches apart. Cover and let rise until doubled, about 1 to 1 1/2 hours.
- Preheat oven to 400°F. Bake breadsticks for 12-14 minutes until golden brown.
- Brush baked breadsticks generously with melted butter. Mix kosher salt with garlic powder and sprinkle evenly on top. Serve warm.
- To reheat leftovers, warm breadsticks on a baking sheet in a 425°F oven for 4-5 minutes, optionally brushing with butter and sprinkling garlic powder and salt.
Notes
Water temperature should be warm (100-110°F) to avoid killing the yeast., Bread flour is preferred for chewier texture; if using all-purpose flour, knead longer for gluten development., The sugar activates the yeast but does not make the breadsticks sweet., You can knead dough by hand for 15-20 minutes if no mixer is available., Dough is ready when doubled in size and indentations remain after pressing fingers (ripe test)., Breadsticks can be prepared ahead: after shaping, cover and chill in fridge up to 24 hours or freeze shaped logs up to 2 months., For longer storage, freeze baked cooled breadsticks for up to 2 months; thaw and reheat as usual., Leftover breadsticks keep for up to 3 days in an airtight container at room temperature., To make vegan, use plant-based butter substitutes in dough and for brushing., Instant yeast is used; active dry yeast can substitute 1:1 but may require proofing and longer rising time.
- Prep Time: 15 minutes
- Cook Time: 12-14 minutes
- Category: Side Dish
- Cuisine: Italian-American
Nutrition
- Serving Size: 1 breadstick
- Calories: Approximately 150-170 calories per breadstick (estimate)
- Fat: Approximately 6 grams per serving (estimate)
- Carbohydrates: Approximately 22 grams per serving (estimate)
- Protein: Approximately 4 grams per serving (estimate)