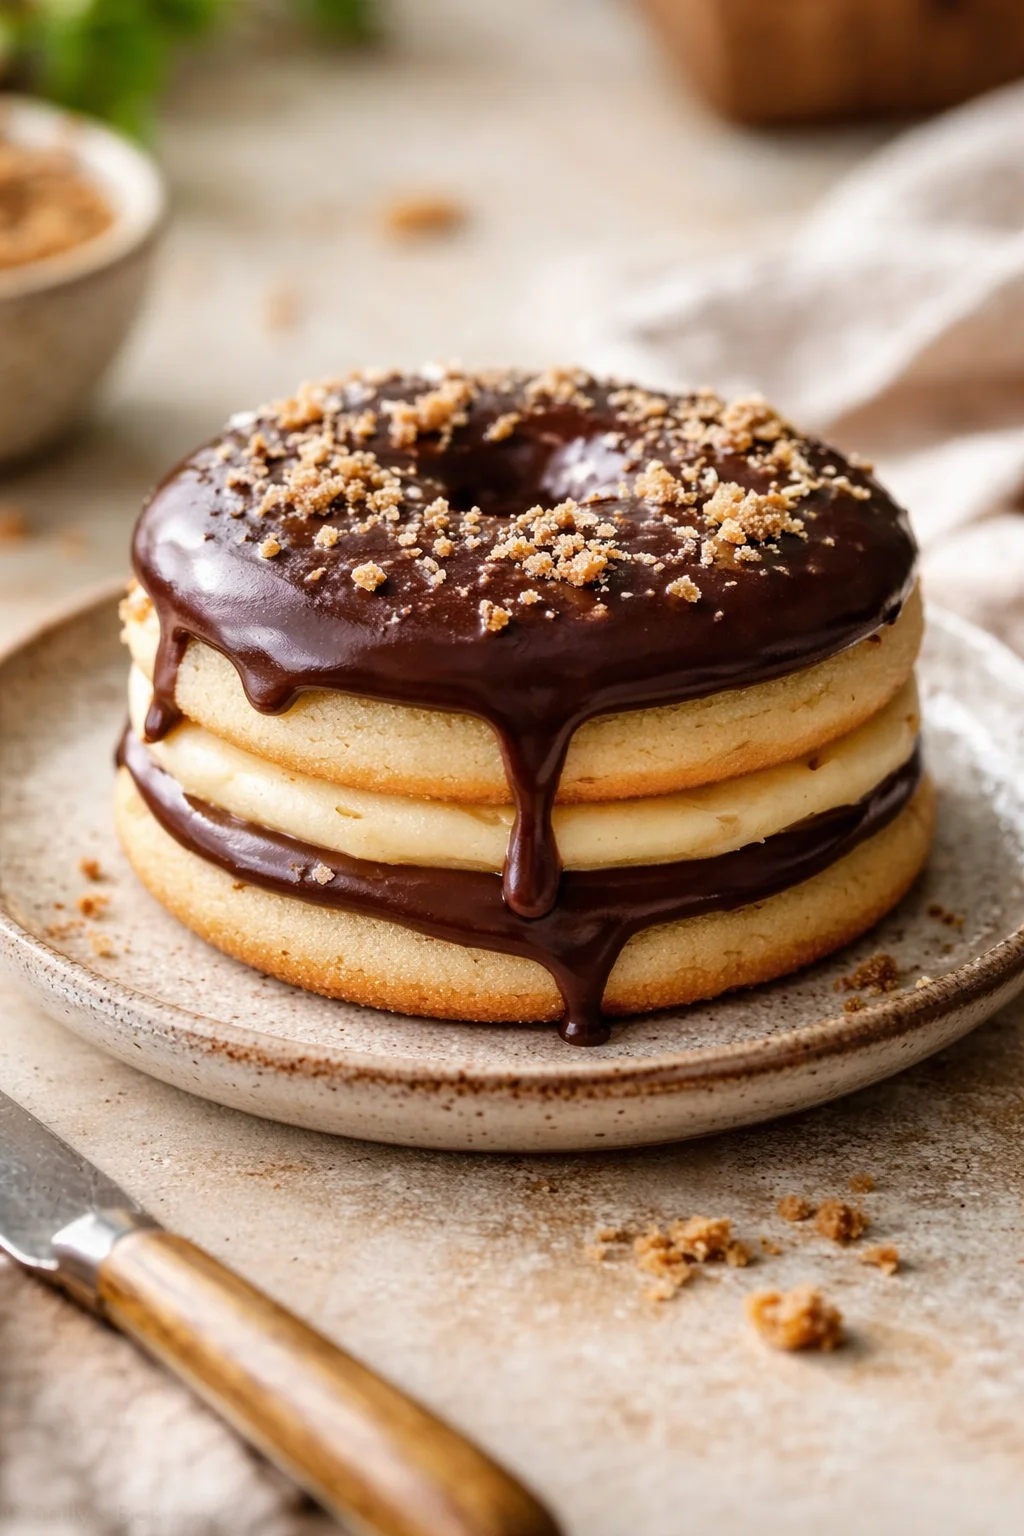
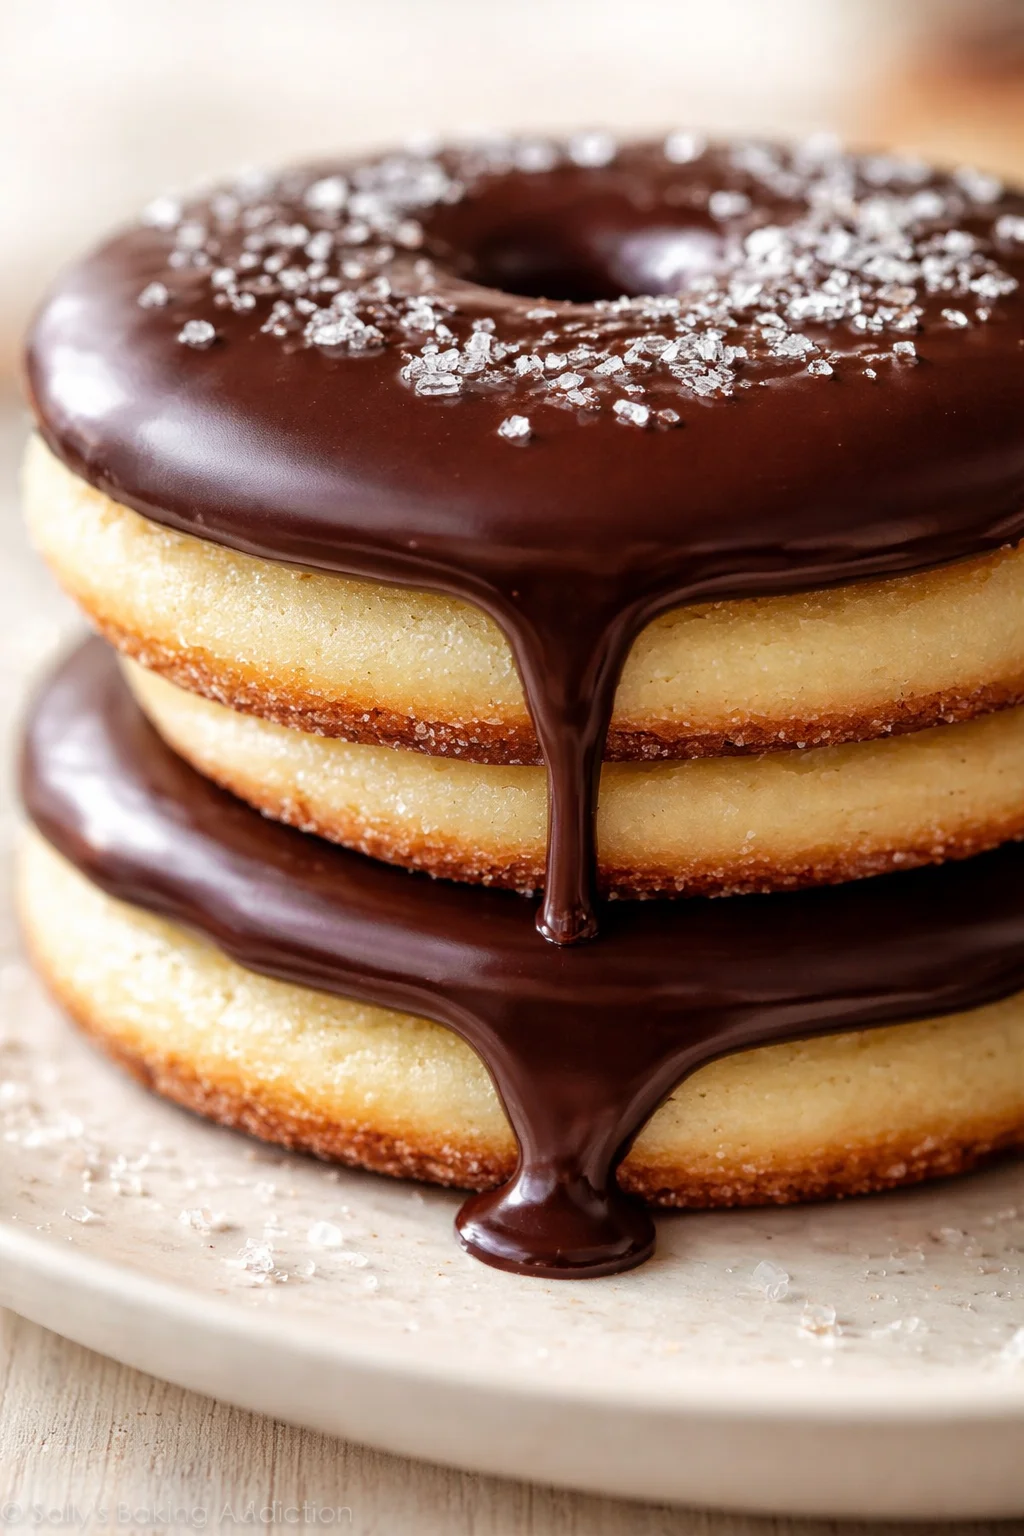
Boston Cream Pie Cookies

Boston Cream Pie Cookies give a charming spin to the classic dessert that many of us grew up loving. Inspired by the iconic Boston Cream Pie, which has been a favorite since the late 1800s, these little cookies pack all those familiar flavors into an easy, handheld treat. Soft, cake-like cookies sandwich a creamy vanilla filling, all topped with a glossy chocolate glaze—making these cookies downright irresistible.
What I truly love about Boston Cream Pie Cookies is how they blend the comforting texture of a cookie with the rich, indulgent flavors of the pie. They’re perfect for everything from casual family snacks to fancy gatherings, or even a sweet little reward after a busy day. The perfect mix of sweetness and creamy filling keeps everyone coming back for more! Honestly, once you give these cookies a try, you’ll quickly see why they’ve become such a family favorite around here.
Boston Cream Pie Cookies take the nostalgic, comforting taste of the traditional Boston Cream Pie and make it fun and portable by turning it into a cookie sandwich. You can expect soft, tender cookies that have a cake-like crumb, filled with a luscious vanilla cream, and topped with a smooth, shiny chocolate glaze—everything you adore about the original pie but easier to serve and share anywhere.
This recipe walks you through every step, from mixing a tender cookie dough, whipping up a simple yet delicious cream filling (plus an optional swap for pastry cream if you want something sturdier), baking the cookies just right, melting the chocolate glaze, and finally assembling those perfect cookie sandwiches. Along the way, I’ll share handy tips to keep things tender and stable, plus flavor variations and smart storage tips so your cookies stay fresh and tasty.
There’s a bit of a rhythm to this—your dough will chill to get a little firmer, and the cream needs to stay nice and cool—but no fancy kitchen gadgets needed! Just everyday pantry staples and a little patience. Ready to bake up some fun? Gather those ingredients, and let’s dive in step by step to create perfectly delicious Boston Cream Pie Cookies.
Why These Are Irresistible
To sum it up, these Boston Cream Pie Cookies are a guaranteed crowd-pleaser for anyone who adores the classic dessert but wants a more playful, portable version. They give you that soft, cake-like cookie with a creamy, indulgent filling and a shiny chocolate finish that’s hard to resist. Whether you’re bringing them to a party, enjoying a cozy afternoon snack, or treating your family to a special dessert, these cookies are sure to steal the show.
For serving, think about pairing these cookies with a scoop of vanilla ice cream or a fluffy dollop of whipped cream for a little extra decadence. You can also get creative with flavors—try adding a touch of almond extract to your filling or use dark chocolate for a richer glaze that adds a little twist to the classic flavor. Craving something citrusy? Lemon Curd Thumbprint Cookies deliver a bright, custardy center in a buttery cookie.
I can’t wait for you to try this recipe and hear all about your baking adventures! Feel free to share your cookie creations and any fun twists you put on them. If you’re in the mood for another beloved filled cookie, give Kolacky Cookies a try next. Now, roll up your sleeves, grab those ingredients, and get ready for a sweet treat that brings all the joy of Boston Cream Pie into a cute, cookie form. Happy baking, friends!
Ingredients and Measurements
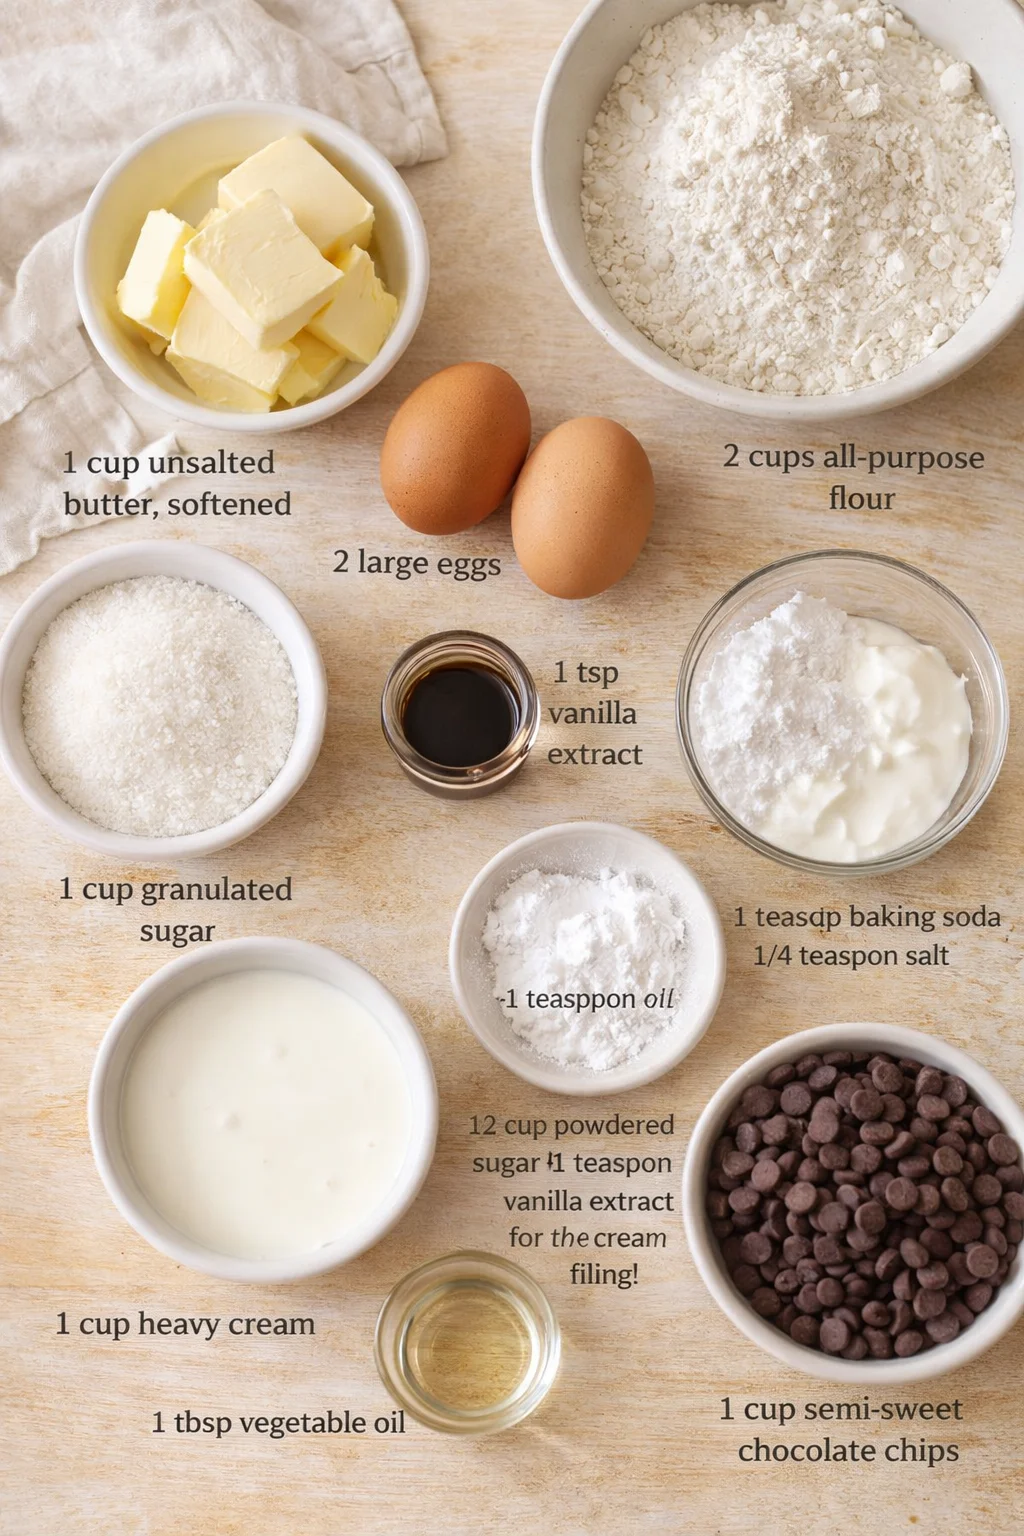
- 1 cup unsalted butter, softened
- 1 cup granulated sugar
- 2 large eggs
- 1 teaspoon vanilla extract
- 2 cups all-purpose flour
- 1 teaspoon baking powder
- 1/2 teaspoon baking soda
- 1/4 teaspoon salt
- 1 cup heavy cream
- 1/2 cup powdered sugar
- 1 teaspoon vanilla extract (for the cream filling)
- 1 cup semi-sweet chocolate chips
- 1 tablespoon vegetable oil
Baking and Assembly Instructions
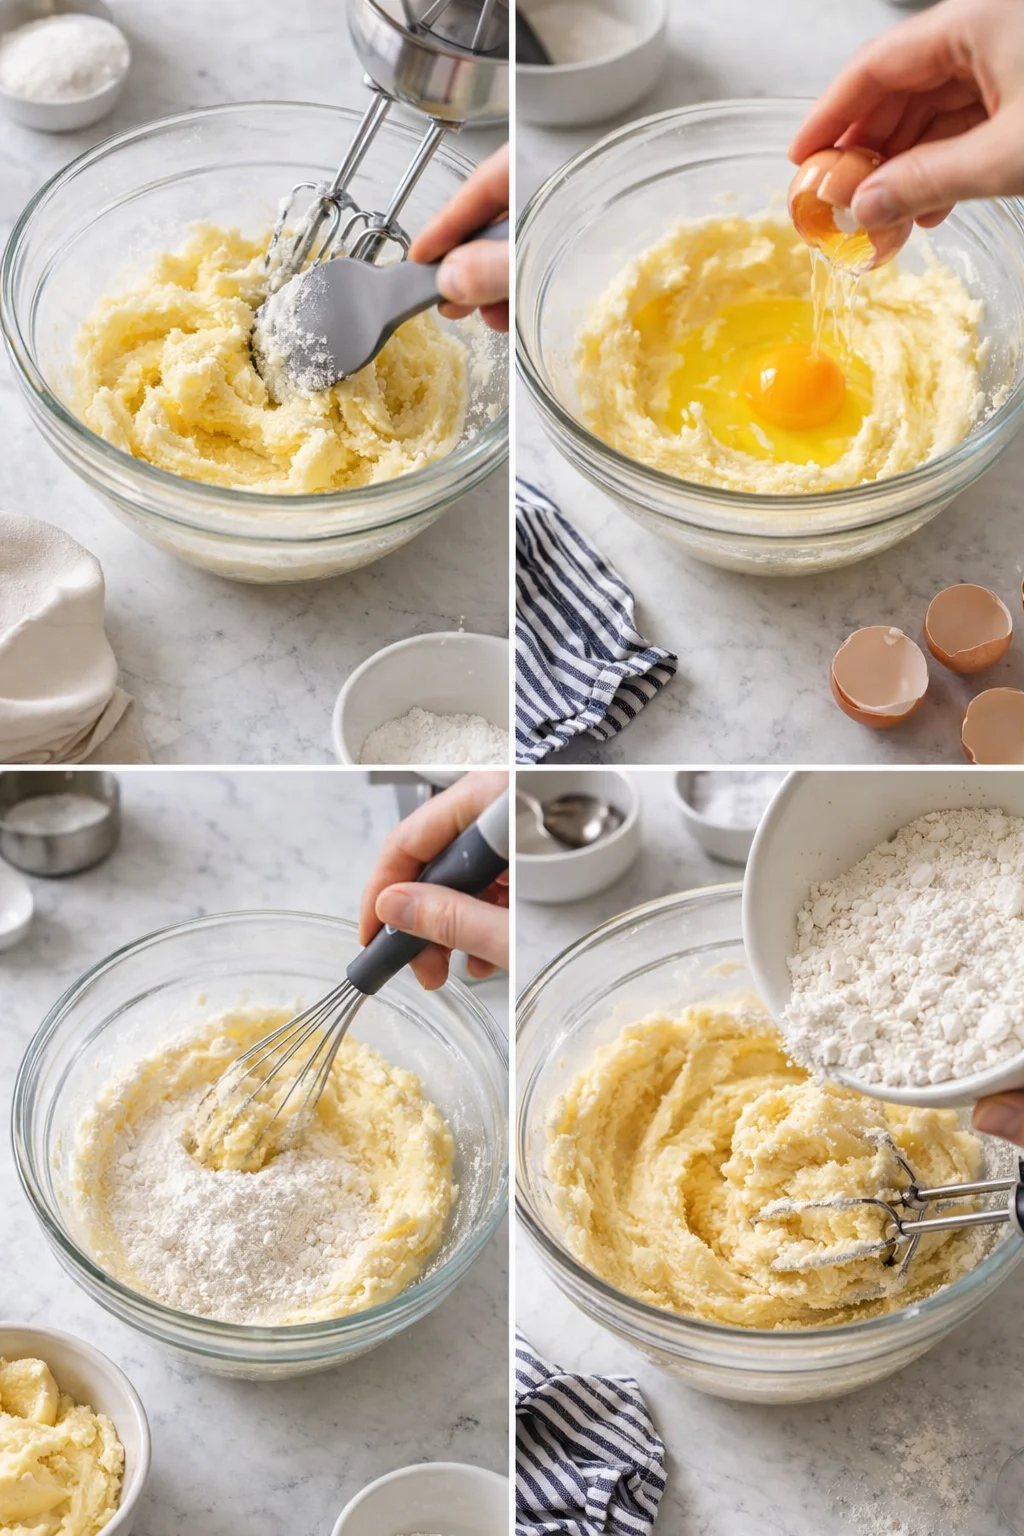
- Beat 1 cup softened unsalted butter and 1 cup granulated sugar on medium speed until light, fluffy, and pale, about 3–4 minutes.
- Add 2 large eggs one at a time, mixing fully after each, then stir in 1 teaspoon vanilla extract.
- Whisk together 2 cups all-purpose flour, 1 teaspoon baking powder, 1/2 teaspoon baking soda, and 1/4 teaspoon salt in a separate bowl.
-
Slowly add the dry ingredients to the butter mixture on low speed and mix just until combined.
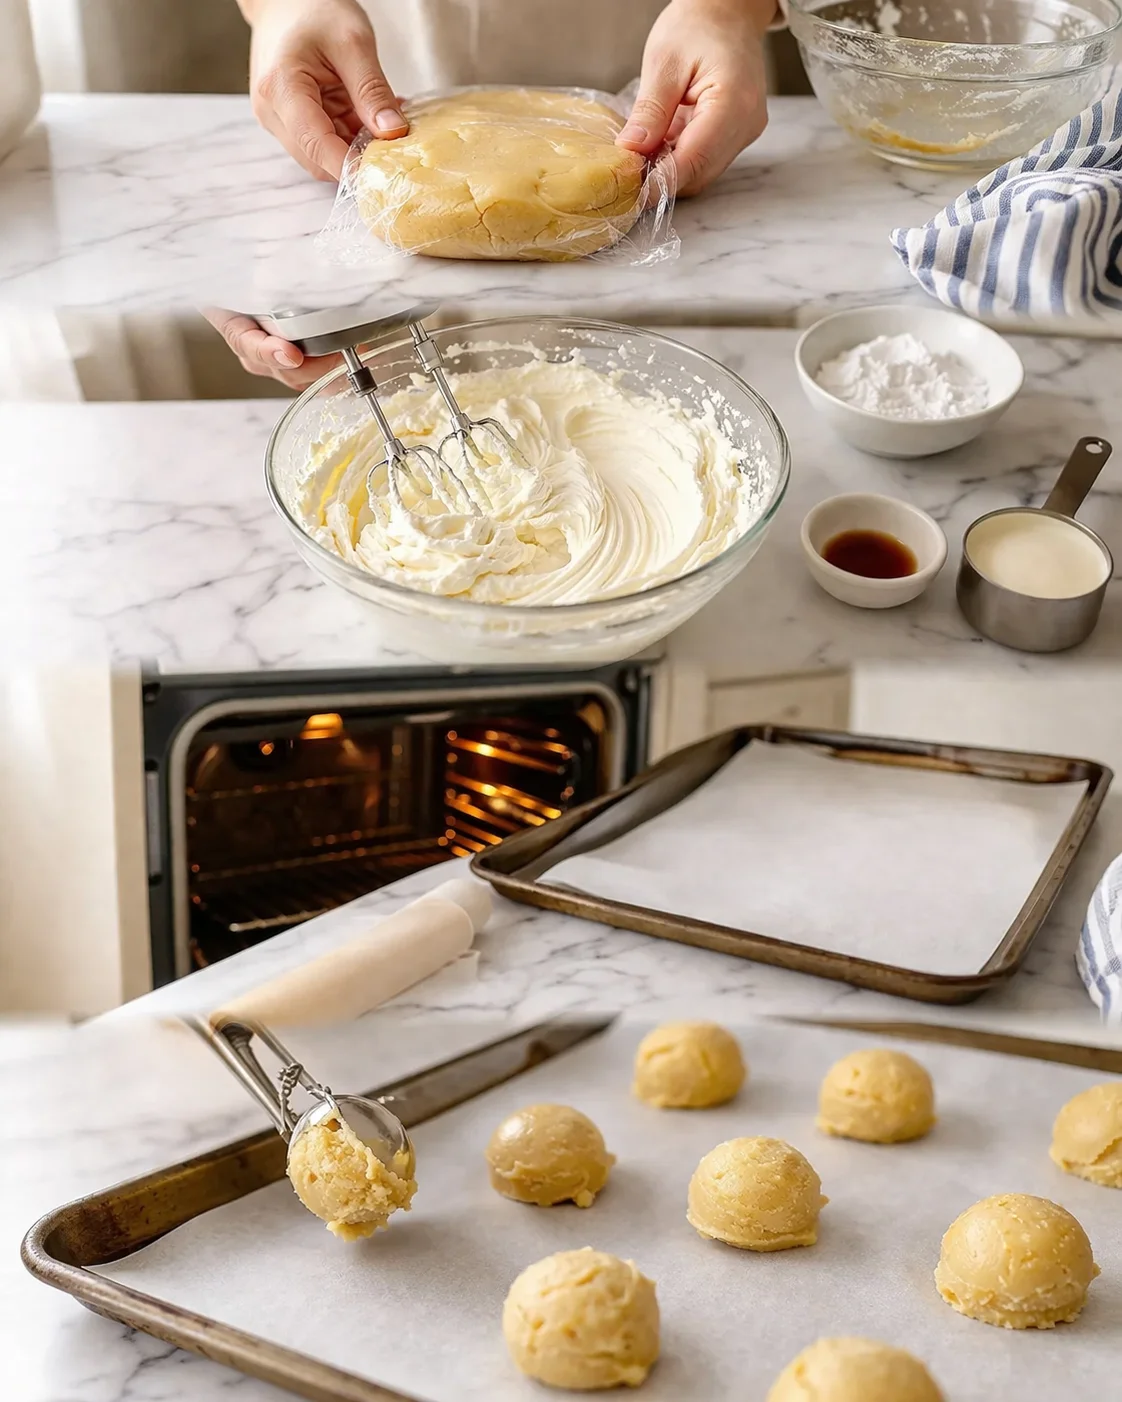
- Wrap the dough tightly and chill in the refrigerator for at least 30 minutes.
- In a chilled bowl, combine 1 cup heavy cream, 1/2 cup powdered sugar, and 1 teaspoon vanilla extract; whip with a mixer to stiff peaks (about 3–5 minutes) and refrigerate until ready to assemble.
- Preheat the oven to 350°F (175°C) and line baking sheets with parchment paper.
-
Scoop rounded dough balls onto the prepared sheets, spacing about 2 inches apart.
- Bake for 10–12 minutes until edges are lightly golden and centers appear slightly soft.
- Cool the cookies on the baking sheet for 5 minutes, then transfer to a wire rack to cool completely.
- Combine 1 cup semi-sweet chocolate chips and 1 tablespoon vegetable oil in a microwave-safe bowl and heat in 30-second increments, stirring between bursts, until melted and smooth (or melt over a double boiler); let cool until pourable.
-
Place one cookie flat side up, dollop or pipe a generous spoonful of chilled whipped cream on it, then top with a second cookie flat side down and press lightly to spread the filling; repeat for remaining cookies.
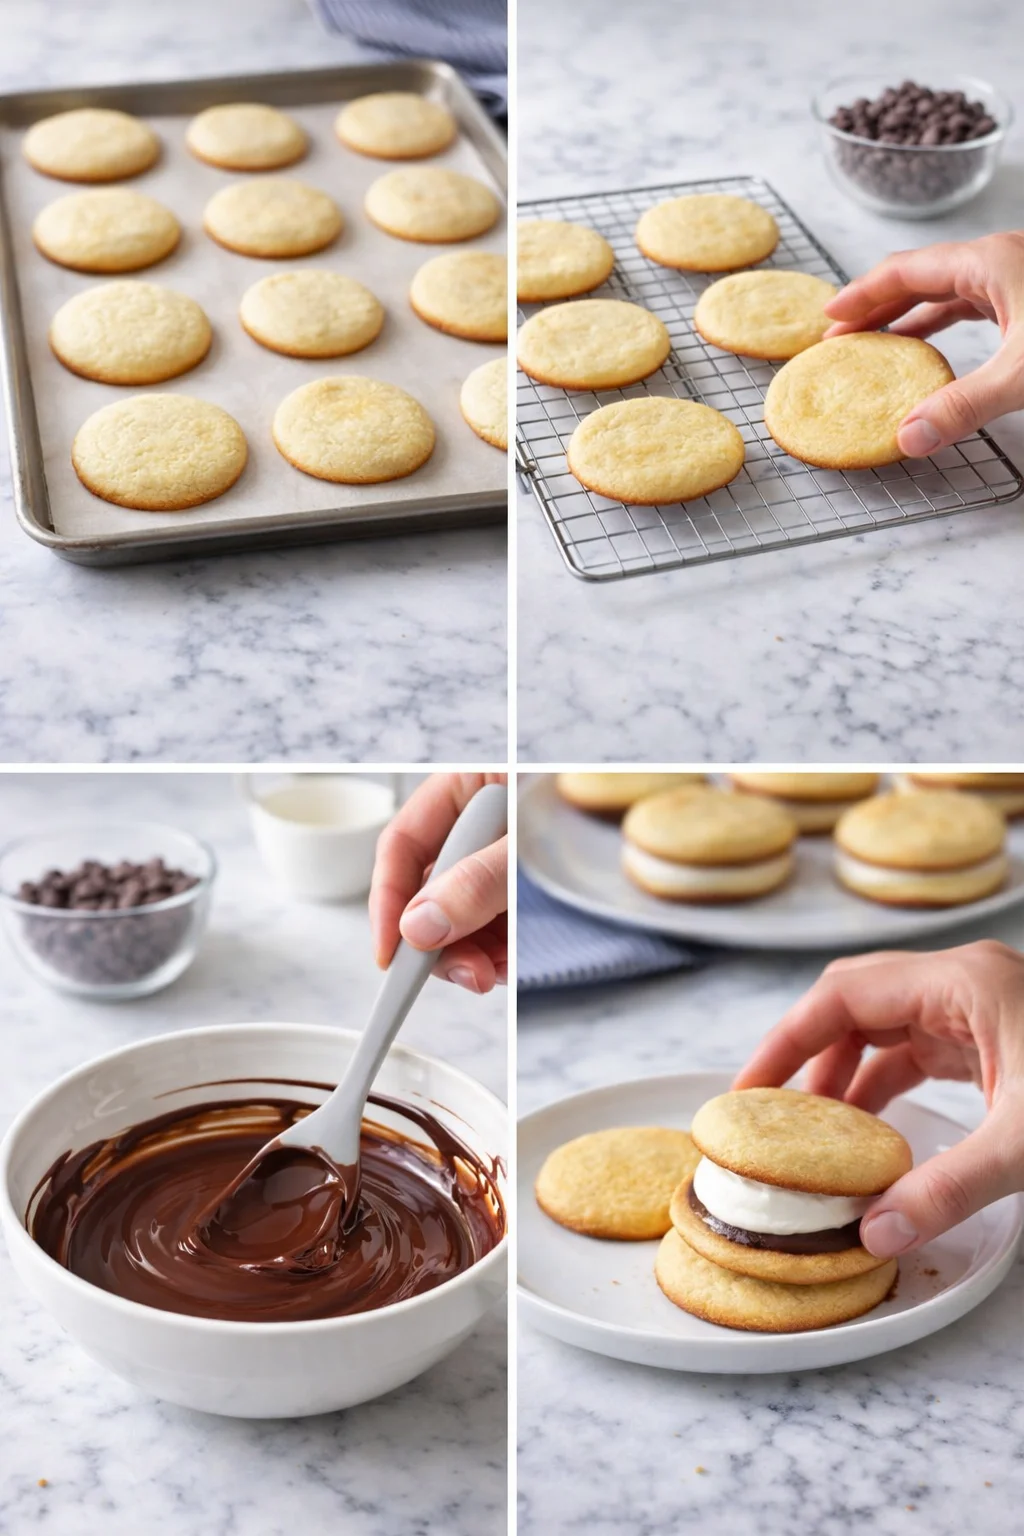
- Dip the tops of the assembled sandwiches into the melted chocolate or spoon the glaze over them, let excess drip off, and set them on parchment or a rack to harden.
-
Let the chocolate set at room temperature or chill the cookies in the refrigerator for 5–10 minutes to firm the glaze.
Tips for Best Texture and Stability
- Chill your dough: Letting the dough rest in the fridge for at least 30 minutes keeps the cookies from spreading too much and gives them a soft, cake-like texture. For more on controlling spread, see The BEST Chocolate Chip Cookies.
- Mix gently: Once you add the flour, blend everything just enough to combine. Overmixing tightens gluten and makes cookies tough.
- Whip the cream with care: Stop whipping as soon as you see stiff peaks—this Strawberries and Cream Swiss Roll shows the right texture. Going beyond that turns your cream grainy and buttery.
- Keep the cream stable: If you want your filling to hold up longer for a party or longer transport, fold in a tablespoon of instant pudding mix or a couple tablespoons of cream cheese or mascarpone for extra stability.
- Handle the chocolate glaze gently: If you microwave, heat in short bursts and stir often to avoid seizing. A splash of vegetable oil keeps it shiny and smooth.
- Make sure cookies are cool before glazing: Warm cookies can melt the chocolate and cause it to run off.
- Give dough balls room to spread: Leave at least 2 inches between each scoop to keep them from sticking together.
Variation Ideas and Substitutions
- Go classic with pastry cream: Swap out the whipped cream for a homemade or store-bought vanilla pastry cream for the authentic Boston Cream Pie filling experience.
- Try different chocolates: Use dark chocolate for a richer, bittersweet glaze or milk chocolate if you want it sweeter and mellow.
- Add flavor hints: Stir in 1/2 to 1 teaspoon of instant espresso powder into your glaze (espresso deepens chocolate flavor, as in these Espresso Chocolate Pinwheel Cookies) or add almond extract to your dough or filling for a subtle, interesting twist.
- Mini sandwich cookies: Use a smaller cookie scoop to make bite-sized versions. Adjust baking time to about 6 to 8 minutes.
- Fruit twist: Add a thin spread of raspberry or apricot jam—or make a quick berry chia seed jam—beneath the cream filling for a pop of fruity brightness.
- Gluten-free option: Swap the all-purpose flour for a 1:1 gluten-free flour blend. Make sure to chill the dough well and keep an eye on baking time.
Storage and Make-Ahead Strategies
If you have unassembled cookies, store them cooled in an airtight container at room temperature for up to three days. For longer storage, freeze the baked cookies in a single layer on a baking sheet first, then transfer to a freezer bag. They keep well frozen for up to three months. Just thaw at room temperature before assembling.
Your cream filling should stay refrigerated and is best used within 24 to 48 hours. The chocolate glaze can be kept covered in the fridge for up to a week. Warm it gently to soften before you glaze again.
Once your Boston Cream Pie Cookies are assembled, keep them refrigerated and enjoy within 24 to 48 hours if you’re using whipped cream filling. If you’ve stabilized the filling or used pastry cream, you can keep them refrigerated for up to three days. Store sandwiches in a single layer or separate layers with parchment paper to protect the glaze from smearing—especially for glazed cookies like Pistachio Shortbread Cookies with Raspberry Glaze.
Freezing assembled cookies is tricky. It’s best to freeze components separately. You can freeze baked cookies or dough (as mentioned)—this also works well for cut-out doughs like Lemon Cut Out Cookies—but avoid freezing sandwiches with whipped cream since it can separate. Pastry cream-filled sandwiches freeze better—wrap them tightly and freeze for up to a month. Thaw overnight in the refrigerator before serving.
Common Questions and Troubleshooting
- Can I use pastry cream instead of whipped cream? Absolutely! Pastry cream is more traditional and stands up better for longer storage or warmer settings. Just make sure it’s fully cooled before assembling.
- How do I stop the cookies from getting soggy? The key is to assemble them close to serving time and store any leftovers in the fridge. Using a stabilized filling or pastry cream helps keep sogginess at bay as well.
- My whipped cream turned grainy—what happened? That’s a sign of overwhipping. You might rescue it by gently folding in a little fresh cream to soften the texture, or you may need to whip up a new batch.
- Can I melt the chocolate without a microwave? Definitely! Use a double boiler: melt the chocolate and oil in a heatproof bowl set over simmering water, stirring gently. Just make sure no steam or water gets into the chocolate or it could seize. For a quick walkthrough on gentle melting, see the white chocolate technique in our White Chocolate Strawberry Truffles.
- How long will the assembled cookies keep? With whipped cream filling, enjoy them within 1 to 2 days for best taste. With a sturdy filling like pastry cream, they’ll last up to 3 days refrigerated.
- Can I make these ahead for a party? Yes! Bake and cool the cookies up to three days ahead or freeze them. Prepare the filling and chocolate glaze the day you plan to serve. Assemble the cookie sandwiches just before guests arrive to keep everything fresh. Planning a cookie assortment? The BEST Sugar Cookies hold beautifully and can be made days ahead.

Soft, cake-like cookies sandwiching a creamy vanilla filling, topped with a glossy chocolate glaze, inspired by the classic Boston Cream Pie dessert.
- Total Time: 1 hour
- Yield: 24 sandwich cookies (48 cookies before assembly) 1x
Ingredients
- 1 cup unsalted butter, softened
- 1 cup granulated sugar
- 2 large eggs
- 1 teaspoon vanilla extract (for the dough)
- 2 cups all-purpose flour
- 1 teaspoon baking powder
- 1/2 teaspoon baking soda
- 1/4 teaspoon salt
- 1 cup heavy cream
- 1/2 cup powdered sugar
- 1 teaspoon vanilla extract (for the cream filling)
- 1 cup semi-sweet chocolate chips
- 1 tablespoon vegetable oil
Instructions
- Beat softened unsalted butter and granulated sugar on medium speed until light, fluffy, and pale, about 3–4 minutes.
- Add eggs one at a time, mixing fully after each, then stir in vanilla extract for the dough.
- Whisk together all-purpose flour, baking powder, baking soda, and salt in a separate bowl.
- Slowly add the dry ingredients to the butter mixture on low speed and mix just until combined.
- Wrap the dough tightly and chill in the refrigerator for at least 30 minutes.
- In a chilled bowl, combine heavy cream, powdered sugar, and vanilla extract; whip with a mixer to stiff peaks (about 3–5 minutes) and refrigerate until ready to assemble.
- Preheat the oven to 350°F (175°C) and line baking sheets with parchment paper.
- Scoop rounded dough balls onto the prepared sheets, spacing about 2 inches apart.
- Bake for 10–12 minutes until edges are lightly golden and centers appear slightly soft.
- Cool the cookies on the baking sheet for 5 minutes, then transfer to a wire rack to cool completely.
- Combine semi-sweet chocolate chips and vegetable oil in a microwave-safe bowl and heat in 30-second increments, stirring between bursts, until melted and smooth; let cool until pourable.
- Place one cookie flat side up, dollop or pipe a generous spoonful of chilled whipped cream on it, then top with a second cookie flat side down and press lightly to spread the filling; repeat for remaining cookies.
- Dip the tops of the assembled sandwiches into the melted chocolate or spoon the glaze over them, let excess drip off, and set them on parchment or a rack to harden.
- Let the chocolate set at room temperature or chill the cookies in the refrigerator for 5–10 minutes to firm the glaze.
Notes
Chill dough for at least 30 minutes to keep cookies from spreading and to achieve a soft, cake-like texture., Mix dry ingredients into wet only until combined to avoid tough cookies., Stop whipping cream once stiff peaks form to prevent graininess., Stabilize cream filling with instant pudding mix or cream cheese for longer shelf life., Heat chocolate glaze gently to avoid seizing and add vegetable oil for smoothness and shine., Ensure cookies are cool before glazing to prevent melting chocolate., Leave at least 2 inches between dough balls on baking sheet to prevent sticking., For sturdier filling, substitute whipped cream with cooled pastry cream., Variations include using dark or milk chocolate for glaze, adding almond extract or espresso powder for flavor twist, and adding a thin layer of fruit jam under cream filling., Gluten-free flour blend can replace all-purpose flour; adjust baking time and chill dough well.
- Prep Time: 20 minutes plus 30 minutes chilling time
- Cook Time: 10-12 minutes per batch
- Category: Dessert
Nutrition
- Serving Size: 1 sandwich cookie
- Calories: Approximately 180 calories per sandwich cookie
- Fat: Approximately 9 grams per serving
- Carbohydrates: Approximately 25 grams per serving
- Protein: Approximately 3 grams per serving
More in easy meals

Creamy, Crunchy Dill Pickle Dip

Boston Cream Pie Cookies

Snoop Dogg’s Rolls Royce Cookies