Chocolate Snowball Cookies with White Chocolate Center – Pin Desserts
A Warm Winter Tale
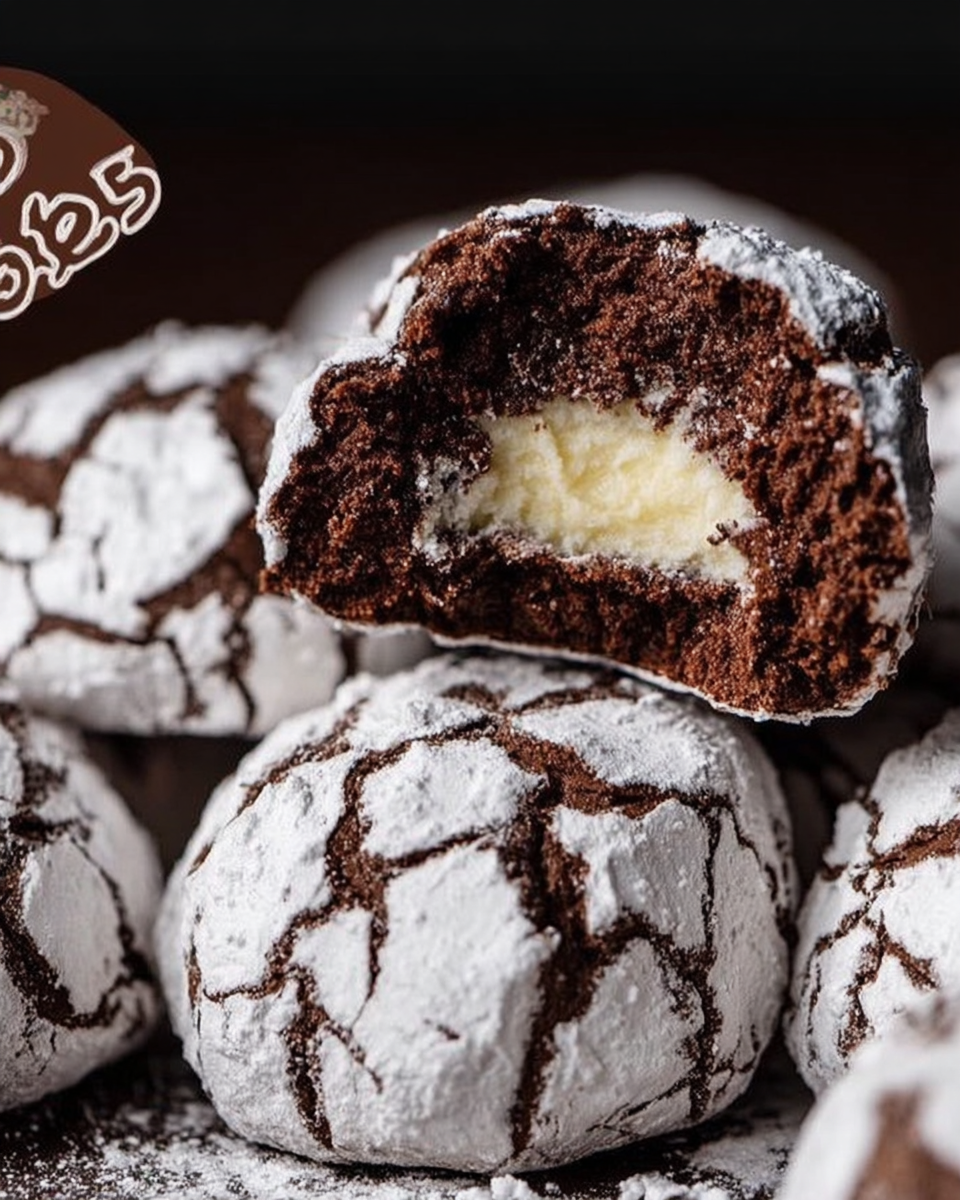
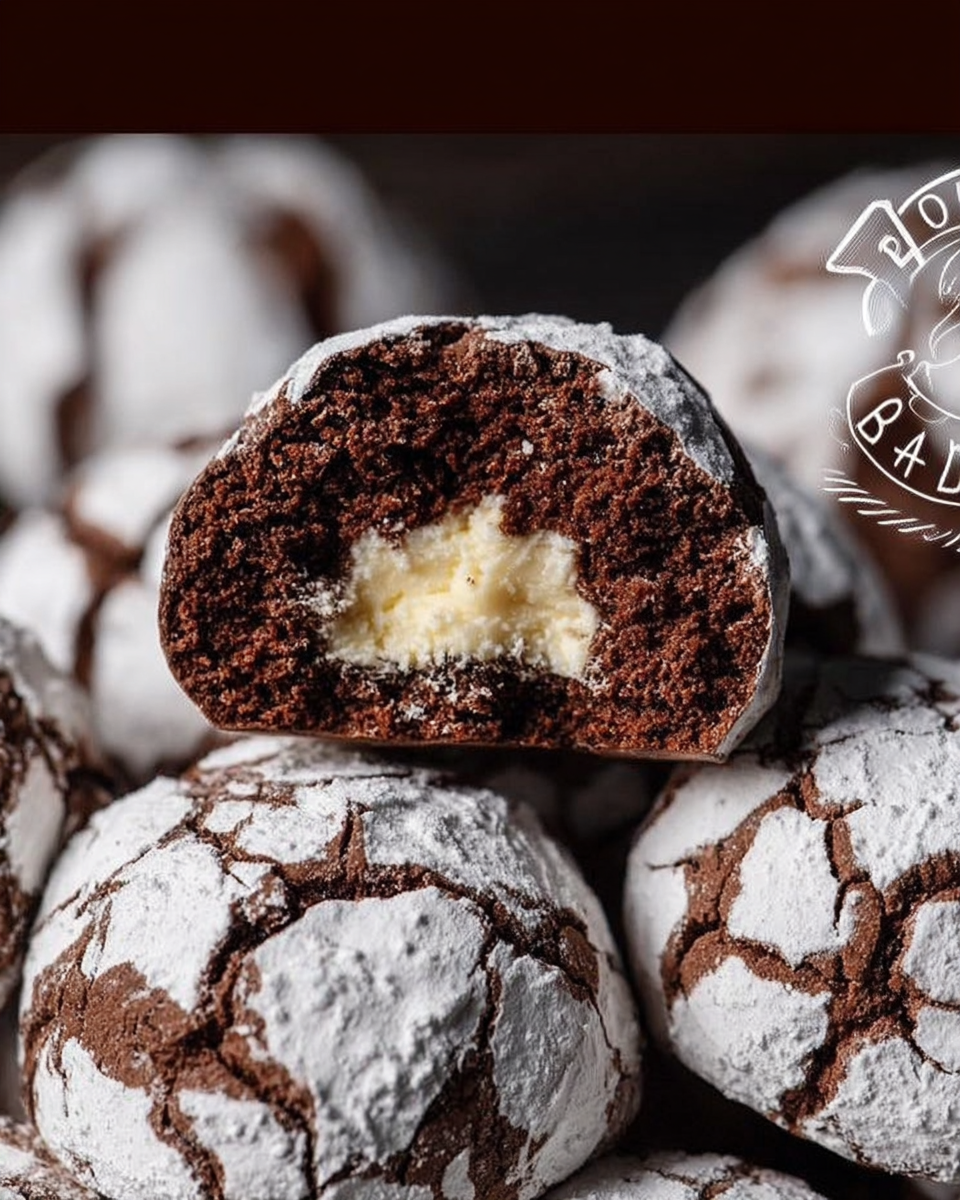
Chocolate Snowball Cookies are these little bundles of joy coated in a snowy dusting of powdered sugar. I first discovered them on a chilly evening when I was craving something chocolatey but light enough not to feel too heavy. These cookies hit that cozy spot perfectly. Their soft, fudgy chocolate shell hides a creamy white chocolate center that just melts away. The way the smooth center and tender outside combine is pure comfort food, like wrapping yourself in a warm, sweet hug.
That powdered sugar coating gives these cookies a festive look that’s perfect for chilly evenings by the fire or cozy holiday gatherings. They look elegant but come together quickly with simple pantry staples. Honestly, this recipe works for everyone—from the baking beginner just finding their footing to the seasoned home cook wanting a crowd-pleaser.
So grab your apron and stick with me—I’m going to guide you through everything step by step. We’ll explore the ingredients, dough-making tips, shaping magic, baking secrets, and some fun ways to make this cookie your own wintertime favorite.
Ingredients You’ll Need and Why They Matter
This recipe keeps things straightforward, but each ingredient plays a big role in the cookie’s perfect texture and taste. Using softened unsalted butter gives these cookies a tender crumb and rich flavor. I always go with unsalted because it lets me control the salt level exactly—little things like that make a difference.
Mixing granulated sugar with powdered sugar gives you two great effects: the granulated sugar builds a bit of structure and crispness, while the powdered sugar added at the end gives that soft, velvety snowy finish we all love. And don’t forget, your cocoa powder should be unsweetened to pack that rich, deep chocolate punch. No need to buy expensive brands, but a good-quality cocoa really shines here.
A splash of vanilla extract and just a pinch of salt balance all the flavors perfectly without tipping the sweetness overboard. Now the best part: white chocolate chunks. They’re the surprise gooey center that melts delightfully with every bite.
A touch of baking powder helps these cookies puff up gently and hold their round, snowball shape instead of spreading too flat. It adds just the right amount of lift.
Creating the Dough: A Balance of Patience and Precision
Mixing this dough is simple but it’s all about a gentle hand and a little patience. Start by creaming the butter and sugar until you get a fluffy, pale mixture. This is where some air gets incorporated, which makes the cookies tender and soft. Add the eggs one at a time, mixing well after each, but be careful not to overmix—the dough should just come together for the best texture.
Mix your dry ingredients—flour, cocoa powder, baking powder, and salt—in a separate bowl first. This helps them blend evenly and avoids any clumps in the final dough. Then, gently fold this dry mix into your wet mixture. The dough might feel a bit sticky—that’s totally normal! Just pop it in the fridge for at least an hour. Chilling is key: it firms up the dough, making it easier to work with and helps those flavors marry beautifully.
Shaping and Filling: Where the Magic Happens
Shaping these cookies is kinda fun and feels a little like your own mini craft project. Scoop about a tablespoon of chilled dough and roll it into a ball. Flatten it in your hand, then nestle a good chunk of white chocolate right in the center. Take another small piece of dough, flatten it too, and cover that chocolate, pinching the edges tight so it’s sealed. Then roll the whole thing into a smooth ball again.
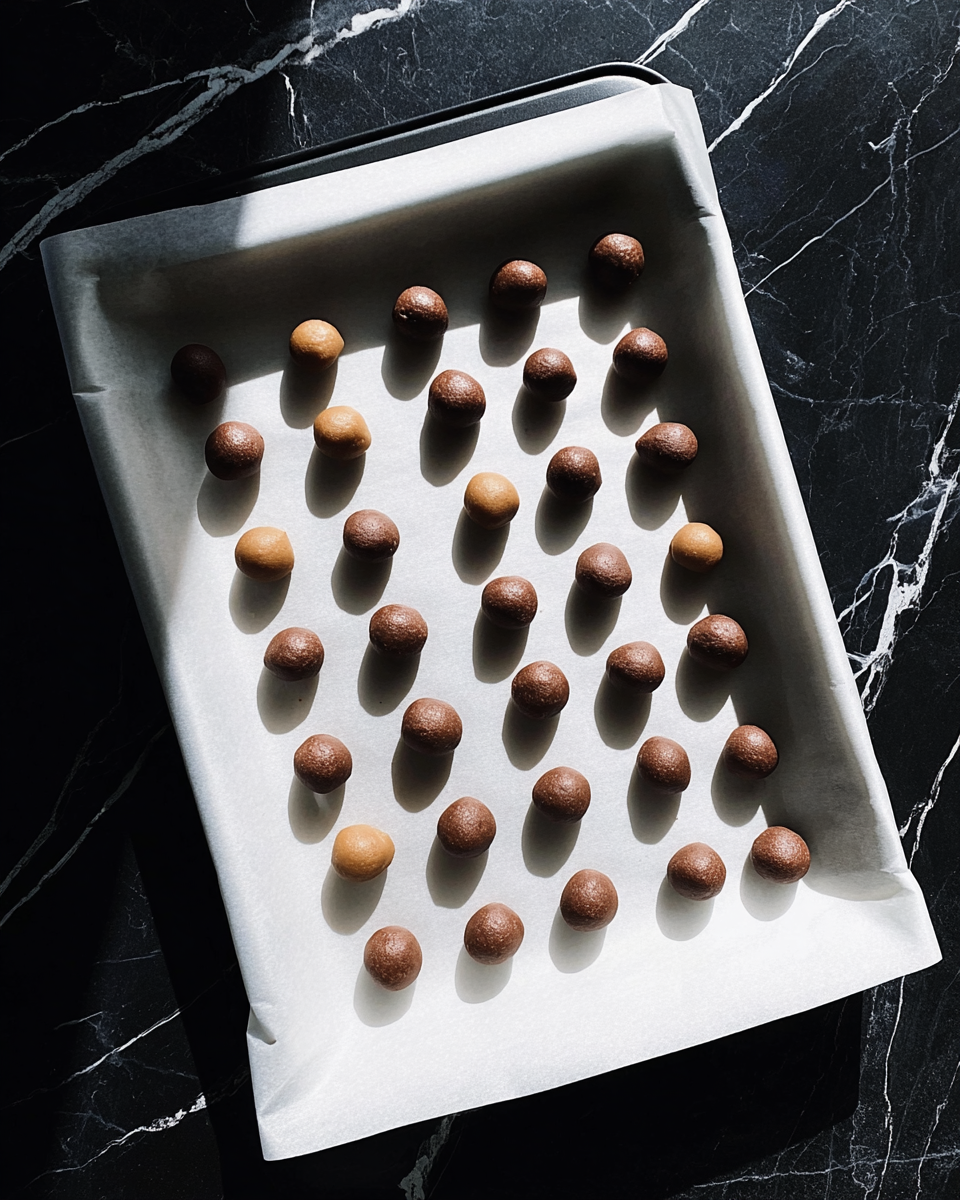
This step really rewards your care. Make sure the white chocolate is totally sealed inside so it doesn’t leak as it bakes. I even find it soothing to shape these cookies—like a little calming break in the middle of a busy day—knowing that creamy chocolate surprise is waiting for you in every bite.
Baking for That Signature Snowball Look
Preheat your oven to 350°F (175°C) to get ready. Bake these little gems for just 10 to 12 minutes. You’ll see the tops crackle just like classic snowballs and the edges will look set, but the center will still feel a bit soft. That’s perfect because they’ll keep baking a bit as they cool, staying soft and fudgy inside. So don’t fret if they seem a little underbaked when you pull them out.
Let them rest on the baking sheet for about five minutes to set up without cooling too fast, then move them to a wire rack to cool completely. This little pause really makes a difference for texture and flavor.
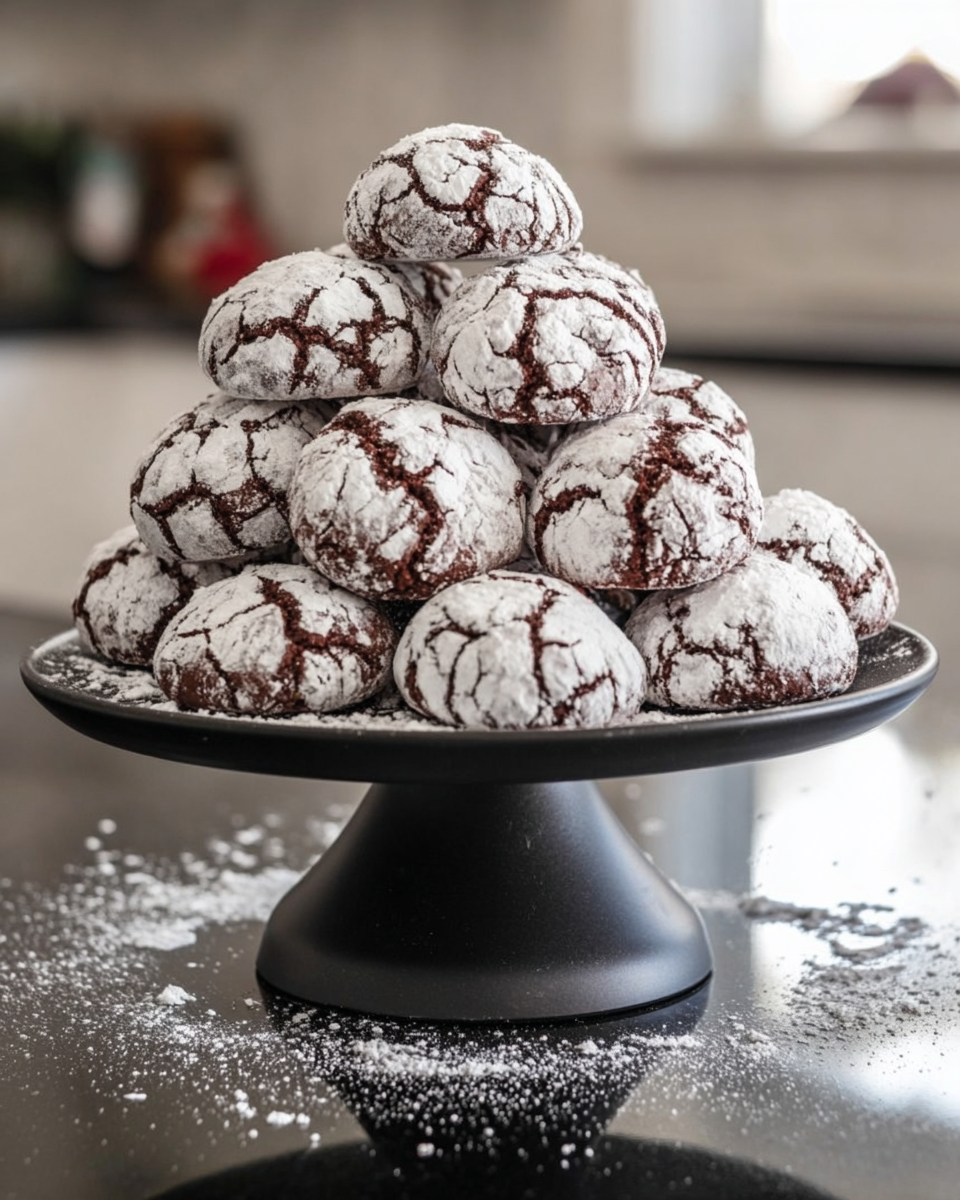
The Snowy Coating: A Final Touch of Sweetness
Once the cookies have cooled completely, it’s time to give them their signature snowy makeover. Roll each one generously in powdered sugar to coat every nook. I like to do a quick extra dusting right before serving, especially if they’ve been sitting a day or two. That second layer freshens them up and keeps them looking like a winter wonderland. Plus, the slight sweetness perfectly contrasts the rich chocolate inside.
How Long Will Chocolate Snowball Cookies Keep?
If you want to prepare these ahead of time or have them ready for your next gathering, they keep really well. Store them in an airtight container layered with parchment paper so they don’t stick together. At room temperature, they stay fresh and delicious for about 4 to 5 days.
Looking to store them longer? Freeze them without the powdered sugar coating. When you’re ready to enjoy, just thaw and roll them in powdered sugar before serving. This little trick helps them keep that freshly baked look and gooey center almost perfectly.
Bonus Tips for Success
- Chill the Dough Properly: Don’t skip chilling! It firms up the dough so it’s easier to shape and keeps the cookies nice and round during baking.
- Choose Quality White Chocolate: This filling is the surprise star, so pick a white chocolate that melts smoothly and tastes creamy for that perfect gooey center everyone will rave about.
- Watch Your Bake Time: Pull the cookies when edges are set but centers still feel soft. They finish cooking as they cool, which keeps them tender and fudgy inside.
Serving Options
These Chocolate Snowball Cookies are simple but super adaptable. They shine on their own but are also wonderful with a warm drink. Picture them next to your morning coffee, a steaming mug of hot cocoa, or even a peppermint mocha for a festive twist. Want to make your cookie plate extra special? Arrange the cookies on a pretty platter with some fresh rosemary sprigs or holly for that holiday touch.
If you want to add a little flair, drizzle melted dark chocolate over the cookies for a rich contrast. Or sprinkle some edible glitter for a little sparkle at your next party. Those tiny extras make them feel special and festive, without extra fuss.
Chocolate Snowball Cookies with a soft, fudgy chocolate dough and a gooey white chocolate center, coated generously in powdered sugar for a festive, melt-in-your-mouth treat.
- Total Time: 1 hour 32 minutes
- Yield: 24 cookies 1x
Ingredients
- 1 cup unsalted butter, softened
- 1 1/2 cups granulated sugar
- 2 large eggs
- 2 teaspoons vanilla extract
- 2 cups all-purpose flour
- 3/4 cup unsweetened cocoa powder
- 2 teaspoons baking powder
- 1/2 teaspoon salt
- 1 cup white chocolate chunks or large chips
- 1 cup powdered sugar, for coating after baking
Instructions
- PREPARE THE DOUGH: Beat the softened butter and granulated sugar in a large bowl until fluffy and pale, about 2 to 3 minutes. Add the eggs one at a time, mixing thoroughly after each. Stir in the vanilla extract. In a separate bowl, whisk together the flour, cocoa powder, baking powder, and salt. Slowly add the dry ingredients to the wet mixture, mixing on low speed until just combined. Cover the dough and chill for at least 1 hour.
- FORM THE WHITE CHOCOLATE CENTER: Scoop about 1 tablespoon of chilled dough and roll into a ball. Flatten it in your palm and place a white chocolate chunk or a few large chips in the center. Take another small dough piece, flatten it, cover the chocolate, pinch edges tightly to seal, and roll into a smooth ball. Ensure the white chocolate is fully enclosed to prevent melting out during baking.
- BAKE THE COOKIES: Preheat oven to 350°F (175°C). Line two baking sheets with parchment paper. Place cookie dough balls about 2 inches apart. Bake for 10 to 12 minutes until tops crack and edges are firm but centers remain soft. Let cookies cool on baking sheet for 5 minutes, then transfer to a wire rack to cool completely.
- COAT IN POWDERED SUGAR: Once cooled, roll each cookie generously in powdered sugar. Dust again just before serving for a fresh, snowy appearance.
Notes
Chill the dough properly to make it easier to work with and help cookies maintain shape., Use good quality white chocolate for a smooth, gooey center., Do not overbake; center should remain soft when cookies are removed from oven as they continue to bake while cooling., Cookies keep fresh in an airtight container layered with parchment paper for 4 to 5 days at room temperature., For longer storage, freeze uncoated cookies and roll in powdered sugar after thawing before serving., Serve with warm beverages like coffee, hot chocolate, or peppermint mocha for seasonal pairing., Optional: drizzle melted dark chocolate or sprinkle edible glitter for festive presentation.
- Prep Time: 20 minutes
- Cook Time: 12 minutes
- Category: Dessert
- Cuisine: American
Nutrition
- Serving Size: 1 cookie
- Calories: 234
- Fat: 11g
- Carbohydrates: 32g
- Protein: 3g