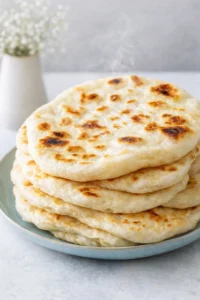
How to Make Fresh Homemade Pita Bread
Making fresh pita bread at home is easier than you might think. This recipe uses instant yeast and skips all that kneading and tricky shaping. In just two minutes in a hot oven, watch those pita rounds puff up into perfect pockets. Keep reading for three simple tips to get it just right every time!

Pita bread is one of the simplest breads you can make at home because it doesn’t need kneading or fancy shaping. It’s right up there with no-knead focaccia and homemade pizza dough for easy bread baking. This recipe is basically half of my mom’s peasant bread recipe, just without sugar, a little less water, and a splash of olive oil for flavor and softness.
Even though it’s straightforward, a few key steps will help you get that perfect puff and soft pocket every time. Let’s dive in!
The Secret to Getting Pita to Puff in the Oven?
- Be gentle when rolling out the dough. Roll softly so you don’t squash all those lovely air bubbles that formed while the dough was resting and rising. Those pockets of air help the pita puff up.
- Let the dough rest after rolling. Once you shape your rounds, give them 15 minutes to relax. This rest lets the gluten calm down a bit after rolling, so the dough can spring back and puff up in the oven.
- Bake on a hot surface. Got a Baking Steel or pizza stone? Perfect! Slide your pita onto it because the intense heat transfers quickly, making the bread puff up like magic the moment it hits the hot pan.

If you don’t have a Baking Steel or pizza stone, try a preheated cast iron skillet or any other oven-safe pan (check the recipe notes for more). They work great, too!
Another option is a preheated sheet pan, which can do the job if heated properly before baking (recipes below explain this).
Just so you know, a cold sheet pan won’t do the trick. Here’s what I mean: one pita puffs up beautifully, and the other just sits flat.

PS: If you love simple breads, don’t miss my easy Homemade Naan recipe – just 5 ingredients!
How to Make Pita Bread, Step by Step
First, gather your ingredients: all-purpose flour, salt, instant yeast, water, and olive oil. Pro tip: a digital scale will help you get the measurements just right and consistent every time.
Whisk together the flour, salt, and instant yeast in a big bowl. Then add your water and olive oil.

Mix everything with a spatula until the dough comes together into a shaggy ball—at this point, it will still feel a bit dry and rough.

Next, use your hands to quickly knead the dough into a smoother ball. Then drizzle a little more olive oil over it and turn it around in the bowl to coat all sides. Cover with a clean cloth and let it rise somewhere warm for about 1.5 hours, or until it’s just slightly puffed up.
When it has puffed up a bit, it’s ready.

Now, tip the dough out onto a lightly floured surface and knead it just a little to get the air bubbles evenly distributed. Use a bench scraper or knife to cut the dough into 6 roughly equal chunks. If you’re weighing the dough (which I highly recommend), each piece should be about 73 grams.
Roll each piece into a smooth ball, then let them rest for 30 minutes. This rest is key because it lets the dough relax, making it easier to roll out without shrinking back.

Flatten each dough ball slightly by hand, then work with one at a time to roll out into a 6-inch circle.
Place each rolled-out round on a piece of parchment paper and let them rest again for 15 minutes. Meanwhile, preheat your Baking Steel or pizza stone to 550ºF. (Check your stone’s manufacturer info to be safe about high heat limits.)

Bake three pita rounds at the same time for 2 to 3 minutes, or until they turn lightly golden and puffed.
Once baked, transfer your warm pita to a bowl lined with a clean towel. Cover them up to keep warm and soft until you’re ready to serve.


Storage Tips
If you have any pita left over, store them in an airtight container or resealable plastic bag at room temperature for up to 2 days. To keep them fresh longer, pop them in the fridge for up to a week. When you’re ready to enjoy, heat them briefly in a warm skillet or the oven wrapped in foil to bring back their soft, pillowy texture.
Make-Ahead Tips
You can prepare the dough a day in advance! After mixing and kneading, cover the bowl tightly and chill the dough overnight in the fridge. Next day, bring it to room temperature, shape, rest, and bake as usual. This is a huge time saver on busy days.
Variations
Want to switch things up? Try adding 1 teaspoon of dried herbs like oregano, za’atar, or rosemary to the flour mix. You can also swap half the all-purpose flour for whole wheat flour for a nuttier flavor and heartier texture. For an extra boost, sprinkle sesame seeds or nigella seeds on top before baking.
Serving Suggestions
Fresh homemade pita is wonderful served warm with hummus or tzatziki for dipping. You can slice it open to make quick pita sandwiches, stuffed with falafel, grilled chicken, or veggies. It’s also great alongside soups and salads, or even cut into triangles and toasted for pita chips. Trust me, once you try this recipe, homemade pita will be a kitchen staple in your house.
Recipe FAQs
- Why didn’t my pita puff up? Most likely your pan wasn’t hot enough or the dough wasn’t rested enough after rolling out. Make sure you preheat your baking surface very hot and let the dough rest before baking.
- Can I use active dry yeast instead of instant yeast? Yes! If you use active dry yeast, dissolve it in warm water first and let it sit for 5 minutes until bubbly before mixing with the flour.
- How do I store leftover pita? Store pita in an airtight bag at room temp for up to 2 days or in the fridge for up to a week. Reheat in a skillet or oven wrapped in foil for soft, warm bread.
- Can I freeze these pitas? Absolutely! Let them cool completely, then wrap tightly and freeze for up to 3 months. Defrost at room temperature and warm before serving.
- Is this recipe beginner-friendly? Yes! It’s straightforward, no-fuss, and doesn’t require kneading or special tools, perfect for home cooks of all skill levels.
Easy homemade pita bread recipe using instant yeast that produces soft and puffed pita pockets in the oven.
- Total Time: 2 hours
- Yield: 6 pita breads 1x
Ingredients
- 250 grams all-purpose flour (about 2 cups)
- 1 teaspoon salt
- 2 teaspoons instant yeast
- 150 milliliters warm water (about 2/3 cup)
- 2 tablespoons olive oil, plus extra for coating the dough
Instructions
- In a large bowl, whisk together the flour, salt, and instant yeast.
- Add warm water and 2 tablespoons of olive oil to the dry ingredients.
- Mix with a spatula until the dough forms a shaggy ball; it will be dry and rough.
- Use your hands to knead the dough briefly into a smoother ball.
- Drizzle a little more olive oil over the dough and turn it to coat all sides.
- Cover the bowl with a clean cloth and let the dough rise in a warm place for about 1.5 hours, or until slightly puffed.
- Turn the risen dough out onto a lightly floured surface and knead gently to distribute air bubbles evenly.
- Cut the dough into 6 equal pieces, approximately 73 grams each.
- Roll each piece into a smooth ball.
- Let the dough balls rest for 30 minutes to relax the gluten.
- Flatten each ball slightly by hand.
- Roll out each ball gently into a 6-inch diameter circle, being careful not to press out air bubbles.
- Place each rolled circle on a piece of parchment paper and let rest for 15 minutes.
- Preheat your oven’s Baking Steel, pizza stone, cast iron skillet, or oven-safe pan to 550°F (or as high as recommended by the stone manufacturer).
- Bake three pita rounds at a time on the hot surface for 2 to 3 minutes or until lightly golden and puffed.
- Transfer baked pita to a bowl lined with a clean towel and cover to keep warm and soft until serving.
Notes
Be gentle when rolling the dough to preserve air bubbles for puffing., Allow dough to rest after rolling for 15 minutes so it can spring back and puff properly., Use a very hot baking surface like a pizza stone or Baking Steel for best results., If you don’t have these, a preheated cast iron skillet or sheet pan works well., Cold pans will result in flat pita, so always preheat., Dough can be prepared a day ahead and refrigerated overnight, then brought to room temperature before shaping and baking., For variations, add 1 teaspoon dried herbs (oregano, za’atar, rosemary) to flour or substitute half the flour with whole wheat., Add sesame or nigella seeds on top before baking for extra flavor., Store leftover pita at room temperature in an airtight container for up to 2 days or refrigerate for up to 1 week., Freeze cooled pita tightly wrapped for up to 3 months and reheat before serving.
- Prep Time: 15 minutes active + 1 hour 45 minutes including resting/rising
- Cook Time: 2-3 minutes per batch
- Category: Main Course
- Cuisine: Middle Eastern
Nutrition
- Serving Size: 1 pita bread
- Calories: Approx. 140 kcal per pita
- Fat: 3 grams per pita
- Carbohydrates: 25 grams per pita
- Protein: 4 grams per pita