Easy Garlic Fried Rice

This Garlic Fried Rice is your go-to speedy side dish, packed with bold flavors and made with pantry staples and day-old rice. You’ll get that irresistible golden, crunchy garlic flavor, a splash of savory soy and oyster sauce for depth, plus the comforting touch of scrambled egg and fresh scallion. This recipe makes roughly 3 servings — just right for a family dinner or lunch leftovers.
Below, you’ll find a full printable recipe card with exact ingredients and simple step photos. Plus, I’ve included my top tips for keeping your garlic perfectly crispy, ideas for easy swaps, storage advice, and answers to the most common questions I get.
- Here’s what you’ll do: fry your garlic until it’s perfectly golden and crisp, set it aside, then scramble your egg in that garlicky oil. Next, toss in the cold rice, sauces, and scallions, and finish by mixing in the reserved garlic crunch.
- Here’s what you’ll learn: how to get your timing and heat just right to avoid burnt garlic, tips on using leftover rice for the best texture, and simple swaps for vegetarian versions or other rice options.
Ready to cook? Scroll down to the recipe card. Want to nail that crispy garlic the first time? Keep reading my tips!
Why This Is So Good
- On the table in 20 minutes flat
- Restaurant-quality flavor at home
- Easy, quick side dish that elevates any meal—try it alongside Garlic Chicken with Broccoli and Spinach
- Loaded with crunchy, toasty garlic goodness
Ingredients and Substitutes
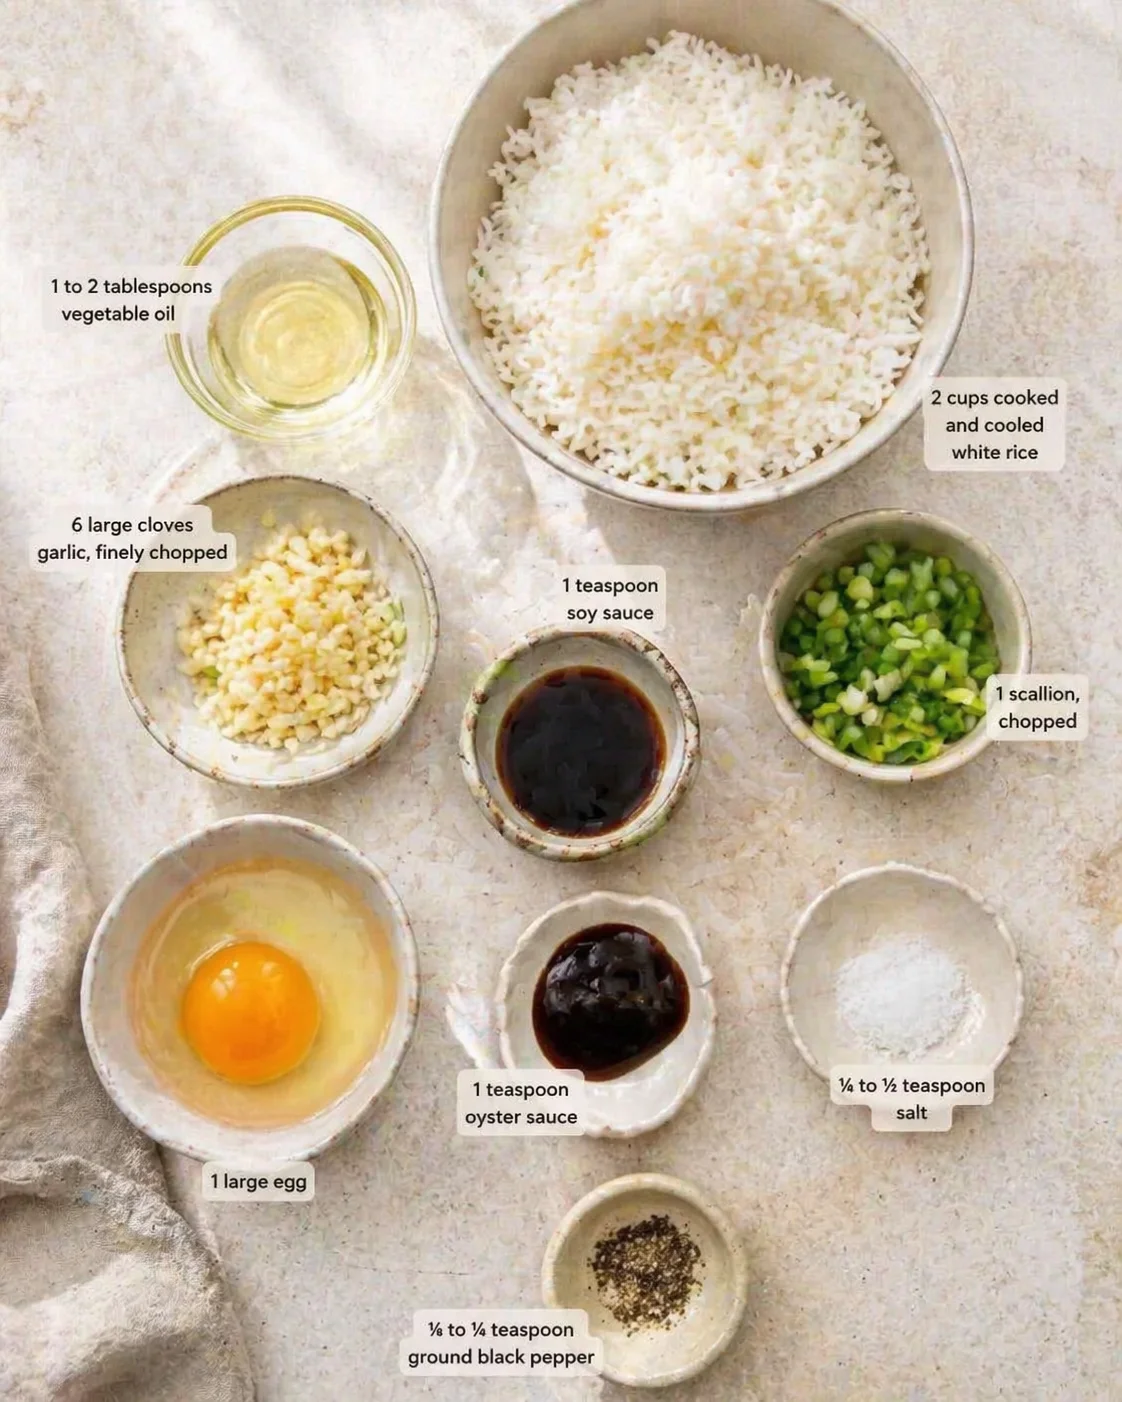
- 1 to 2 tablespoons vegetable oil
- 6 large cloves garlic, finely chopped
- 1 large egg
- 2 cups cooked and cooled white rice
- 1 scallion, chopped
- 1 teaspoon soy sauce
- 1 teaspoon oyster sauce
- ¼ to ½ teaspoon salt
- ⅛ to ¼ teaspoon ground black pepper
Step by Step Method
- Ensure cooked rice is completely cooled (preferably day‑old) or chill/spread fresh rice to dry before frying.
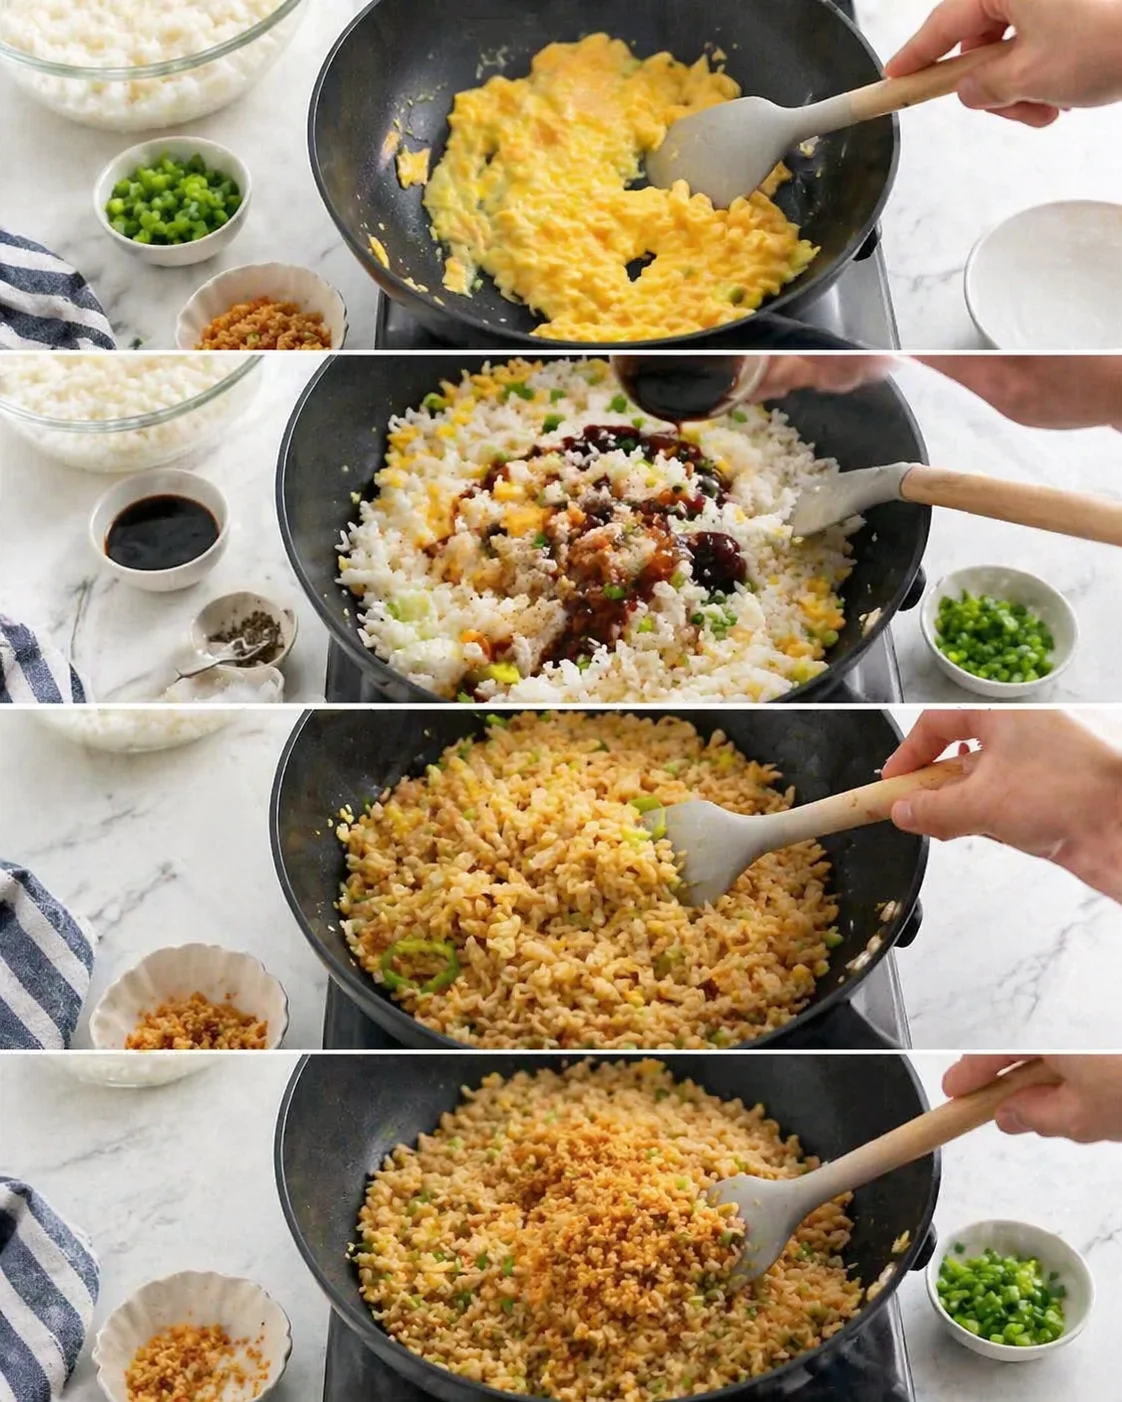
- Add vegetable oil, finely chopped garlic, and 1/8 teaspoon salt to a medium sauté pan (start with a cold pan).
- Heat pan over medium and cook garlic 1–2 minutes until golden and fragrant.
-
Remove the garlic, drain on paper towels, and reserve the crispy garlic, leaving the garlicky oil in the pan.
- Add the egg to the pan and scramble until just slightly set.
- Add cooked rice, chopped scallion, soy sauce, oyster sauce, remaining salt, and black pepper; toss to combine.
- Turn heat to high and stir‑fry until rice is heated through and well combined, separating the grains.
-
Fold in the reserved crispy garlic and taste, adjusting salt, pepper, or soy sauce as needed.
-
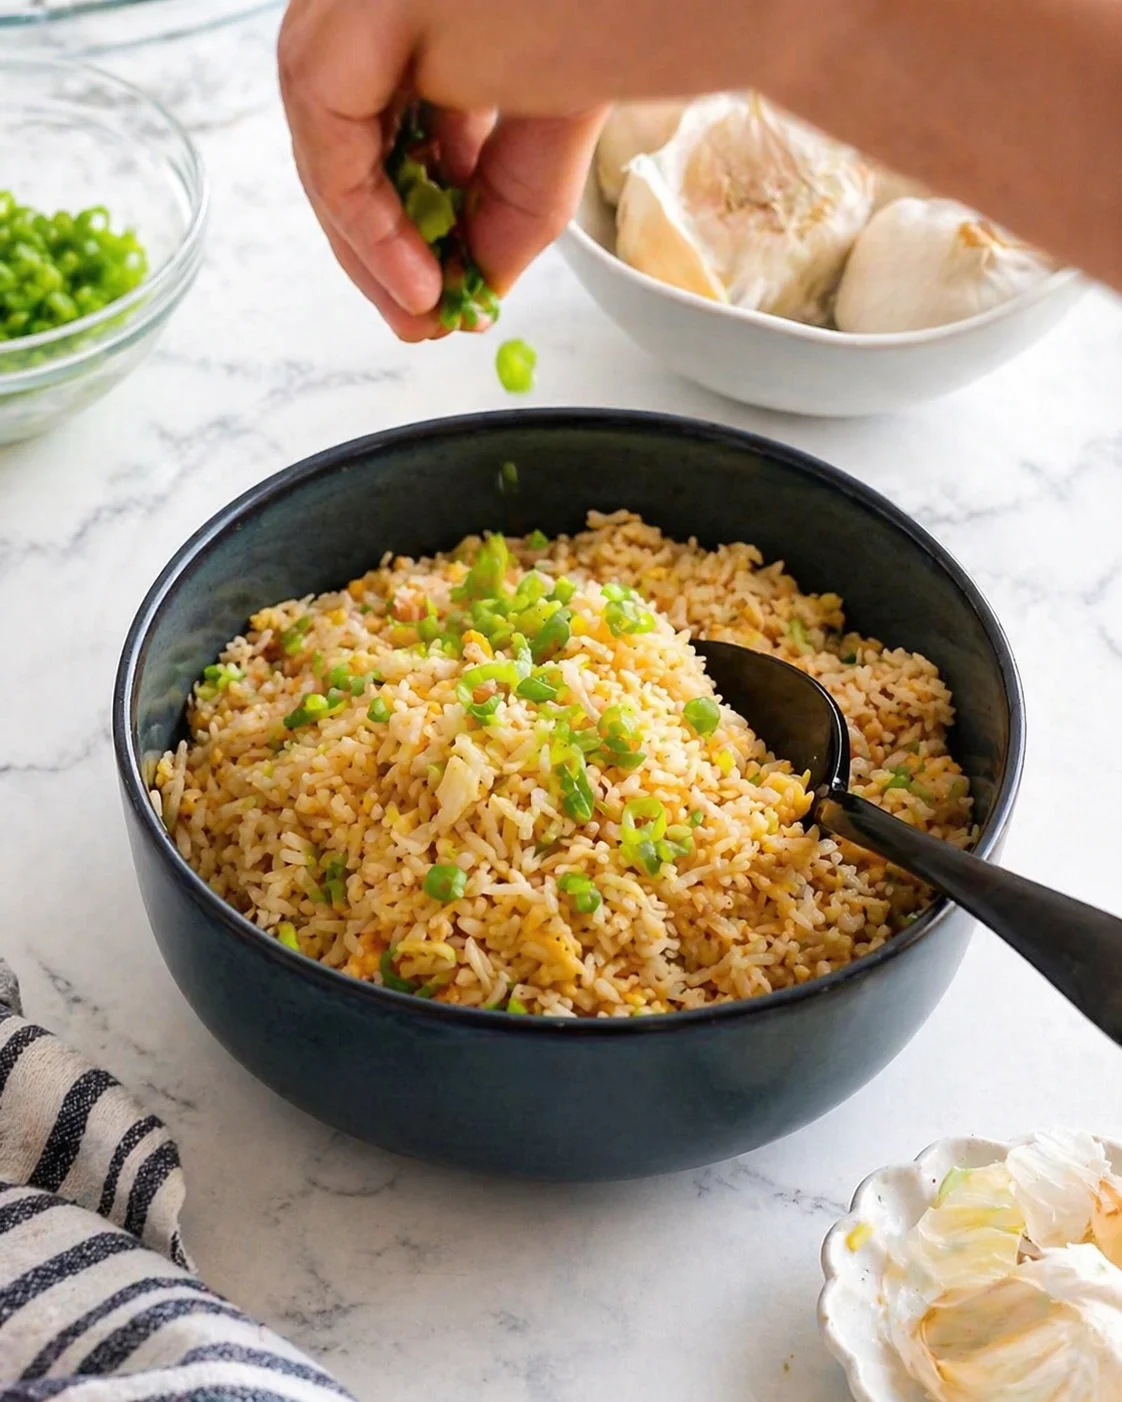
Top with extra chopped scallions if desired.
Tips for Crispy, Flavorful Rice
- Use leftover rice – Always start with rice that’s been cooked and cooled — day-old is ideal to avoid mushy results.
- Be mindful with the garlic – Burnt garlic is a kitchen nightmare. Stick to medium heat and pull it off once golden—just as you would when sautéing garlic for crispy pan-fried gnocchi—to keep that perfect crunch and flavor.
- Use cooled cooked rice – Fresh rice is too moist and soft—controlling moisture is crucial for crisping, as you’ll see when making crispy zucchini fritters. Day-old rice or rice cooled in the fridge gives the best texture when fried.
- Don’t let the garlic burn – Burnt garlic tastes bitter and ruins the dish. Stick to medium heat and remove once golden brown.
Additions and Serving Ideas
Garlic fried rice, or Sinangag, is such a versatile side! It’s fantastic with any Asian-style meals or honestly, anything that needs a flavor boost. It also pairs beautifully with Lemon Garlic Shrimp and Asparagus. I’m a big fan of serving it alongside air fryer bang bang chicken — talk about a winner!
Don’t have leftover rice handy? No worries! Check out my instant pot egg fried rice recipe. It’s a one-pot wonder that cooks rice and all ingredients together, so no leftover rice is needed. Perfect for busy nights!
Garlic fried rice (Sinangag) is incredibly versatile and pairs beautifully with all sorts of meals, especially Asian dishes. My favorite pairing? Crispy air fryer bang bang chicken for a satisfying weeknight dinner. For a creamy, savory protein, try Creamy Garlic Chicken Thighs.
No leftover rice? No problem! Try my instant pot egg fried rice, where you cook everything in one pot—rice and all—so you don’t need pre-cooked rice.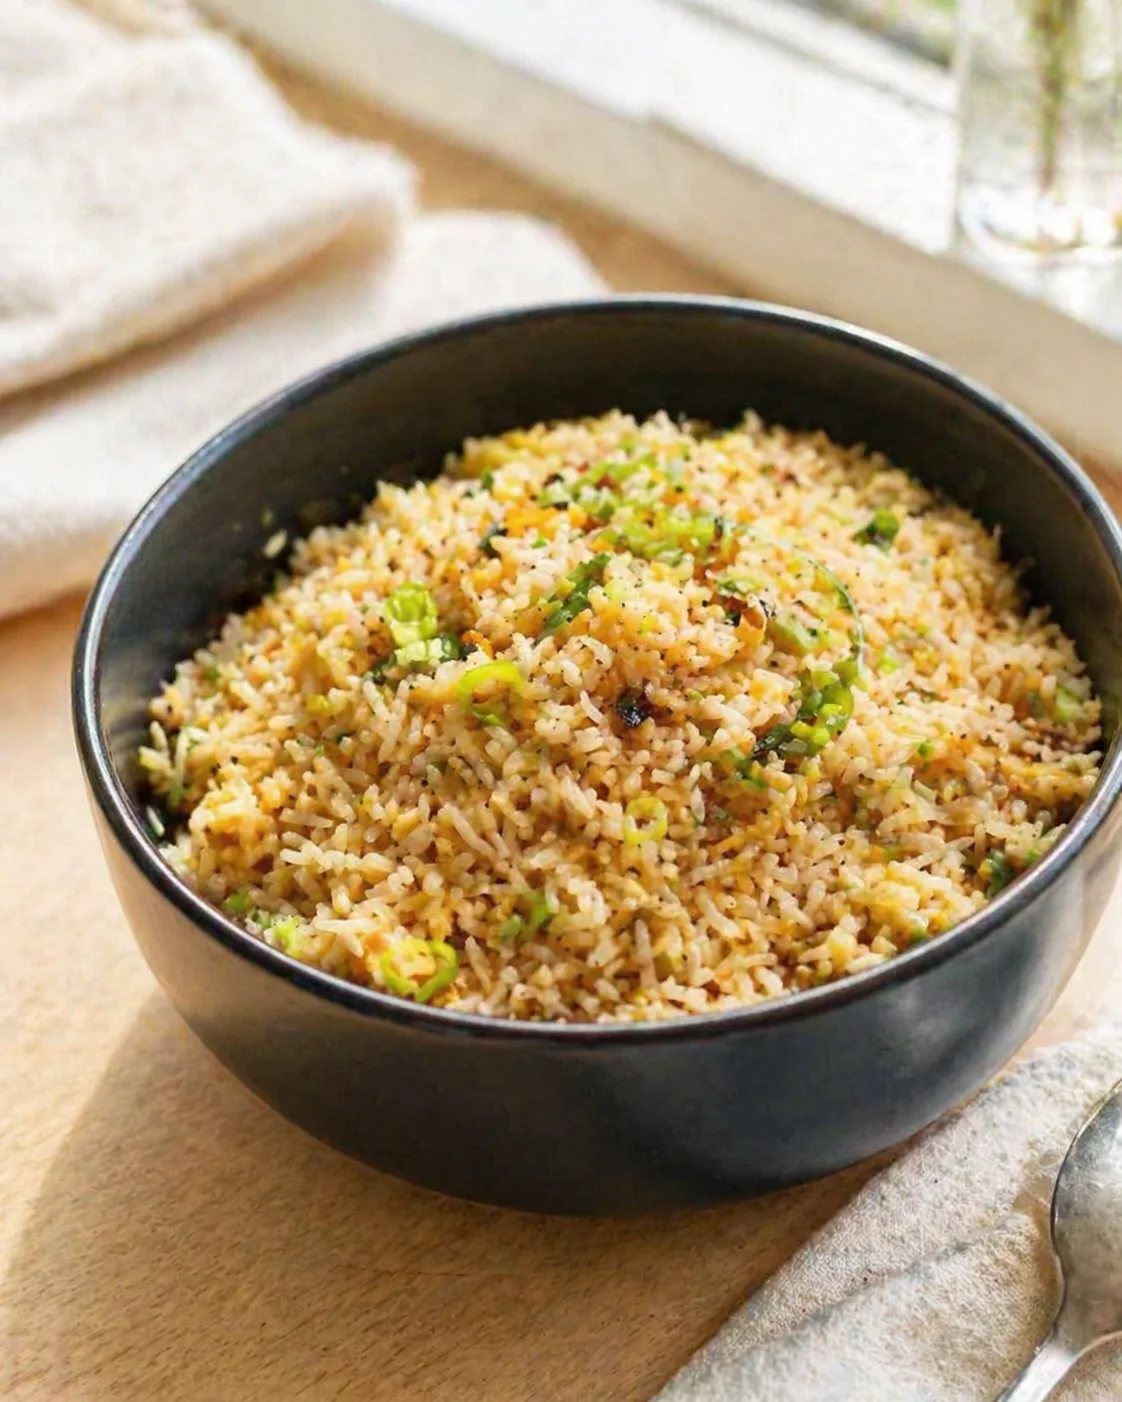
Storage and Make Ahead Tips
After cooking, cool your leftovers quickly and store properly to keep the garlic crisp and rice fresh. Use airtight containers to avoid absorbing fridge smells.
- Keep leftovers in the fridge for 3–4 days maximum.
- Freeze the rice in airtight containers or freezer bags for up to 1 month for best quality. It’s safe longer but texture fades.
- Store fried garlic separately in an airtight container at room temperature for a few days or refrigerate if you want it to keep up to two weeks (similar to keeping homemade croutons crisp). This keeps it crunchy.
When reheating:
- Use the stovetop (best method) — heat the rice over medium-high heat with a little oil or water to loosen it up. Add the crispy garlic at the end to keep its crunch.
- Microwave — place rice in a microwave-safe bowl, add a splash of water, cover loosely, heat in short bursts stirring in between. Add fried garlic after reheating.
- Oven — heat covered rice in a 350°F (175°C) oven for 10–15 minutes. Stir in a bit of water or oil if it feels dry, and add garlic last.
Food safety tip: reheat until steaming hot all the way through (165°F/74°C). Only reheat once. For the best leftovers, keep rice and fried garlic separate until serving.
Common Questions Answered
-
Can I use freshly cooked rice?
Fresh rice usually has too much moisture and can turn mushy when fried. If you only have fresh rice, spread it out on a tray to cool and dry for 20–30 minutes, or chill it in the fridge for a few hours to help steam escape.
-
What if I don’t eat seafood — can I make this vegetarian?
Absolutely! Just skip the oyster sauce or swap it for a vegetarian version made with mushrooms, or use a bit more soy sauce plus a pinch of sugar to keep the flavor rich. For a meatless meal with extra protein on the side, serve it with a bowl of spicy black bean soup.
-
How do I keep the garlic crispy?
Fry the garlic to golden, remove it quickly, and drain on paper towels. Store separately in an airtight container, adding it to the rice just before serving. If the garlic softens, quickly re-crisp it in a dry pan or under the broiler for a few seconds.
-
Can I use brown rice or other grains?
Definitely! Use cooled cooked brown rice or other grains like quinoa or farro, but expect a chewier, firmer texture and slightly different flavor. You might need a little more oil and a longer stir-fry to get grains separated.
-
Can I double or halve the recipe?
Yes! Double it by cooking in batches or using a bigger pan or wok to keep everything frying evenly. Halving is easy too—just adjust seasoning to taste.
-
Is white pepper necessary?
Not at all. White pepper adds a subtle, classic Asian heat, but black pepper works just fine and is what this recipe uses for convenience.
-
Can I freeze the prepared garlic fried rice?
For sure. Freeze portions in airtight containers for up to 1 month for the best taste and texture. Thaw overnight in the fridge and reheat thoroughly. Keep fried garlic separate and add after reheating for the best crunch.
-
What’s the difference between sliced garlic and chopped garlic here?
Sliced garlic gives bigger, chip-like crunchy pieces, while finely chopped garlic creates small, evenly spread crispy bits. Both are delicious — just watch the frying time since slices can burn before chopped pieces brown.

A quick and flavorful garlic fried rice featuring crispy golden garlic, soy and oyster sauces, scrambled egg, and scallions, perfect as a side dish made with pantry staples and day-old rice.
- Total Time: 20 minutes
- Yield: 3 servings 1x
Ingredients
- 1 to 2 tablespoons vegetable oil
- 6 large cloves garlic, finely chopped
- 1 large egg
- 2 cups cooked and cooled white rice (preferably day-old)
- 1 scallion, chopped
- 1 teaspoon soy sauce
- 1 teaspoon oyster sauce
- 1/4 to 1/2 teaspoon salt
- 1/8 to 1/4 teaspoon ground black pepper
Instructions
- Ensure cooked rice is completely cooled (preferably day-old) or chill/spread fresh rice to dry before frying.
- Add vegetable oil, finely chopped garlic, and 1/8 teaspoon salt to a medium sauté pan (start with a cold pan).
- Heat pan over medium and cook garlic 1–2 minutes until golden and fragrant.
- Remove the garlic, drain on paper towels, and reserve the crispy garlic, leaving the garlicky oil in the pan.
- Add the egg to the pan and scramble until just slightly set.
- Add cooked rice, chopped scallion, soy sauce, oyster sauce, remaining salt, and black pepper; toss to combine.
- Turn heat to high and stir-fry until rice is heated through and well combined, separating the grains.
- Fold in the reserved crispy garlic and taste, adjusting salt, pepper, or soy sauce as needed.
- Top with extra chopped scallions if desired.
Notes
Use leftover day-old rice for best texture to avoid mushy results., Be careful not to burn the garlic; cook over medium heat and remove once golden for perfect crunch and flavor., Vegetarian option: omit oyster sauce or use a vegetarian mushroom-based oyster sauce substitute, or increase soy sauce plus a pinch of sugar for depth., Fried garlic can be stored separately at room temperature for a few days or refrigerated up to two weeks to preserve crunch., Use cooled cooked brown rice or other grains like quinoa or farro as alternatives, adjusting oil and cooking time if needed., Reheat rice on stovetop with a little oil or water, adding fried garlic last to maintain crispness., Freeze leftovers in airtight containers up to 1 month; thaw overnight in fridge before reheating.
- Prep Time: 5 minutes
- Cook Time: 15 minutes
- Category: Side Dish
- Cuisine: Asian
Nutrition
- Serving Size: approximately 1 cup per serving
- Calories: Approximately 250 calories per serving
- Fat: 7 grams per serving
- Carbohydrates: 35 grams per serving
- Protein: 8 grams per serving