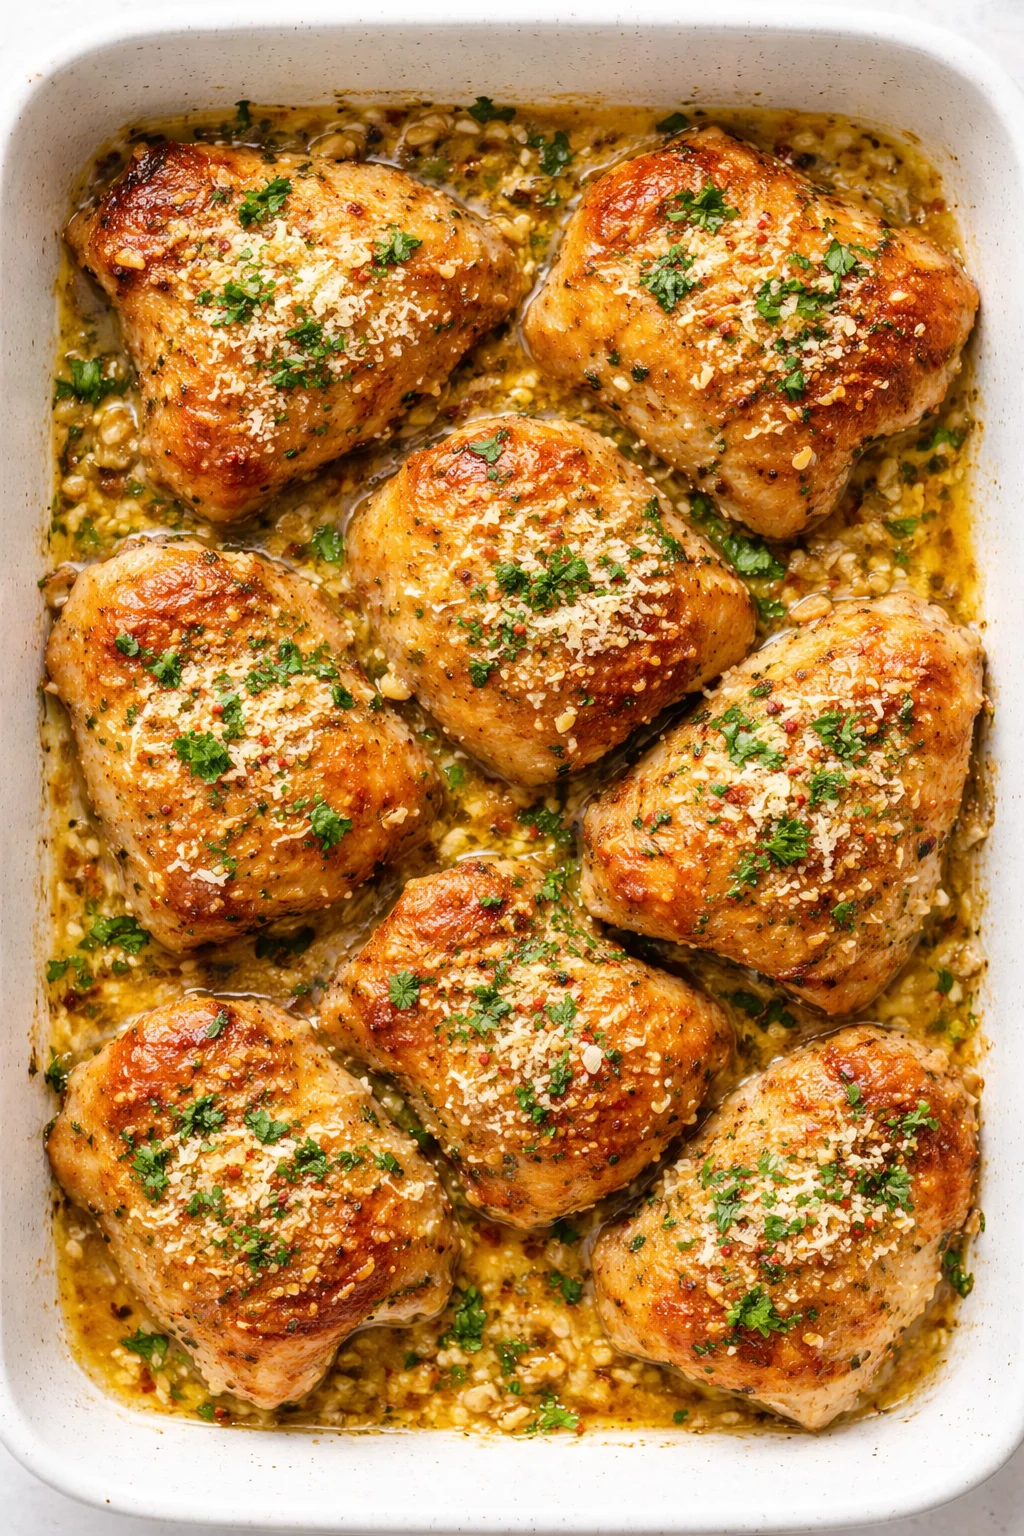
Garlic Parmesan Chicken Thighs
Garlic Parmesan Chicken Thighs bring together juicy, flavorful chicken with perfectly crispy skin and a mouthwatering garlic-Parmesan crust. This one-pan recipe is a total win—not only is it super easy for any busy weeknight, but it also feels special enough to serve to guests. Plus, your whole kitchen will smell amazing while it’s cooking!
Crazy about Garlic Parmesan Chicken Thighs? Me too! If you enjoy quick Chicken Thigh Recipes or want to explore cozy Crockpot Recipes, you’ll find plenty of tasty ideas ahead.
Glad you’re here! You’re about to whip up a simple, impressive dinner that’s perfect for any night of the week. These Garlic Parmesan Chicken Thighs offer the best combo: juicy and forgiving dark meat paired with skin so crispy you’ll want to savor every bite. The secret? A few smart steps—a hot pan, dry skin, and finishing off in the oven—that really make this dish shine.
I’m going to walk you through everything you need for consistent, fantastic results: a short, easy ingredient list, a no-fuss one-pan sear-then-bake method, timing tips so the chicken stays juicy, plus pro tricks to get super-crispy skin and fresh finishing touches. Here’s what you’ll find in this recipe and why each step matters:
- Simple, clear instructions for searing the skin, making that garlicky butter sauce, and baking to finish with a cheesy Parmesan crust.
- Helpful notes on equipment and ingredient picks—why you want bone-in, skin-on thighs and freshly grated Parmesan for best flavor and texture.
- Pro tips and common pitfalls so you avoid soggy skin, burned garlic, or uneven cooking.
- Ideas for sides, make-ahead advice, plus smart reheating and storage tips to keep any leftovers tasting fresh.
Stick with me, follow the steps below, and you’ll have a comforting, beautiful dish that works for busy nights or impressing friends.
What Makes garlic parmesan chicken thighs Special
Looking for an easy dinner that’s bursting with flavor? These Garlic Parmesan Chicken Thighs are exactly that. Using simple ingredients, the stovetop-to-oven method locks in juicy goodness and creates that perfect crispy skin with a garlicky Parmesan crust. Plus, it’s all done with very little fuss—ideal for busy weeknights or a casual dinner with guests.
- Big Flavor, Small Effort: Fresh garlic and freshly grated Parmesan turn everyday ingredients into a rich, delicious sauce that tastes like you spent hours on it.
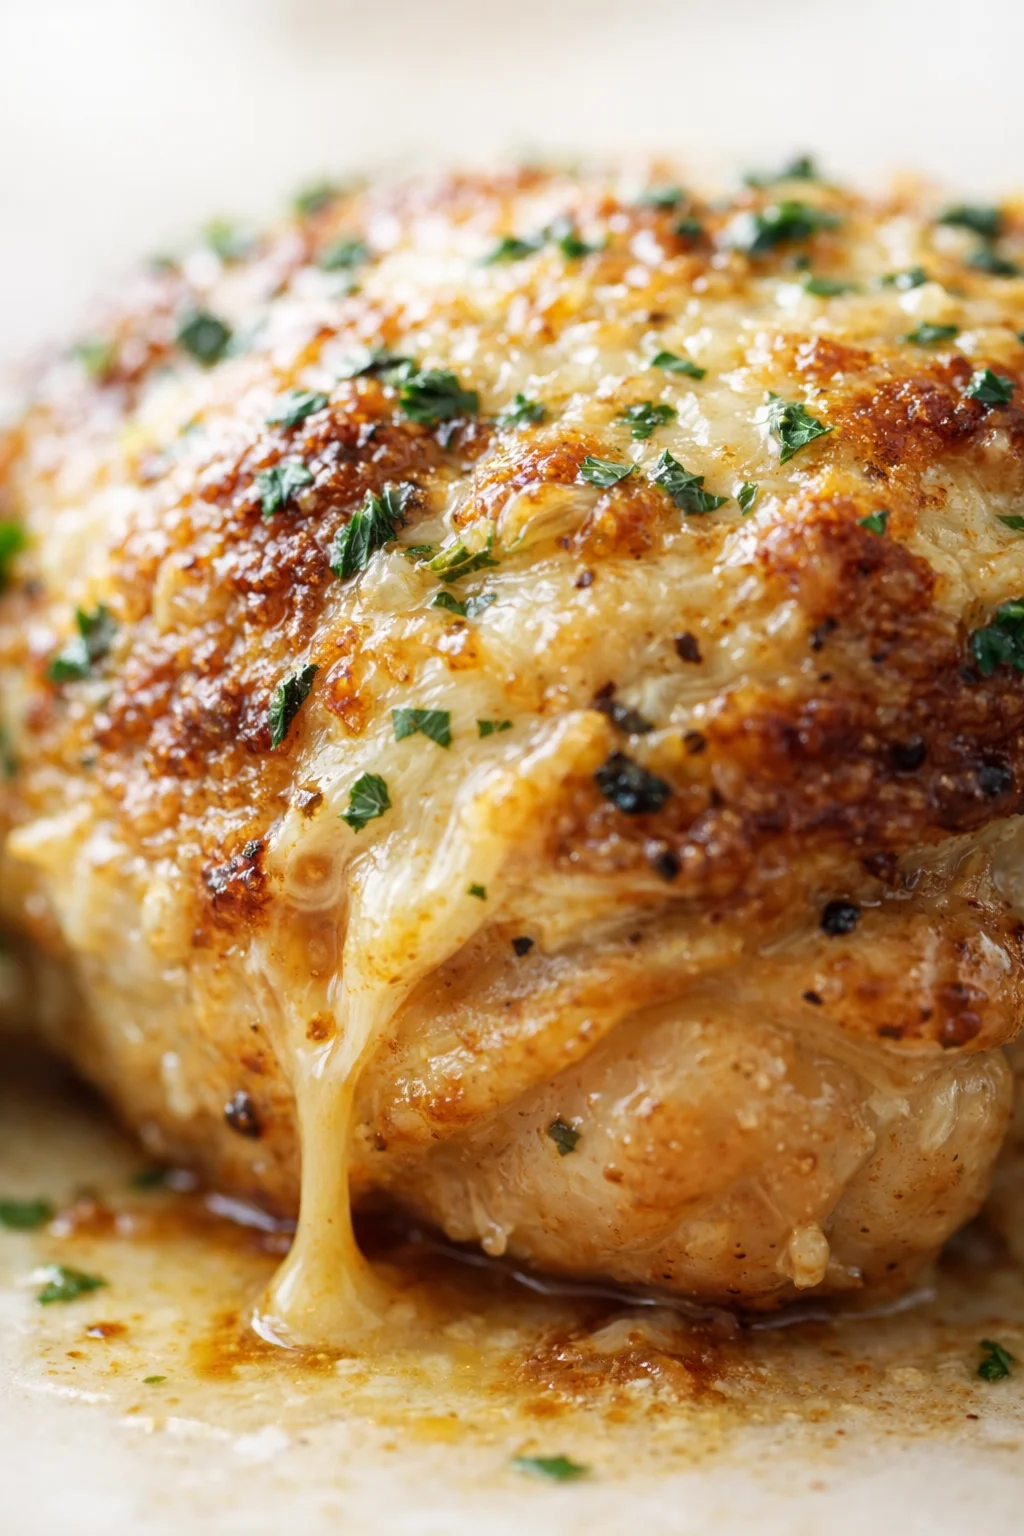
- Texture Perfection: Bone-in thighs stay juicy and tender while the skin crisps up and the Parmesan topping browns beautifully for a perfect bite.
- One-Pan Magic: You sear, make the sauce, and finish baking all in one oven-safe skillet—less cleanup means more family time.
- Forgiving & Reliable: Thighs are hard to mess up, so slight timing slip-ups still lead to a great meal. Plus, the searing builds flavor from browned bits in the pan.
- Quick Hands-On Time: Just a few minutes searing and prep, then the oven does its thing—great when your schedule is packed.
- Flexible Prep Options: You can prep the Parmesan and seasoning earlier or squeeze lemon juice on right before serving to speed things up.
- Super Versatile with Sides: The garlicky Parmesan sauce is perfect spooned over mashed potatoes, risotto, or crusty bread—see my serving ideas below for my favorites.
In a nutshell: big flavor, cozy kitchen smells, crispy skin, juicy meat, and almost no work. What’s not to love?
- Juicy & forgiving: No stress about timing—thighs keep their juicy goodness even if you get a bit off.
- Flavor-packed: Fresh garlic and real Parmesan deliver a deeply tasty, satisfying sauce every time.
- One-pan wonder: Easy cleanup with all the yummy pan drippings adding magic to the dish.
- Fancy results, simple steps: Impressive enough for guests but easy enough for a weeknight.
Ingredients and Tools
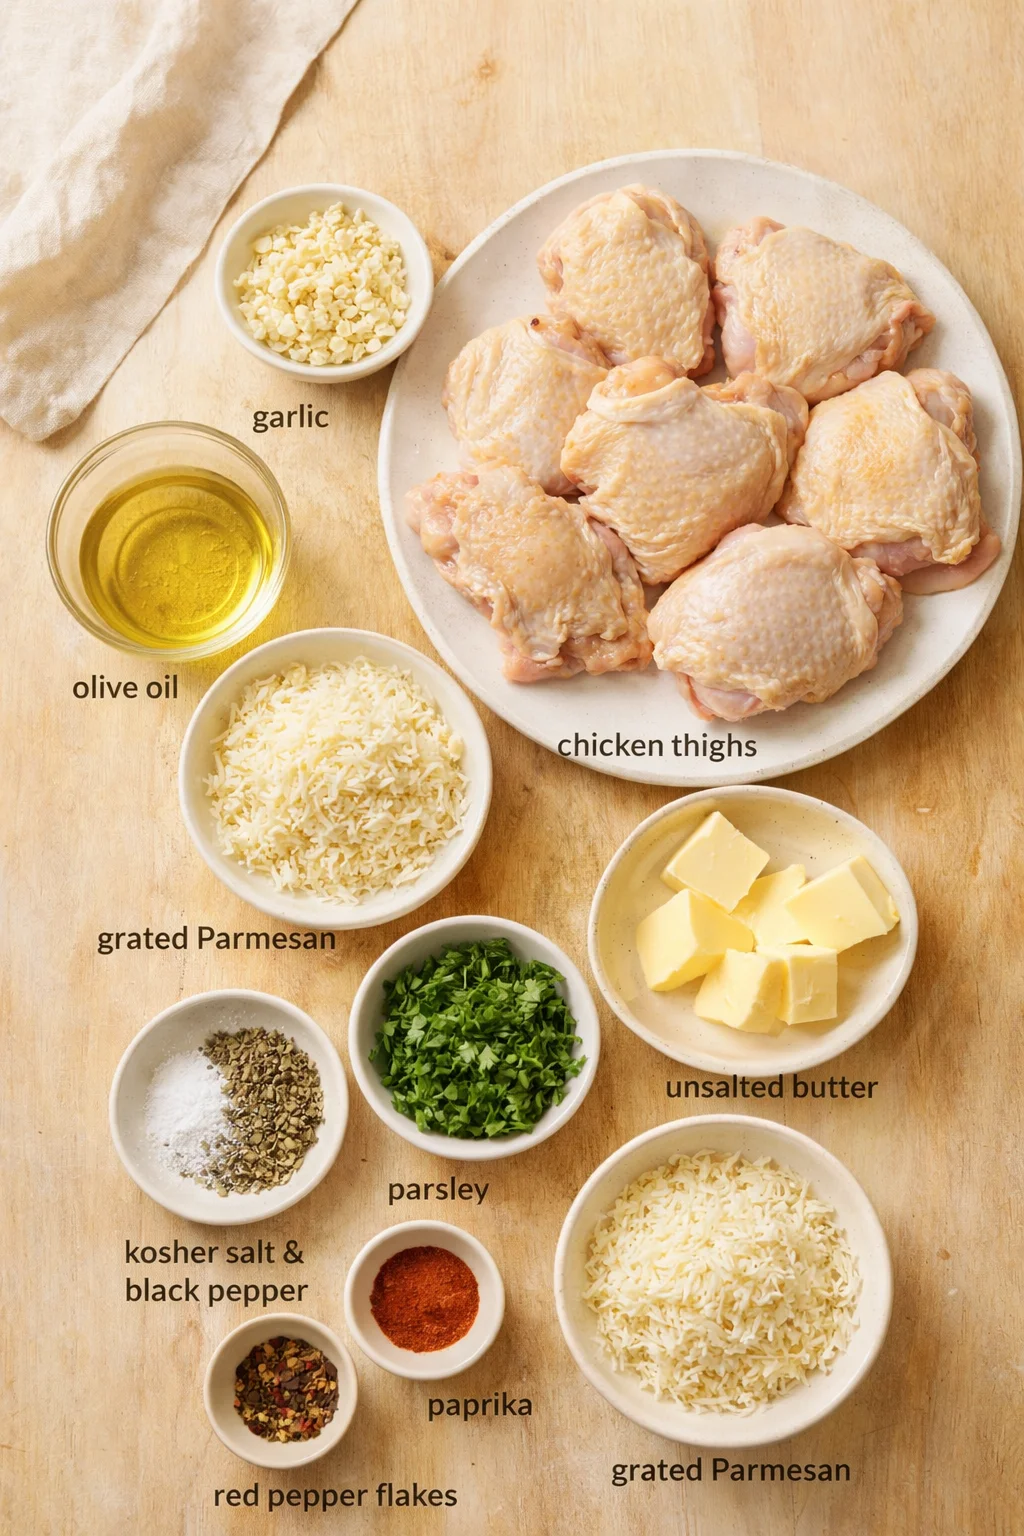
- 8 bone-in, skin-on chicken thighs (about 1.5–2 lbs total)
- 4 tbsp unsalted butter (divided)
- 2 tbsp olive oil
- 6 large cloves garlic (minced)
- 1/2 cup freshly grated Parmesan cheese
- 1 tsp Italian seasoning
- 1/2 tsp paprika (smoked or sweet)
- 1/4 tsp red pepper flakes (optional, for a little heat)
- 1/4 cup fresh parsley (chopped)
- to taste kosher salt and freshly ground black pepper
Stovetop-to-Oven Method
- Remove chicken from the fridge and let sit 20–30 minutes to come closer to room temperature.
- Preheat oven to 400°F (200°C); pat chicken thighs completely dry with paper towels and season both sides generously with salt and pepper.
- Heat an oven-safe skillet over medium-high heat; add olive oil and 2 tablespoons butter.
-
When the butter melts and foaming subsides, place chicken in the skillet skin-side down and cook undisturbed 6–8 minutes until the skin is deep golden and crisp.
- In a small bowl combine freshly grated Parmesan, Italian seasoning, paprika, and red pepper flakes (if using); mince the garlic.
- Flip the chicken with tongs and sear the other side 2–3 minutes, then transfer the pieces to a plate briefly.
- Reduce heat to medium-low, add the remaining 2 tablespoons butter to the skillet, then add the minced garlic and stir constantly about 1 minute until fragrant (do not burn).
-
Return the chicken to the skillet skin-side up, spoon garlic-butter over each piece, sprinkle the Parmesan mixture evenly over the thighs, and gently press to adhere.
- Place the skillet in the preheated oven and bake 15–18 minutes, or until an instant-read thermometer inserted into the thickest part (without touching bone) reads 165°F (74°C) and the Parmesan is melted and lightly golden.
-
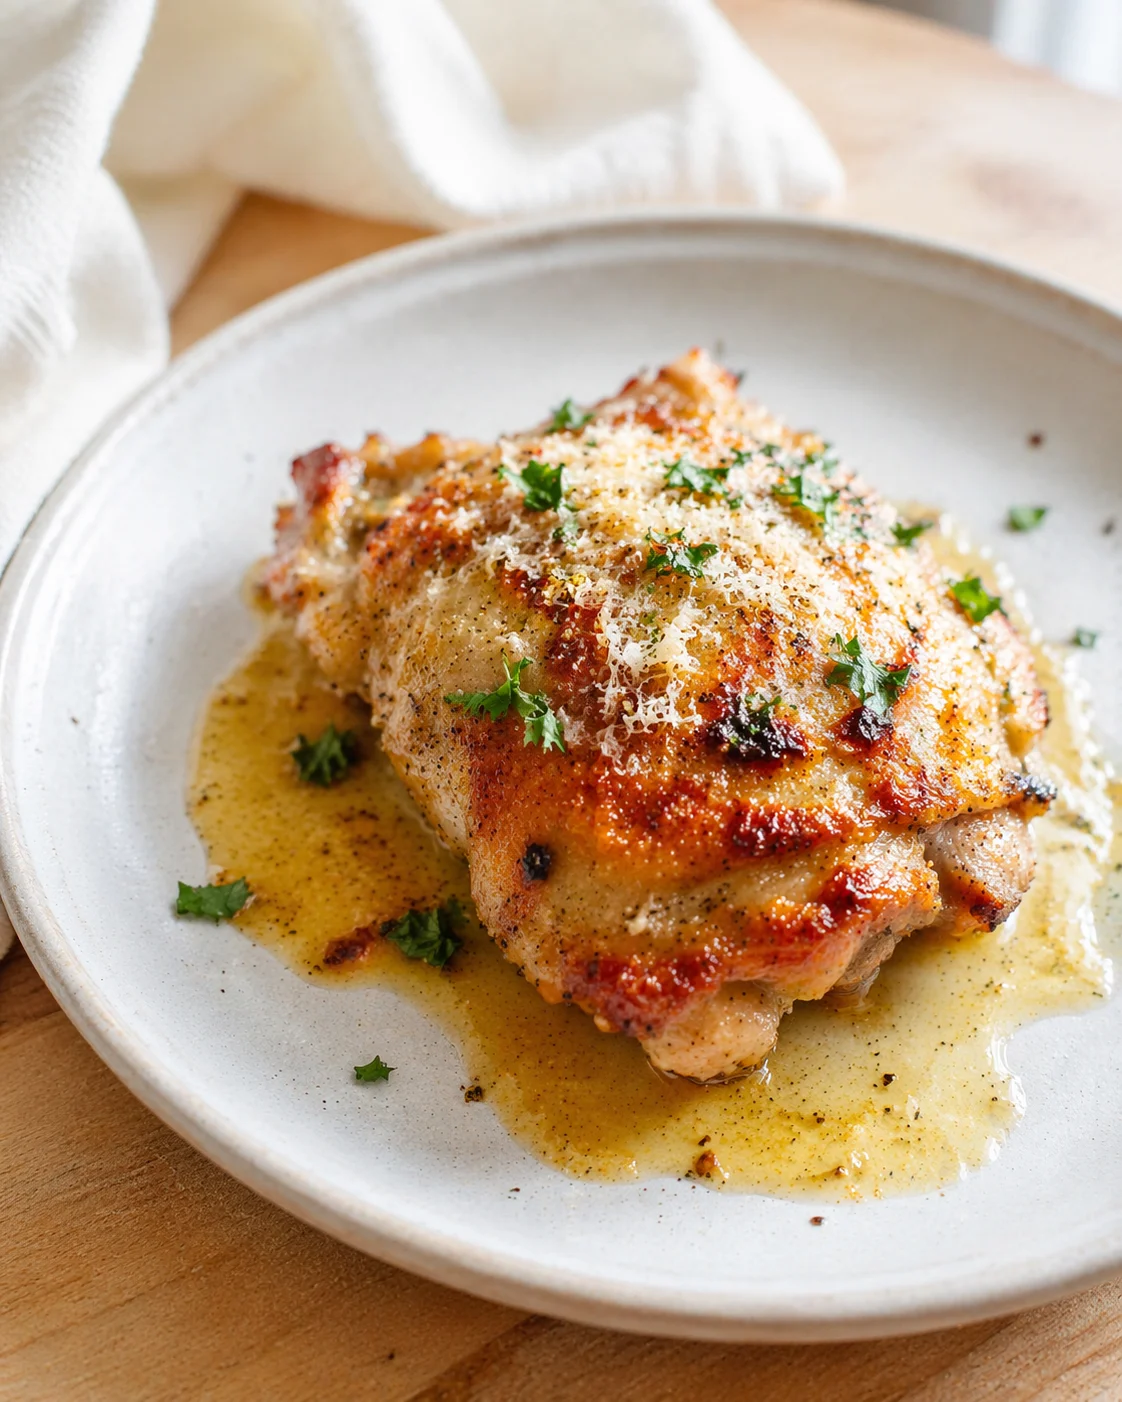
Remove the skillet from the oven, let the chicken rest in the pan about 5 minutes, then sprinkle chopped fresh parsley on top before serving.
Tips for Best Results with garlic parmesan chicken thighs
- Let the chicken warm up a bit. Taking garlic parmesan chicken thighs out of the fridge 20-30 minutes before cooking means it cooks more evenly without cold centers or overcooked edges.
- Completely dry those thighs. Patting the skin bone-dry is the secret for that crackling, crispy crust. Moisture leads to steaming, which stops browning.
- Grate your Parmesan fresh. It’s a tiny step that totally changes the texture and flavor. Pre-shredded cheese melts unevenly and can be grainy.
- Use an oven-safe pan. Since you cook on the stove and finish in the oven, make sure your skillet handles the heat. Cast iron is my go-to!
- Don’t use boneless, skinless thighs instead. The bone keeps the meat juicy and the skin crisps up to make your sauce base extra flavorful. If you must swap, cut your oven time a bit.
- Give the chicken time to develop a crust. Moving it early can tear the skin off before it’s ready. Wait for the initial sizzle to calm—that’s your sign.
- Watch the garlic carefully. Garlic burns fast and turns bitter. Cook it gently on medium-low, stirring constantly. If it burns, wipe the pan and start fresh—you don’t want bitter notes here.
- Don’t skip resting the chicken. I know it’s tempting to dive in, but resting locks in juices so your bites are juicy, not dry. Cut too soon and all that goodness is lost.
- Heat your pan well before adding fats. A hot skillet means a good sear and less sticking when the chicken hits the pan.
- Use a weight for ultra-crispy skin. Pop a smaller heavy pan or bacon press on top of the chicken while it cooks to increase contact with the heat, speeding browning.
- Brighten with lemon juice. A quick squeeze just before serving cuts through richness with a fresh zing—it’s magic!
- Make a quick pan sauce. After you remove the chicken, splash in some chicken broth or white wine, scrape up the tasty browned bits, and simmer briefly for a saucy boost.
Serving Ideas and Substitutions
Complementary Dishes
- Creamy Parmesan Risotto — The rich sauce from the chicken makes this rice dish a perfect cozy companion.
- Roasted Asparagus — Its slight bite and crisp-tender texture balance the richness of the chicken beautifully.
- Garlic Mashed Potatoes — Yes, more garlic! These are the ultimate comfort side to soak up all that garlicky sauce.
Drinks
- Crisp Pinot Grigio — Its bright acidity cuts through the richness, refreshing your palate after every bite.
- Light Italian Lager — A cold, refreshing beer like Peroni won’t overpower the flavors and keeps things simple and delicious.
- Sparkling Water with Lemon — For something non-alcoholic, bubbles and citrus refresh and reset your taste buds alongside this savory meal.
Something Sweet
- Lemon Sorbet — Sharp, icy, and clean, it’s the perfect palate cleanser after a rich dinner.
- Tiramisu — Stick with the Italian vibes and enjoy a light, coffee-flavored classic dessert.
- Dark Chocolate Almond Biscotti — A crunchy, lightly sweet nibble to enjoy alongside your coffee without feeling too heavy.
How to Store and Reheat
- Fridge: Store leftovers airtight for up to 3 days to keep them fresh and tasty.
- Freezer: Freeze in a sealed bag for up to 2 months. The skin might lose its crispness after thawing, but the flavor is still excellent.
- Reheating: Warm in a 350°F oven until hot. This helps bring back some crispiness to the skin while keeping the meat juicy.
Answers to Common Questions
Can I use chicken breasts instead of thighs?
You can substitute breasts, but they cook faster and are less forgiving. Bone-in, skin-on breasts work best, and you might need to sear them a little longer. Just keep a close eye on cooking time and aim for 165°F internal temp to avoid dryness.
How do I know when the chicken is done without a thermometer?
If you don’t have a thermometer, pierce the thickest part with a knife or skewer and check the juices—they should run clear, no pink or red. The meat will also feel firm and start to pull away from the bone slightly.
Can I make this ahead of time?
You can prep the Parmesan mix and grate the cheese ahead, but I recommend cooking the chicken fresh for best texture. Reheating can toughen the meat and soften the crispy skin. If needed, gently reheat in a 350°F oven until warm.
What if I don’t have an oven-safe skillet?
No worries! Sear the chicken as instructed, then move everything to a baking dish for the oven step. You’ll lose some browned bits on the skillet, but the flavor will still be lovely. Just scrape all the garlic butter into the dish before baking.
Should the Parmesan crust be crispy or saucy?
It’s both! The cheese melts into the buttery pan juices, creating a tasty, slightly saucy layer underneath, while the top browns to a lovely lightly crispy finish. That contrast is what makes this so satisfying.
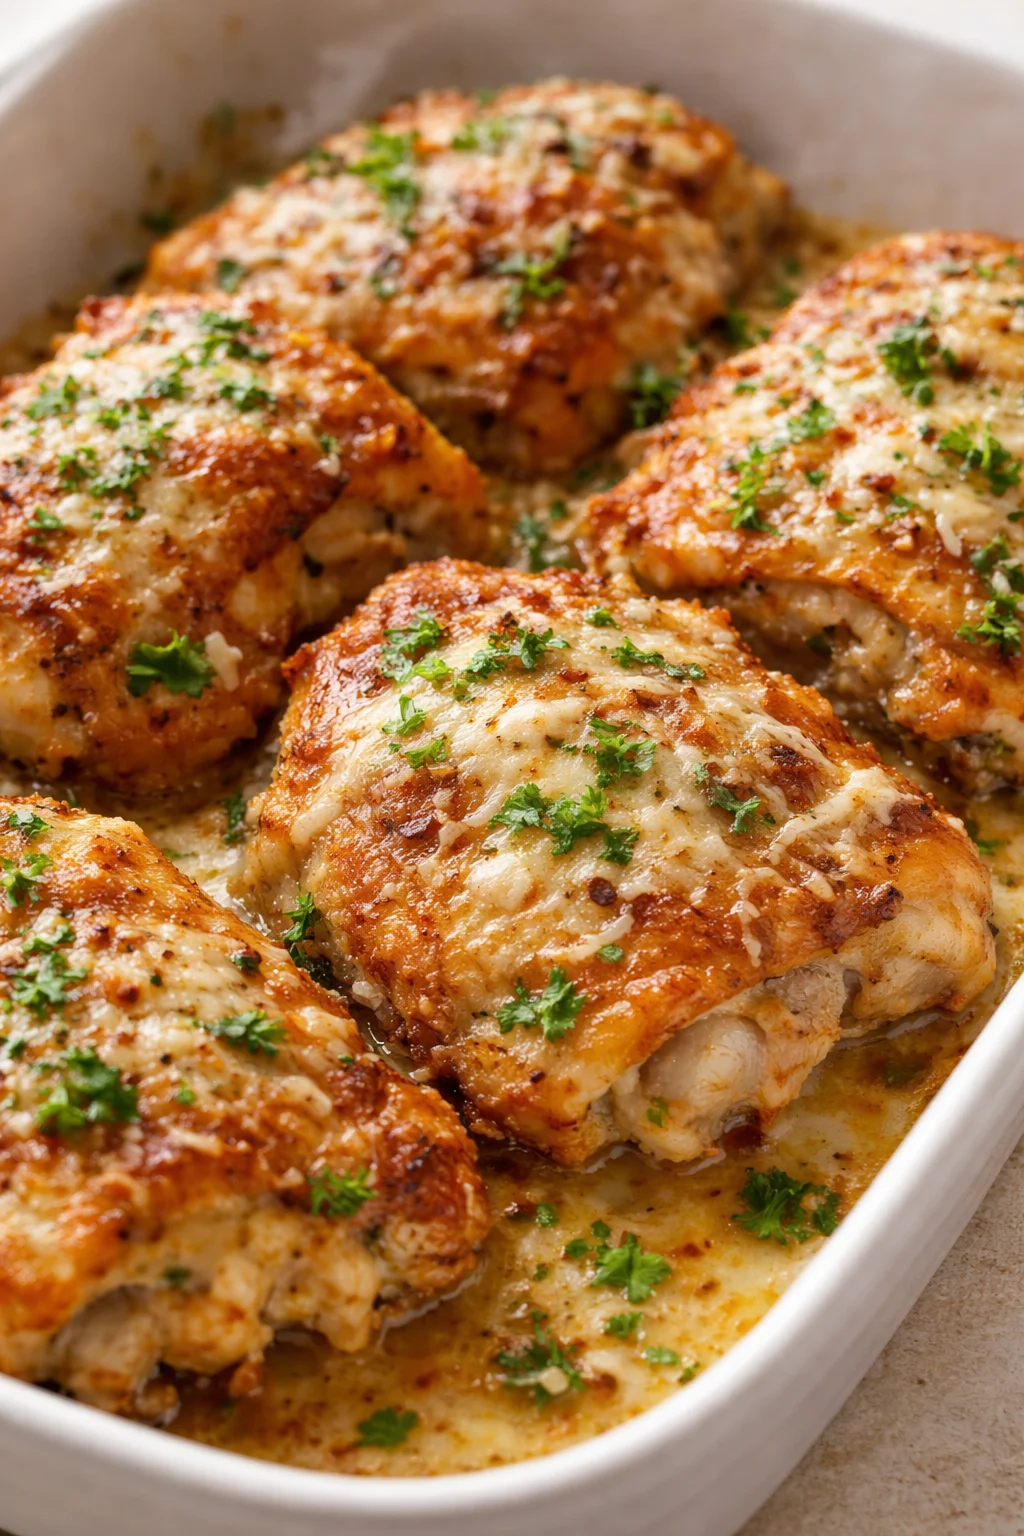
Juicy, flavorful chicken thighs with crispy skin and a mouthwatering garlic-Parmesan crust, cooked in one pan with a stovetop-to-oven sear-then-bake method.
- Total Time: 55 minutes
- Yield: 4 servings 1x
Ingredients
- 8 bone-in, skin-on chicken thighs (about 1.5–2 lbs total)
- 4 tbsp unsalted butter (divided)
- 2 tbsp olive oil
- 6 large cloves garlic (minced)
- 1/2 cup freshly grated Parmesan cheese
- 1 tsp Italian seasoning
- 1/2 tsp paprika (smoked or sweet)
- 1/4 tsp red pepper flakes (optional)
- 1/4 cup fresh parsley (chopped)
- Kosher salt to taste
- Freshly ground black pepper to taste
Instructions
- Remove chicken from the fridge and let sit 20–30 minutes to come closer to room temperature.
- Preheat oven to 400°F (200°C); pat chicken thighs completely dry and season both sides generously with salt and pepper.
- Heat an oven-safe skillet over medium-high heat; add olive oil and 2 tablespoons butter.
- When butter melts and foaming subsides, place chicken skin-side down and cook undisturbed 6–8 minutes until deep golden and crisp.
- In a small bowl, combine Parmesan, Italian seasoning, paprika, and red pepper flakes; mince the garlic.
- Flip chicken and sear other side 2–3 minutes, then transfer to a plate.
- Reduce heat to medium-low, add remaining 2 tablespoons butter and minced garlic; stir constantly about 1 minute until fragrant, avoiding burning.
- Return chicken to skillet skin-side up, spoon garlic butter over each piece, sprinkle Parmesan mixture evenly on thighs, and gently press to adhere.
- Place skillet in oven and bake 15–18 minutes, or until internal temperature reaches 165°F (74°C) and Parmesan is melted and lightly golden.
- Remove skillet from oven, let chicken rest in pan about 5 minutes, then sprinkle fresh parsley on top before serving.
Notes
Letting the chicken rest before cooking promotes even cooking and juiciness., Completely drying the chicken skin before searing ensures crispy skin., Use freshly grated Parmesan cheese for best flavor and texture; pre-grated cheese melts unevenly., Use an oven-safe skillet such as cast iron for stovetop-to-oven cooking., Avoid boneless, skinless thighs to maintain juiciness and crispy skin., Be careful not to burn the garlic; cook it gently on medium-low heat., Resting the chicken after cooking locks in juices., For ultra-crispy skin, use a weight like a bacon press while searing., A quick squeeze of lemon juice before serving brightens the dish., Leftovers can be stored in the fridge for up to 3 days or frozen up to 2 months; reheat in a 350°F oven until warm.
- Prep Time: 30 minutes (including bring to room temperature)
- Cook Time: 25 minutes
- Category: Main Course
- Cuisine: American
Nutrition
- Serving Size: 1-2 chicken thighs
- Calories: Approximately 350-400 calories per serving
- Fat: About 25g per serving
- Carbohydrates: Approximately 2-4g per serving
- Protein: About 30g per serving