No Knead Artisan Yeast Bread | Recipe Teach

This no-knead artisan yeast bread is the absolute easiest way to whip up fresh, homemade bread without any kneading or special tools. With just a few simple ingredients and barely any effort, you’ll get a golden, crunchy crust and a soft, airy crumb that you’d swear came from a bakery. Whether you’re new to baking or have been making bread for years, this recipe delivers a delicious loaf you’ll feel proud of every time.
The World’s Most Simple Yeast Bread – Artisan and No Knead is a rewarding recipe that gives you a fresh, crusty loaf bursting with aroma. It calls for minimal fuss and a handful of ingredients, making it perfect to enjoy at home anytime. Whether you’re just starting out or a bread pro, you’ll find this recipe is a sure-fire way to bake tasty bread that smells as good as it tastes. Let’s get baking!
Welcome! This is hands-down the easiest way to make a beautiful, bakery-style loaf right in your own kitchen with hardly any fuss. With just flour, yeast, salt, and warm water, you mix briefly and then let nature do the hard work. After a long, hands-off rise, you’ll have a loaf with a golden, crackly crust and a soft, light inside without kneading or special skills.
- Time and effort: You’ll spend about 10 to 15 minutes actively mixing and folding, then let the dough rest for 2 to 3 hours at room temp (or up to 3 days in the fridge to build flavor). Baking takes another 40 to 45 minutes once your oven and Dutch oven are good and hot.
- Equipment: All you need is a big bowl, a spoon or spatula, parchment paper, and a lidded Dutch oven. No Dutch oven? Don’t worry! I’ve shared easy alternatives below.
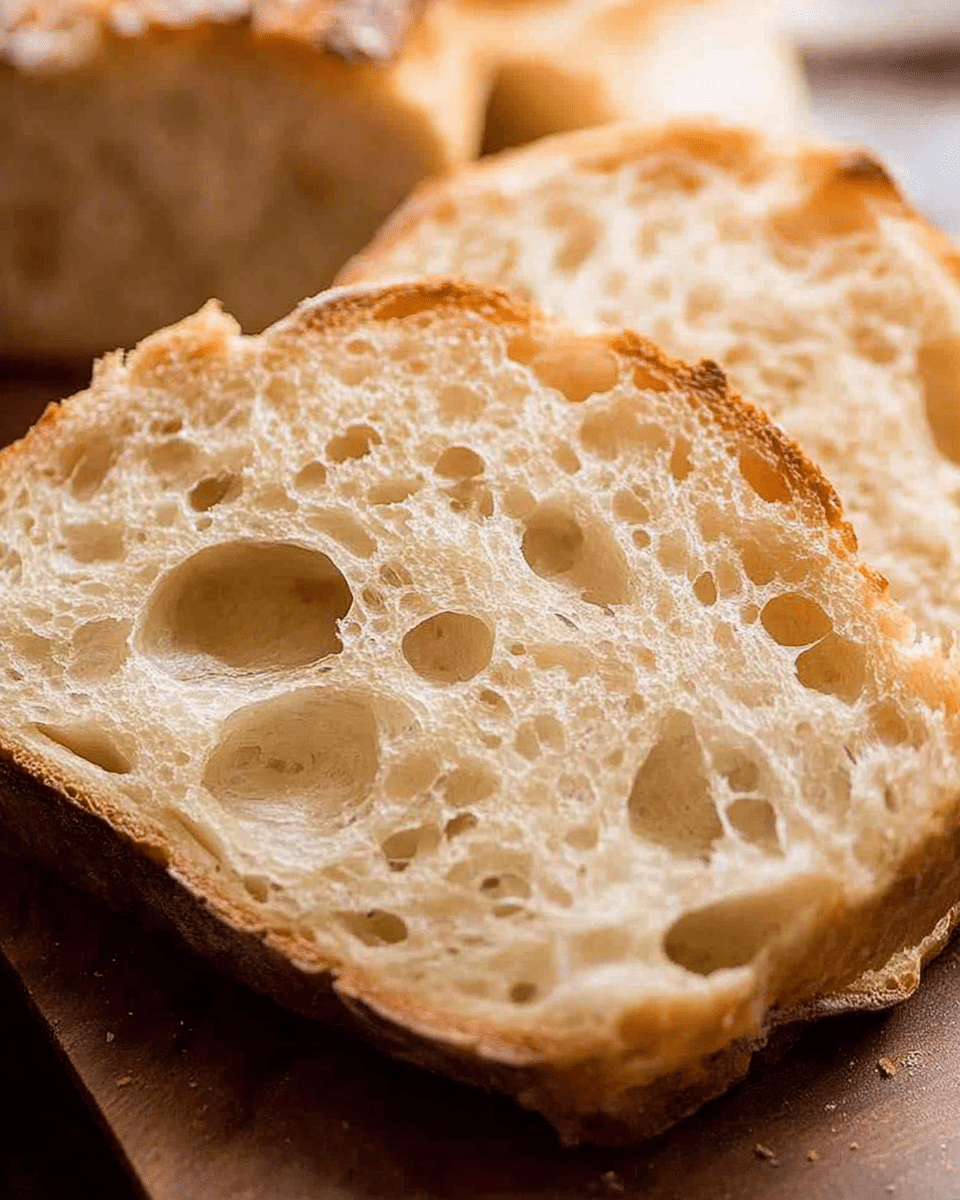
- Results: You’ll get wonderfully rustic, chewy bread with a rich, deeply browned crust — perfect sliced for toast, sandwiches, or eaten warm with butter on top.
- Skill level: This is a beginner-friendly recipe but also a favorite for seasoned bakers who want reliable, stress-free bread.
Keep reading for the full ingredient list, detailed instructions, helpful tips on water temp, flour choices, and timing, plus some ways to make this loaf your own.
Why You’ll Love the Results
This no-knead artisan bread is a total game-changer whether you’re just starting out or bake all the time. The method couldn’t be easier — mix, rise, and bake in a preheated Dutch oven to get a wonderfully crunchy, rustic loaf with a soft crumb. If you don’t have a Dutch oven, My Mother’s Peasant Bread offers similar mix-and-rise ease without special equipment. The option to refrigerate the dough lets the flavors really develop, making it even better. It’s the kind of bread you’ll want to make over and over—fantastic for sandwiches, toast, or just a slather of butter—but if you prefer a pillowy loaf for everyday slicing, try our Simple Soft Sandwich Bread (6-Ingredients, No-Knead).
Dough Ingredients and Measurements

- 3 cups (450g) bread flour or plain/all-purpose flour
- 2 tsp instant or rapid-rise yeast
- 2 tsp cooking/kosher salt (not table salt)
- 1 ½ cups (375ml) very warm tap water (up to 55°C/130°F)
- 1 ½ tbsp flour (for dusting)
Mix, Rise, and Bake
- In a large bowl stir together flour, instant/rapid-rise yeast, and salt; pour in very warm water (up to 55°C/130°F) and mix with a wooden spoon until no dry flour remains and the dough is wet and sticky, adjusting with a bit more water or flour if needed.
- Cover the bowl with plastic wrap or a plate and let the dough rise at room temperature 2 to 3 hours until roughly doubled, bubbly, and jiggly; if it hasn’t risen after 1 hour, move it somewhere warmer.
- (Optional) Refrigerate the covered dough for up to 3 days to develop flavor; when ready to bake, bring it to room temperature for 45 to 60 minutes before shaping.
-
About 30 minutes before baking place a lidded Dutch oven inside your oven and preheat to 230°C/450°F (220°C fan) to get it very hot.

- Lightly flour a work surface, scrape the dough out onto it, dust the top with flour, and fold the sides in about six times to form a loose round.
- Lay a large sheet of parchment paper next to the dough, flip the dough onto the paper seam-side down with the smooth side up, and gently shape into a round if needed.
- Carefully lift the hot Dutch oven from the oven, use the parchment to transfer the dough into the pot, put the lid on and bake 30 minutes, then remove the lid and bake another 12 minutes or until the crust is deep golden and crisp.
-
Remove the loaf and cool on a wire rack for about 10 minutes before slicing.

Tips for Better Texture and Flavor
- Flour: Bread flour is great for a chewier loaf and longer freshness (see the Small Batch Crusty Bread recipe). All-purpose works too if that’s what you’ve got—you’ll get a slightly softer bread.
- Yeast: Instant or rapid-rise yeast is the easiest to work with. If you only have active dry yeast, mix it with the water first to dissolve before adding.
- Salt: If you’re swapping kosher salt for table salt, reduce the amount to 1 ¼ teaspoons.
- Water Temperature: Aim for warm water, about 55°C/130°F—warm enough to activate yeast but not hot enough to kill it.
- Storage: Keep your fresh loaf wrapped in a paper bag or breadbox at room temperature for up to 2 days. Past that, toast or warm slices to freshen them up—or turn day-old slices into garlic bread. For longer storage, freeze the baked bread tightly wrapped for up to 3 months.
Flavor Add-Ins and Shape Ideas
- Add-ins: Want to jazz it up? Fold in fresh herbs like rosemary or thyme, minced garlic, or even chopped olives before shaping the dough—or take inspiration from Italian Herbs and Cheese Bread.
- Shapes: You don’t have to stick with a round. Try forming your dough into a rustic boule or a baguette shape before baking for some variety.
- Toppings: Sprinkle sesame seeds, poppy seeds, or a pinch of flaky sea salt over the dough before baking to get a crunchy, flavorful crust—similar to this No-Knead Rosemary Sea Salt Bread.
How to Store and Refresh
Store your fresh bread in a paper bag or breadbox on the countertop for up to two days — this helps keep the crust from getting soggy. For longer storage, wrap the loaf tightly in plastic wrap or foil and freeze it for up to three months. When you want to eat it, just warm it in the oven at 350°F (175°C) for about 10 minutes, or slice and toast to your liking. This way, even day-old bread tastes fresh and delicious — or repurpose it in an indulgent Eggnog French Toast Casserole.

Troubleshooting and FAQs
Can I make this bread without a Dutch oven?
Absolutely! If a Dutch oven isn’t in your kitchen arsenal, you can bake on a heavy baking sheet or in a roasting pan. Preheat the oven with a baking stone if you have one, and place the dough directly on it. To mimic the steamy environment a Dutch oven provides, cover the dough with an inverted roasting pan or a large baking dish during the first part of baking.
Can I add toppings to the bread dough?
Yes, you can! Add seeds like sesame or poppy, fresh herbs, or even cheese into the dough before shaping. Just mix them in gently while you fold the dough so they’re evenly distributed.
How can I tell when the bread is fully cooked?
Your loaf should have a deep golden brown color and sound hollow if you tap the bottom. If you have a kitchen thermometer, the inside should read about 200°F (93°C) for perfectly baked bread.
Can I make the dough ahead of time?
Definitely! Refrigerate the dough for up to 3 days to develop richer flavors. Just take it out of the fridge and let it come to room temperature for about 45 to 60 minutes before shaping and baking.