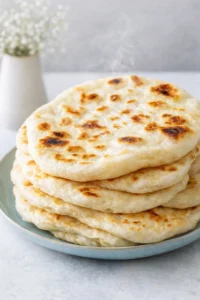
Easy Homemade Pita Bread
Once you discover just how simple it is to whip up homemade pita bread, you’ll never want to buy the store-bought kind again! Stick with me through this easy, step-by-step guide and we’ll create the softest, fluffiest pita bread together — perfect for any meal or snack.
I’ll be honest, making my own pita the first few times took some practice, but now that I’ve got the hang of it, it’s a total game changer. And guess what? This recipe is naturally vegan and calls for just 5 easy-to-find ingredients you probably already have sitting in your kitchen cupboards.

Ready to say goodbye to store-bought pita and welcome soft, pillowy pita pockets straight from your stove? This recipe is super approachable, naturally vegan, and only needs five basic pantry staples plus a hot cast-iron skillet — no fancy oven required. Whether you’re new to bread baking or you’ve been doing it for a while, you’ll find this method easy and forgiving.
Here’s what you’ll get in the next sections:
- A clear rundown of the five key ingredients, including why water temperature and yeast type truly matter.
- Step-by-step dough-making instructions, whether you’re mixing by hand or with a stand mixer, plus details on that important yeast bloom and dough rise.
- How to shape your dough rounds and get perfect pita pockets right on your stovetop.
- Helpful pro tips for making your pitas puff just right, along with advice on storing, freezing, and reheating.
- Tasty serving ideas and simple ingredient swaps, like adding some whole wheat flour for a little extra nutrition.
Stick with me, and you’ll soon be enjoying fresh, homemade pita — perfect for dipping, stuffing, or turning into quick flatbread pizzas that everyone will love.
Why It Makes Perfect Pita Pockets
This homemade pita bread recipe is all about being simple, reliable, and tasting so much better than those pre-packaged pitas at the store. Using just five pantry staples, it’s naturally vegan and turns out soft, pillow-like rounds with real pita pockets — great for sandwiches, dippers, or speedy personal flatbreads — and if you prefer pocketless rounds, try our Fluffy Greek Pita.
The method couldn’t be easier: you can mix the dough by hand or stand mixer, cook it right on your stovetop in a hot cast-iron pan (no oven needed!), and feel free to tweak the flour or oil to your liking. Plus, leftovers freeze and reheat beautifully — making this a smart choice for quick weeknight meals or meal prep.
In short: it’s quick to learn, super versatile, and delivers bakery-quality pita bread right from your kitchen — soft, fluffy, and ready to stuff or dunk in a creamy spinach artichoke dip.
Essential Ingredients and Measurements

- Warm water (about 105–110°F)
- Sugar — 1 tablespoon
- Dry active yeast
- Instant yeast — about 1 3/4 teaspoons (if using instant)
- All-purpose flour — 1 cup (for bloom) + about 1 1/2 cups remaining; add up to 1/2 cup more flour if dough is sticky
- Olive oil (extra virgin preferred)
- Salt
Make, Shape, and Cook the Dough
- Combine warm water (105–110°F), sugar, and dry active yeast with 1 cup of flour; whisk until smooth and let sit 15 minutes until foamy.
- Add olive oil, salt, and the remaining flour (~1½ cups); mix on low with a dough hook about 5–6 minutes (or transfer to a floured surface and knead by hand) until the dough is soft and pulls away from the bowl, adding up to ½ cup more flour if sticky.
- Turn the dough onto a lightly floured surface, shape into a ball, place in a lightly oiled bowl, roll to coat, cover with a towel, and let rise in a warm spot until doubled, about 2 hours.
-
Punch down the risen dough, reshape into a ball, and divide into 8 equal pieces.

- Form each piece into a smooth ball by tucking the edges underneath; place the balls about 1 inch apart on a floured surface, cover lightly with oiled plastic wrap, and rest 30 minutes.
- Roll each dough ball into a round about 1/4 inch thick.
- Let the rolled pita rounds rest 10–30 minutes before cooking.
-
Heat a cast-iron skillet over medium-high until very hot; cook pitas one or two at a time for about 2–3 minutes until they puff, then flip and cook 1–2 minutes more, avoiding poking or pressing while cooking.

Tips for Reliable, Fluffy Results
- Get your water temperature just right — about 105–110°F, warm like a cozy bath. Too hot and the yeast will die; too cool and it won’t wake up properly.
- Bloom the yeast properly: after mixing water, sugar, and yeast, wait for about 15 minutes until the mixture gets foamy and bubbly. No foam? Time to get fresher yeast or adjust your water temp.
- Instant yeast swap: use instant yeast if you want to save time, about 1¾ teaspoons, and you can skip the separate bloom step.
- Adjust flour as needed: the dough should be soft, not tacky. Add up to ½ cup more flour gradually if it sticks too much, but don’t add too much or your pitas will be dense.
- Let the dough rise in a warm spot until doubled (about 2 hours). Don’t rush this step because a good rise means perfect puffing.
- Rest after dividing and rolling: 30 minutes after dividing, then another 10–30 minutes after rolling out—these rests help the gluten relax and pitas puff beautifully.
- Roll pitas to about ¼ inch thick—thin enough to puff but thick enough to hold their shape without tearing.
- Preheat your pan well! A hot cast-iron skillet creates steam inside the dough that helps it puff up nicely; for visuals and timing, see this step-by-step guide to making fresh homemade pita bread.
- Cook patiently: cook the first side until the pita puffs (about 2-3 minutes), then flip and cook for 1-2 more minutes. Avoid poking or pressing the dough during cooking.
- Don’t crowd the pan: cook one or two pitas at a time to ensure even heat and good puffing.
- Keep pitas soft by stacking and covering with a clean towel or storing in an airtight container — this traps steam and keeps them flexible.
- Store your fresh pitas wrapped at room temp up to a week or freeze for up to 3 months. Reheat quickly in a hot skillet, oven, toaster oven, or steam for a few seconds to revive softness.
- Whole wheat swap: replace 1 cup of all-purpose flour with whole wheat for a bump in nutrition and a heartier texture, still delicious.
- Inactive yeast? If your yeast doesn’t foam during bloom, start fresh with new yeast and check your water temp—you’ll get much better results!
Ways to Serve and Customize
This homemade pita recipe is super versatile and so much fun to use! Whether as a side, sandwich vessel, pizza crust, or dipping bread, it’ll become a go-to in your kitchen. Here’s how we love to enjoy it:
- Perfect dipper: Pita and hummus are BFFs — beat homemade hummus and fresh pita is happiness on a plate.
- Flatbread pizza crust: Want a quick pizza night? Use your pitas as mini crusts and top with zucchini, tomatoes, vegan chicken pesto, or whatever you love.
- Pita pocket sandwiches: If you haven’t been making pita pockets yet, you’re missing out! Fill them with baked falafel, vegan feta, olives, and crisp veggies for Mediterranean magic.
-
Sidekick to meals: Serve warm pita alongside a vegan Mediterranean Buddha bowl, grilled veggie salad, or flavorful vegetable rice pilaf for a satisfying meal.
Storing, Freezing, and Reheating
Got leftover pita bread? No problem! Store it at room temperature up to a week or freeze for up to 3 months. For best results, keep it in an airtight container or zipped freezer bag (a Stasher bag works great). Leaving pita exposed to air will dry it out and make it lose that soft fluffy texture we all love. These same storage tips work for other flatbreads like homemade naan.
If you’re freezing several pitas, flash freeze them on a baking sheet first, or place parchment paper between each pita before freezing. This prevents them from sticking together in a solid block, making it easier to grab just what you need later. The parchment trick also helps when freezing no-oven Turkish bazlama.
Answers to Common Questions
Can I make this fresh pita bread without a stand mixer?
Absolutely! No stand mixer? No problem. Just use a large bowl and mix your ingredients with a wooden spoon until the dough comes together. Then transfer it to a floured surface and knead by hand until soft and no longer sticky. It takes a little elbow grease but works perfectly well.
Can I leave the sugar out of the recipe?
I wouldn’t recommend skipping the sugar. Yeast needs sugar as its fuel to activate and help the dough rise. Without it, your dough won’t puff up and create those lovely pita pockets. So, sugar is a small but key player here!
I’m out of yeast. Can I still make this pita bread?
We haven’t tested this recipe without yeast, and leaving it out changes the texture and rise a lot. Instead, you might want a yeast-free option like homemade corn tortillas.
Is this recipe gluten-free friendly?
This particular recipe hasn’t been tested with gluten-free flour. However, you can try a naturally gluten-free bread like Brazilian cheese bread. If you want to experiment, Bob’s Red Mill all-purpose gluten-free flour is a great option to try.